Showing posts with label Sketches in Thyme Card Maven. Show all posts

Tuesday, February 22, 2011

Tuesday Takes at Sketches in Thyme

I've had so much fun as a Card Maven for Sketches in Thyme, it has been a pleasure working for Kim and alongside so many talented designers... but alas all good things must eventually come to an end. My time as a Card Maven is done with this post, but things will still be hopping over at Sketches in Thyme so I hope you'll continue to stop in over there and play along with all the great sketch challenges and fabulous Designers she has lined up to inspire you!

This week's sketch is by Mojo Monday (you just gotta love their sketches!) and like I mentioned a couple of weeks ago, I used both this sketch and the last one for the Tuesday Takes challenges to create birthday cards for my daughter  who turned 21 in late January. (I made both of the cards in early January, so I was ahead of the game for a change when it came to having birthday cards ready to go for the special event!)  Yippee!

I chose to keep this card pretty clean and simple...and just highlight that big "21" that my daughter has been dreaming of for the past year! :-)


I cut the number '21' and the shadow using the Blackletter (a free Gypsy download with a December update) and embossed it using the Swiss Dots folder and my Cuttlebug. To make the number stand out even more, I added some gems as well. A quick and simple card for the big day!

I'm really looking forward to seeing what you design for this challenge too!  Have fun.

Supplies Used:
Cardstock: Papertrey Ink: "Stampers Select White", "Sweet Blush", "Dark Chocolate"
Patterned Paper: My Mind's Eye: Fine and Dandy "Tickled Pink" 6 x6 paper pad
Embellishments: My Mind's Eye: Find and Dandy "Tickled Pink" gems, Dear Lizzy and American Crafts: Ribbon
Other Tools:Provocraft: Cricut Expression and Blackletter cartridge, Swiss Dots Embossing Folder

Tuesday, February 8, 2011

Tuesday Take at Sketches in Thyme

It's Tuesday Take at Sketches in Thyme! And we've got a another fun sketch to inspire you for this challenge.  I hope you'll take the time to hop on over to the Sketches in Thyme blog to play along with us!

Now I know that a big card day (Valentine's) is just around the corner, but what I really envisioned when I saw this sketch was a birthday card in honor of my middle daughter's milestone 21st birthday. (In fact, in a couple of weeks you'll see yet another card I created for her using the next Tuesday Take challenge sketch).

To create this card, the first thing I did was pull out one of the new Cuttlebug Quilling Kits...this one is their pretty Daisy kit. After I took the photo of the card for this post, I realized that I didn't emboss the leaves to the flower (I ALWAYS emboss my handmade flower leaves...so I can't believe that I forgot this time and frankly I'm not sure how I'm feeling about those plain leaves, but I sure love the flower. Never the less...here's the card, plain leaves and all! :-)


Supplies Used:
Cardstock: Papertrey Ink: "Stampers Select White", "Sweet Blush", "Aqua Mist" , "Lemon Tart" "Melon Berry"
Patterned Paper: My Mind's Eye: Fine and Dandy "Tickled Pink" 6 x6 paper pad 
Embellishments: My Mind's Eye: Find and Dandy "Tickled Pink" gems, Dear Lizzy and American Crafts: Ribbon
Other Tools:Provocraft: Cuttlebug Daisy Quilling Kit, Spellbinder's die cut

Tuesday, January 25, 2011

Cuttlebug Quilling Kit and Tuesday Take Challenge

Back in December I purchased all three of the new Cuttlebug Quilling kits that are available... and when I saw this week's sketch for the Tuesday Take Challenge at Sketches in Thyme, I knew I wanted to use one of the kits to create a flower for the card I made using this sketch.

For this card I gathered together cardstock, patterned paper, ribbon and stamps from Papertrey Ink. Some Hero Arts pearls, a cuttlebug folder to emboss the white cardstock behind the Cuttlebug Quilling kit flower and ta-da, a card was born.

Oh geez, I almost forgot...that little banner that the sentiment is stamped on is a die from Papertrey Ink as well. Now, what I really want you to see though is this flower and leaves close-up.... take a look...


Such a fun flower...and so dang easy with the Cuttlebug Quilling kit too... you can buy them for yourself right here. This particular flower is from the Chrysanthemum kit.

Now I'd love it if you hurried on over to the Sketches in Thyme blog... you don't want to miss the other Designer reveals for this sketch, really you don't! Then, of course, I want you to get in that craft room of yours and whip up something pretty to join the challenge along with us... because I can't wait to see what you design too!

Tuesday, January 11, 2011

Come on Over Friend

We've got a fun sketch over at Sketches in Thyme for our Tuesday Take card challenge this week and I am so hoping you'll join us!

Now as much as I LOVE the holidays, it is so nice to be creating something other than Christmas projects now! I had a great time combining this sketch with a little purple paper...reminds me of Spring...and I'm always up for anything that reminds me of Spring about this time of year in Michigan when we typically have snow up to our patooties.

To create this project I gathered up a whole slew of Papertrey Ink products. The patterned paper, cardstock, saddle-stitch ribbon, stamps and the eyelet and chair die I used are all from Papertrey Ink. The pearls are from Hero Arts and I used Fiskar's Top Crest border punch as well. A little black ink went into the mix too.


Now I want you to scurry on over to Sketches in Thyme and check out the other Designer inspiration for this sketch...and then, get in your craft room and whip up something fun... I can't wait to see what you do with this sketch too!

Monday, December 27, 2010

Sketches in Thyme and The Kraft Outlet Creative Team

Before I introduce the Sketch and Challenge for the Tuesday Take Card Sketch challenge at Sketches in Thyme this week, I want to make an announcement about something new that is going on beginning in January... I'll be heading up (coordinating) a team of four fabulous Designers over at The Kraft Journal, which is the blog for Kraft Outlet.  To learn all about the exciting new happenings and to meet this fabulous new Creative Team... please visit The Kraft Journal today!

That said, here's another fun sketch to get you creating for this week's Sketches in Thyme challenge!  Our sponsor for this month is Charlene's Button Box and do I ever have the cutest winter snowflake buttons to show off on this card!  I adore these buttons!  You can buy your own right here. It's funny too, when I started this project, I wasn't sure how I was "feeling" this sketch.... but I am so pleased with how it inspired this card!  I hope you play along with us this week... I can't wait to see what you create using this sketch as your inspiration too!


Here is a close-up so that you can get a really good look at the buttons.  I just realized too that although I made this card (and this blog post) at the beginning of December, it won't actually reveal until AFTER Christmas... good thing the card simply reads Happy Holidays... perhaps we can pretend this is a winter/New Year holiday card?


Supplies Used:

Buttons: Charlene's Button Box
Cardstock: Papertrey Ink: "Hawaiian Shores", "Stampers Select White", "Kraft"
Ink: Papertrey Ink "Hawaiian Shores"
Stamps: Hero Arts "Get Merry"
Other Tools: Ranger: Emossing Pearl "Silver", ProvoCraft: Mini Monograms Cartridge, and Cuttlebug Embossing Folder, Papertrey Ink: "Banner" die cut,

Tuesday, December 14, 2010

Joy Joy Joy for Sketches in Thyme

It's Sketches in Thyme... time!  This week's sketch is clean and simple... and thus allows you to keep it that way, or use your imagination and really doll it up.  I hope you play along with us this week!


For this challenge we were given both the sketch to use and some beautiful buttons from this month's Sketches in Thyme sponsor, Charlene's Button Box.  For this card, I opted to use these cute little Christmas tree buttons... but instead of using them as trees... I decided to make them holly leaves instead.  They do kind look like leaves when coupled with the berries... right? (At any rate, in my world they do!).  :-) I decided to keep the card just as clean and simple as the sketch.... because I really wanted the holly "leaves" to shine through. Aren't those trees....errrr leaves cute as a button! :-)...  (I just couldn't let that pun pass me by... sorry about that!)


The patterned paper is from The Girl's Paperie Tinsel & Twig Collection. I also used a Hero Arts stamp and Red Baker's Twine from Jillibean Soup and those berries I hacked off a big sprig of them that I bought at Meijer in the floral department.  Now you just have to hop on over to Sketches in Thyme and see the rest of the Team B reveal... the cards are gorgeous!

Saturday, December 4, 2010

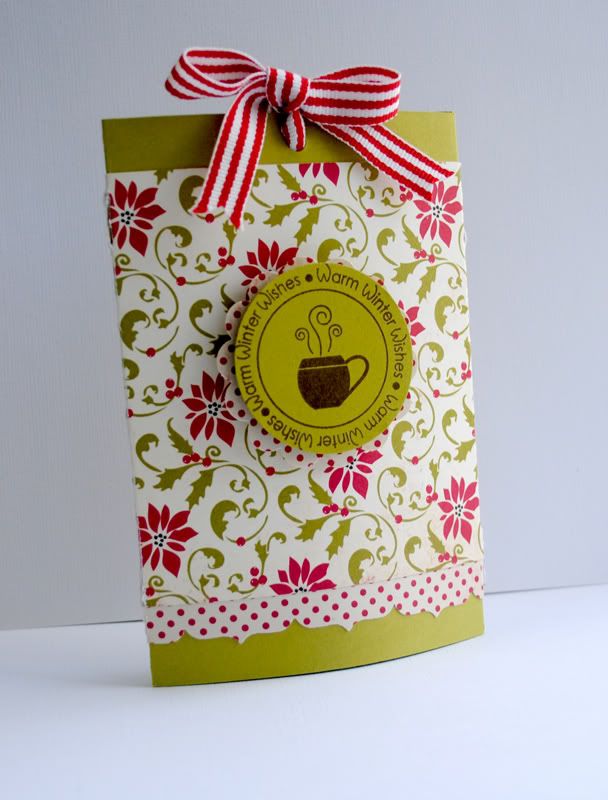
Hot Cocoa Slider Tutorial (a Variation) for Sketches in Thyme


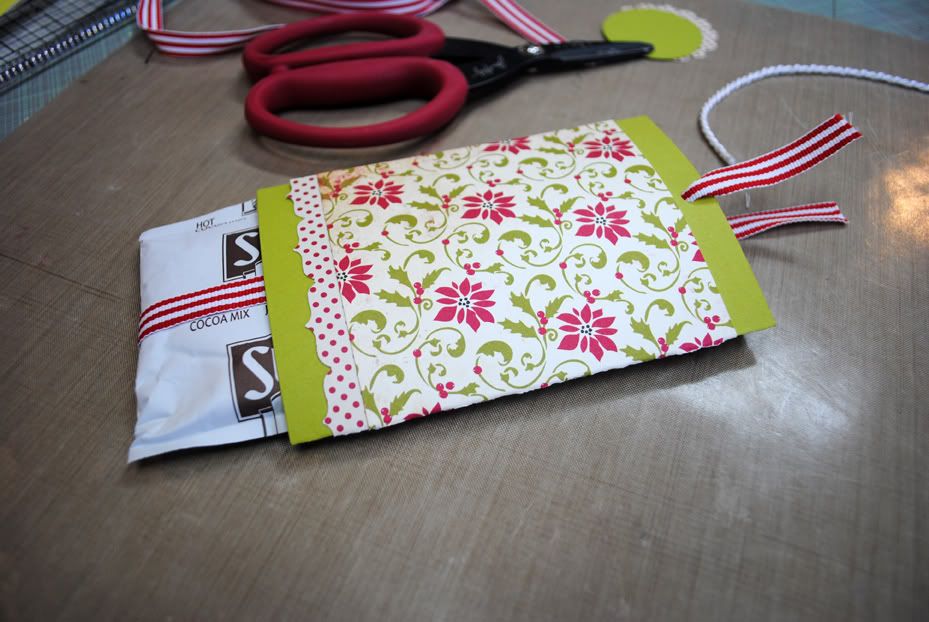
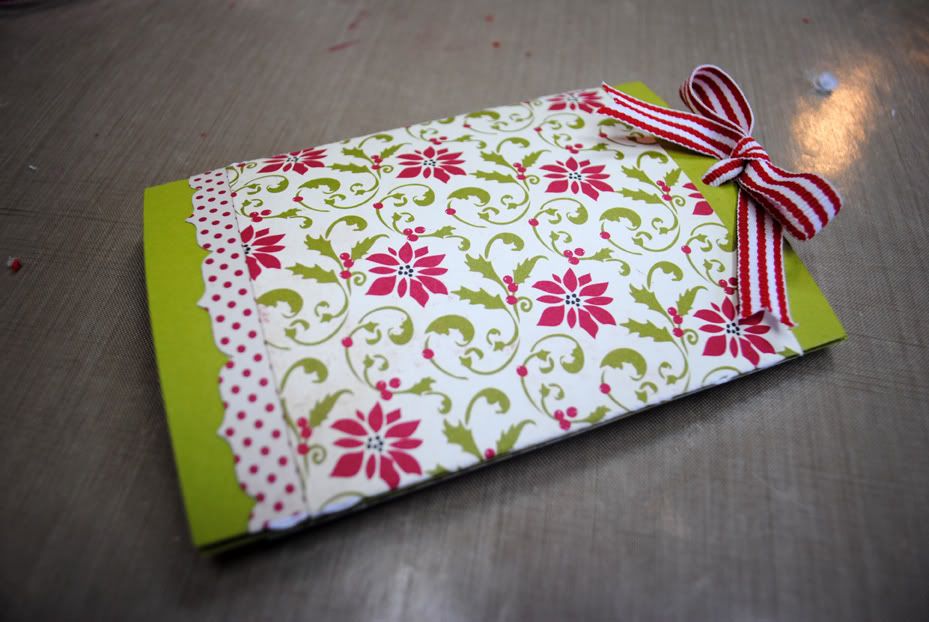
I absolutely adore these sweet little holiday Cocoa Sliders! They are easy to create, and an inexpensive but "warming" gift to give at the holidays! I loved it so much that after doing my first tutorial featuring products from Discount Cardstock that I decided to do yet another tutorial with patterned paper. I added a little something extra to the original design with a sweet Fiskars edger punch and some cheerful red and white striped ribbon.   

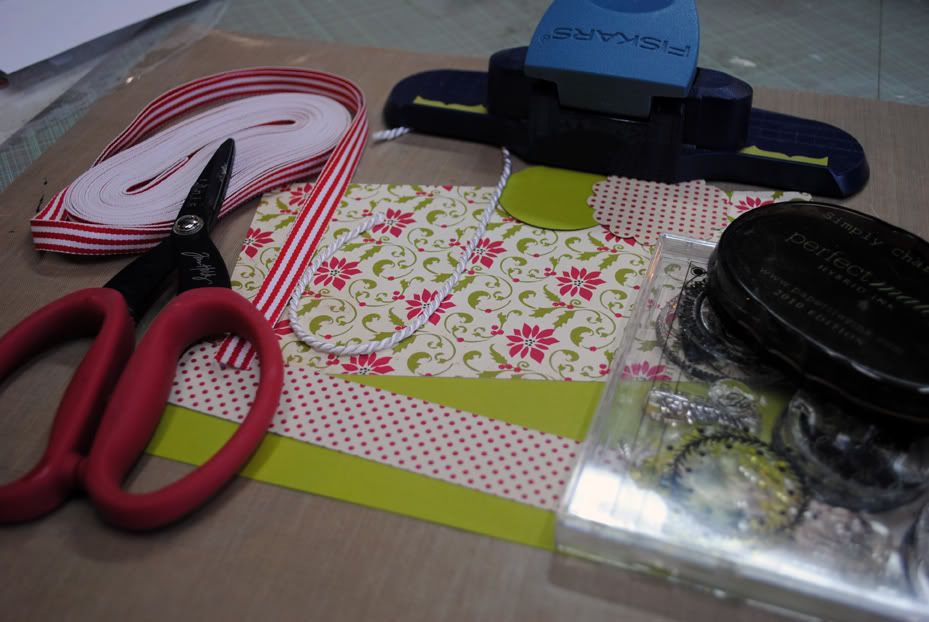
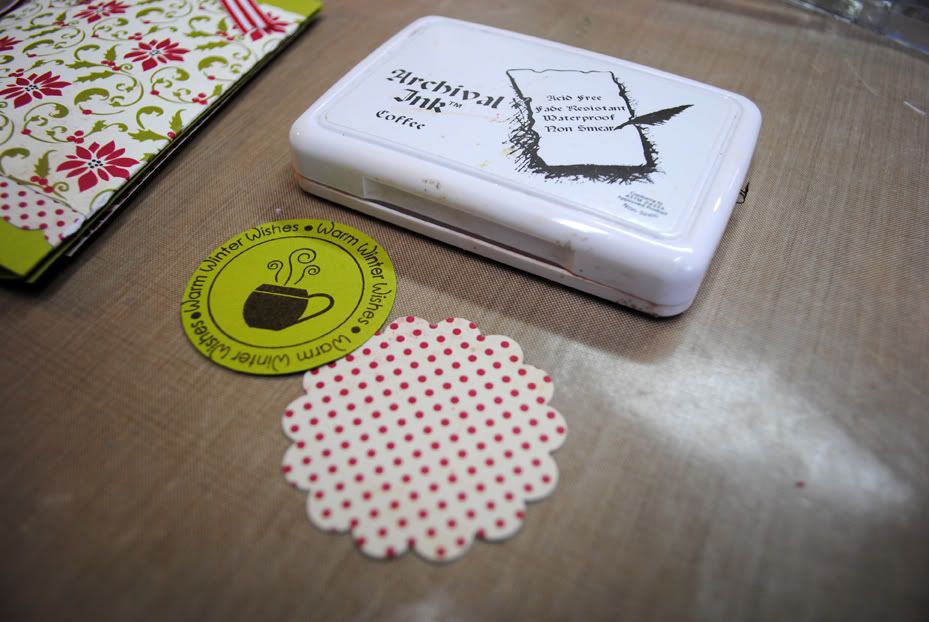
(Please note that I did not use the twine or the ink that is pictured in this supply photograph)


Supplies needed to create this project:
  • Cardstock cut at 7 3/4 x 5 1/4, scored at 3 5/8 and 1/2 inch.
  • Patterned  Paper cut at 7 3/4 x 4, scored at 3 5/8 and 1/2 inch
  • Coordinating Patterned Paper cut 5 1/4 x 1 inch
  • 16 inch (more or less) Ribbon of your choice
  • 1 - 2 inch scallop circle punch patterned paper
  • 1 - 1/34 inch circle punched from Cardstock
  • Papertrey Ink 2008 Holiday Tag stamp set (or stamp of your choice)
  • Ranger: Archival Ink "Coffee" or ink of your choice
Note: Patterned Paper is Tinsel and Twig by The Girl's Paperie, Cardstock is Simply Chartreuse by Papertrey Ink. Red and White Striped Ribbon purchased online at Really Reasonal Ribbons.

Tools needed to create this project:
  • Your favorite border punch
  • Paper Trimmer
  • Scissors
  • Scoreboard
  • Hold Punch
  • Adhesive Tape   

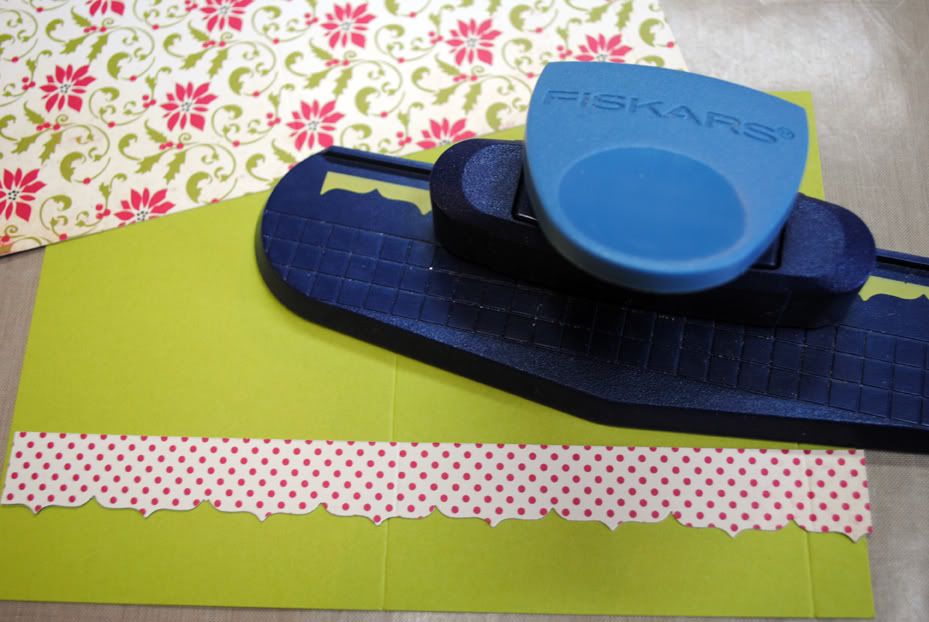
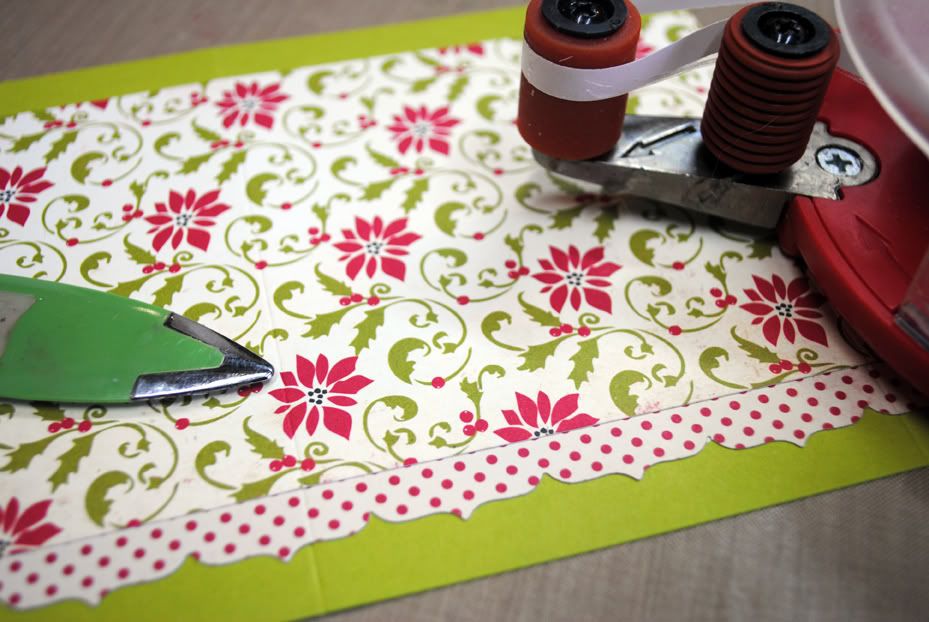
Step One: Punch border along one long edge of 1 inch wide patterned paper.  


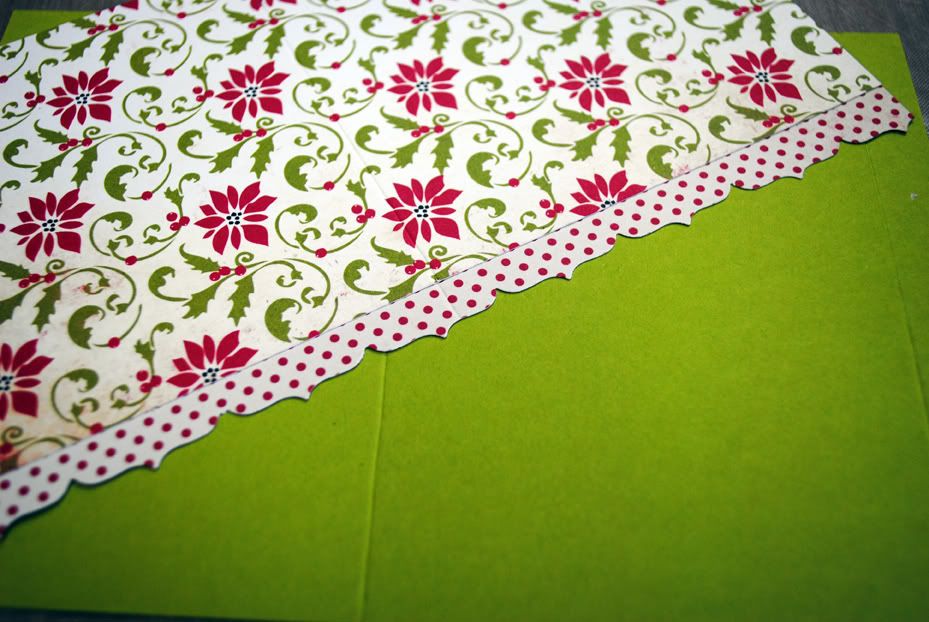
Step Two: Adhere border to patterned paper being careful to line up score marks.


Step Three: Adhere patterned paper to cardstock being careful to line up score marks.


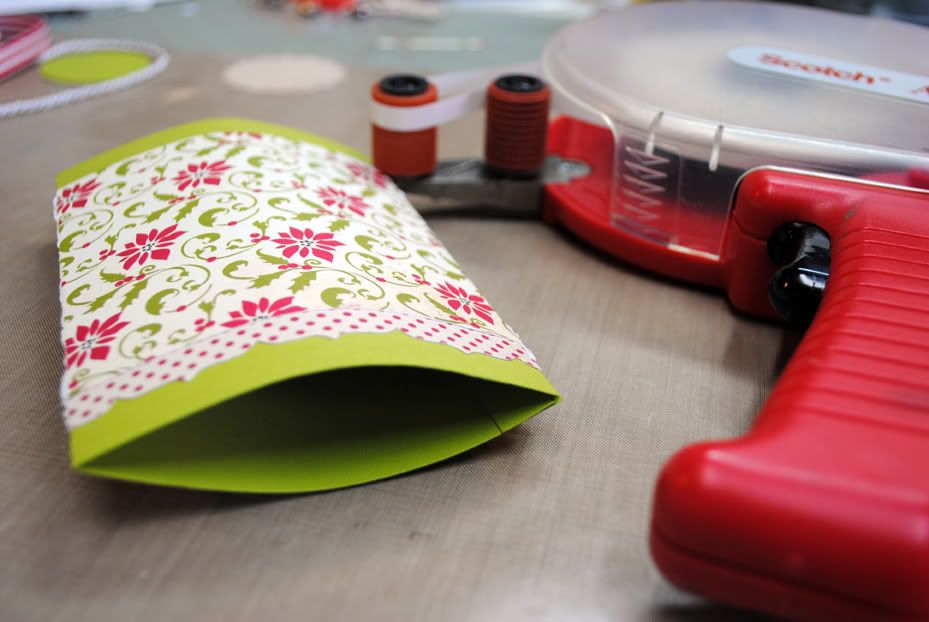
Step Four: Fold at score marks. Adhere 1/2 inch scored part of cardstock to inside of flap creating a pocket for the packet of Cocoa.


Step Five: Punch hole toward top of slider through both sides of cardstock.
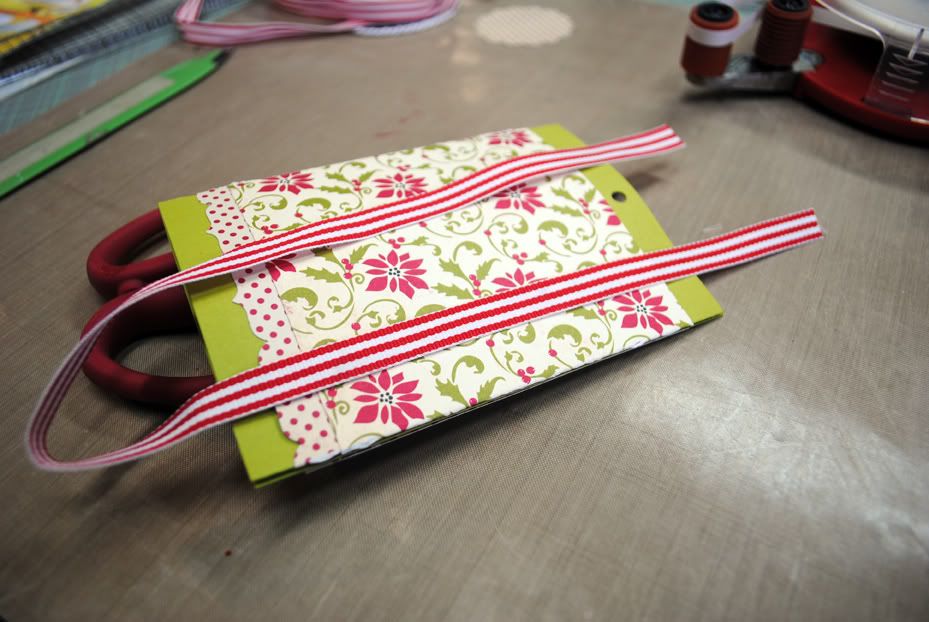
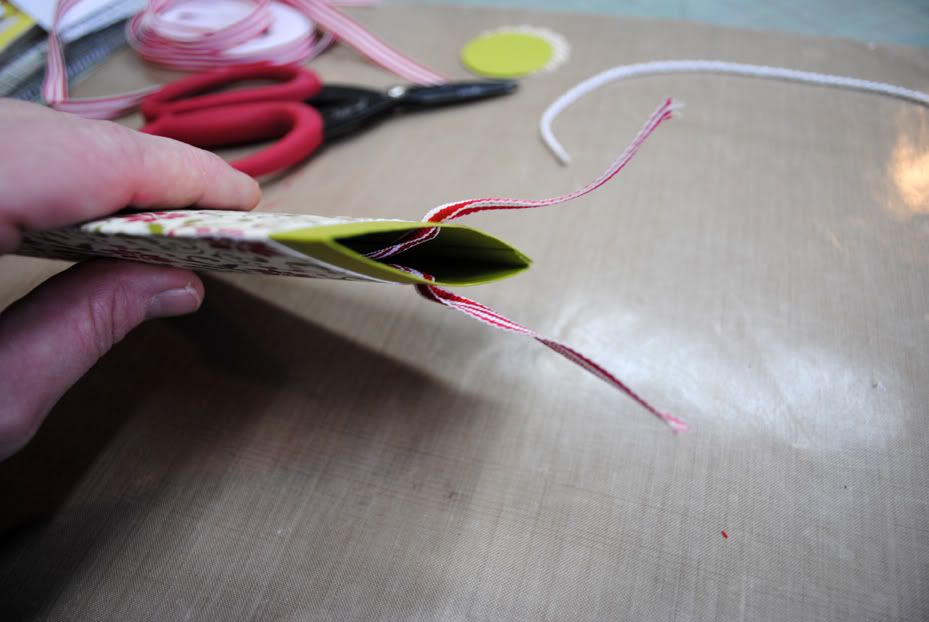
Step Six: Fold ribbon in half and slip down inside pocket. String one end of each ribbon through each hole punch to create a loop inside the pocket to hold the Cocoa packet.

Step Seven: Slip Cocoa packet down into top of pocket. Let the loop "catch" the Cocoa packet. 

Step Eight: Pull both ends of ribbon up until Cocoa packet is held firmly in place inside the pocket and tie a bow. Trim edges of ribbon as desired.
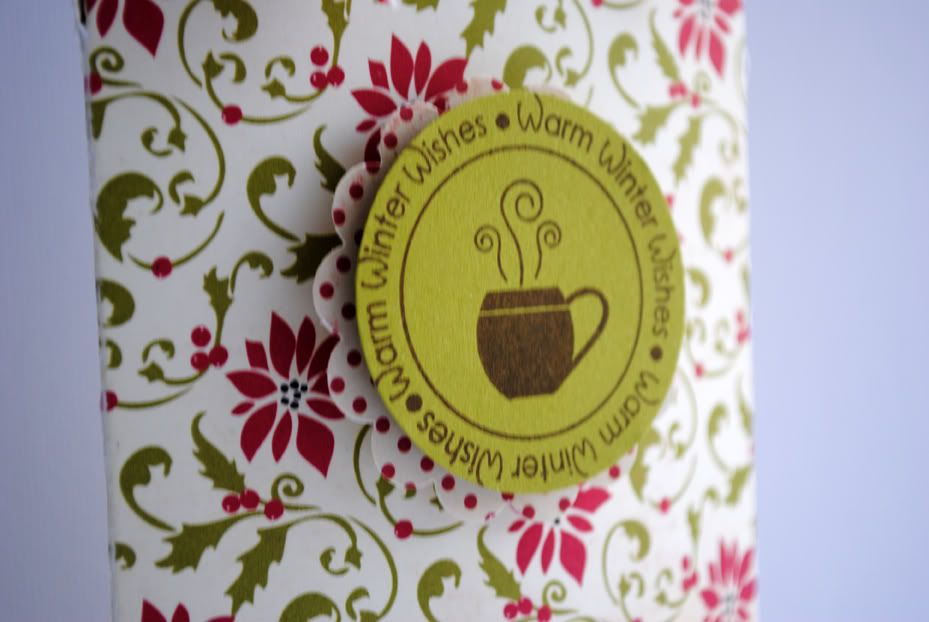
Step Nine: Stamp sentiment on cardstock circle punch. Adhere to scallop circle with Pop Dot.
Step Ten: Adhere sentiment to front of Cocoa Slider with Pop Dot.

Tuesday, November 30, 2010

Sketches in Thyme Card Challenge

We've got a fabulous sketch for you this week at Sketches in Thyme.  I just know you are going to love it as much as I did...

Delicious Doodles, our generous sponsor for November provided us with so many pretty stamps to choose from while creating a card using this sketch.  For this project I chose another beautiful holiday stamp, "Little Nut Tree".  I am CRAZY about this stamp and plan to use it on many more holiday cards and tags... it's just that dang cute!

Because I sized the stamp down for this card, I decided to pull out my Prismacolor Water color pencils... I didn't want to risk the chance for the Copics to bleed outside the fine lines...


The details on this stamp are some of the best I've ever laid eyes on! The shading was already present on the stamp, so coloring this with the pencils was so fun and easy!  Here's a closer shot...


I hope that you'll join us for this week's card sketch challenge at Sketches in Thyme and make sure that you stop by the blog to see all the other Maven reveals... so pretty and inspiring... you just don't want to miss them!  Don't forget to stop by our sponsor's digi store, Delicious Doodles too... there are so many more gorgeous digi stamps to choose from... hop to this link right here to check them out!

Sponsor Supplies Used:

Other Supplies Used:
Patterned Paper: Memory Box: "Mistletoe 6x6 Collection"
Cardstock: Papertrey Ink: "Vintage Cream"
Ink" Papertrey Ink: "Spring Moss"
Stamps: Papertrey Ink: "Holiday Wishes"
Embellishments: Making Memories: Paper Reverie "Sienne Gems and Brads"
Other: Ribbon from stash, Prismacolor Water Color pencis, Spellbinders Nestabilities Large Circles and Scallops, Die Cut from Papertrey Ink

Tuesday, November 23, 2010

Sketches in Thyme Card Challenge!

This is it! The first ever Sketches in Thyme Card Challenge!  I can't wait until you see all the new Card Maven's reveals for this week... FABULOUS!  Super cool too is that all of us Mavens had the pleasure of working with some awesome Digi Stamps (you don't have to use digi's to play along though!) from Delicious Doodles our sponsor for this month! But, I'm getting ahead of myself here... so before I go further... let me show you the super fun sketch you'll be using for this week's challenge...


This sketch was great fun to work with and I selected the adorable "Poinsettia Corner" digi stamp from Delicious Doodles to make my very first holiday card of the year!

I printed the Delicious Doodles stamp out four different times on my printer and then colored them up with my Copic Markers.  Then I cut them apart (eek) and put them all back together with a Pop Dot here and Pop Dot there (here a dot there a dot everywhere a dot, dot... sorry, I couldn't help myself)...  Here's a closer look so you get what I mean...


See what I mean... lots of layers... a big fat gorgeous Poinsettia from one cute - cute digi stamp!  I added some additional dimension to the project by using Mod Podge Dimensional Magic on the berries and the center of the Poinsettia.

At first I was going to attempt to fussy cut the Poinsettia, leaves and flourish... but then I remembered that my scissor skills are about as technically advanced as my three-year old grandsons... so I decided to just cut it all out enough to let it lift up off the page a bit.  (as it is, you shouldn't look too closely at my cutting work... gak!).

At any rate, I really want you to join us in our challenge over at Sketches in Thyme and you just GOTTA SEE all the other Maven reveals over there... REALLY.... so go forth to the blog!  We can't wait to see what you create with this super cute sketch too... so, I hope you join us!


Other Supplies Used:
Cardstock: Neenah: "Classic Crest Solar White"
Patterned Paper: Memory Box: "Mistletoe 6 x 6 Collection"
Stamps: Hero Arts: "MerryChristmas Trees"
Ink: Tsukineko: Memento "Tuxedo Black", "VersaMark Watermark Stamp Pad"
Fibers: Papertrey Ink: Twill Ribbon "Pine Feather"
Other Tools: Plaid: Modge Podge: "Dimensional Magic", "Pop Dots", Ranger: Emossing Powder "Clear", Copic: Copic Markers, Spellbinders: Nestabilities: Large Circles and Scallops, Liquid Gold Pen

Monday, November 15, 2010

I'm a Maven at Sketches in Thyme!

I'm so excited to share the news that I've been honored with the opportunity to be on the first ever team of Card Mavens at Sketches in Thyme! It's part of a whole new concept that founder of Sketches in Thyme, Kim has put together to add card challenges to the already popular layout sketch challenges that are offered each week at the blog!

Each week Sketches in Thyme will offer a scrapbook challenge AND a card challenge as well as provide you with fabulous tutorials and tips on Saturdays... how cool is that?!

To learn more about Sketches in Thyme and to meet all the Mavens... hop on over to the blog... we're waiting there for you! :-)
Related Posts Plugin for WordPress, Blogger...