Friday, December 31, 2010

Happy New Year to You!


Today as I work on the final projects I want to complete before the end of 2010, I have stopped to reflect on all the wonderful things I've had an opportunity to be a part of this past year and rejoice about all the things that I already have to look forward to in the coming year! I have been blessed with so much and I am so thankful for those of you who have shared in my craft and blogging journey these past months!

Here are some of my favorites from the big year of 2010 in no particular order!


I have to admit however... that seeing THIS is one of my favorite things that happened this year...


and my most favorite subject to photograph were these two little guys...


Here's wishing you all a very safe and Happy New Year celebration!  See you next year!

Tuesday, December 28, 2010

A Challenge and 5 Step Flower Tutorial

Everyone needs a little "Round TUIT", and you can get one of your very own right here. Once you have it... you won't have any reason not to join us at Memorable Seasons for the "Round TUIT" challenge. Here are the details... 

Almost all of us have them… that group of photographs that we’ve been meaning to scrapbook but just haven’t gotten “Round Tuit”. You probably have a variety of reasons you haven’t scrapped those photographs yet, perhaps you haven’t found the right paper, embellishments, you lack inspiration or just haven’t found the time. Whatever the reason, close your eyes (no peeking!) and pull out one photograph (or more if you are exceptionally brave) from the pile. Consider this the moment you finally got “Round TUIT” and scrap that photo(s). Then choose at least two of the following additions:

1. On your layout, journal about the reasons why you haven’t gotten around to scrapbooking this photograph yet.
2. Use the “Round TUIT” graphic somewhere on your page.
3. Use the words “Procrastinate” or “Round TUIT in your title.
4. Use at least two different color cardstocks or patterned papers on your page.
5. Use products on your layout that are at least six months old, that you haven’t gotten around to using before now.

To complete this challenge, I first started by sticking my hand in a ziplock bag of photographs I had waiting at the ready to scrapbook (but hadn't yet, because I didn't have my "Round TUIT" yet!). I also decided to take on all the additions to this challenge by writing the journal piece about why I hadn't yet scrapped the photo (before now), used the "Round TUIT" graphic, added more than two different patterned papers which also happened to be papers that I purchased this past spring but just hadn't gotten around to using them yet.


Here's a close-up of the journal block, you can click on it for a size large enough to read.


I also incorporated Plaid (Mod Podge Sparkle and Pop Dots).


Both of these photos (above and below) provide a better look at the flower embellishments I created using Mod Podge Sparkle.  See all that pretty glitter? I have to tell you that I have never gotten along so well with glitter until I used in this form! Plaid created a real winner with this product! Below, I'll show you how to make these easy layered flowers in five steps.


I created the flourish that you see in the above photograph using my Cricut and the Accent Essentials cartridge. I also used my Cuttlebug to add the embossing on the leaves, I love how it provides subtle dimension to the project.

Here is how I created these simple glitter flowers with patterned paper and Mod Podge in five easy steps...


Step One:  Die Cut various flower shapes to create multi-layered flowers.  I used Sizzix Flower Layers and Beautiful Blooms Die Cuts from Papertrey Ink. "Paint" each flower front with Mod Podge "Sparkle" and let dry.


Step Two: Carefully crumple up each flower layer to create texture and then smooth back out for layering.


Step Three:  Assemble layers using Plaid's All Night Media Pop Dots and Pop Dot Mini


Step Four:  Add rhinestones to top of each flower layer.


Step Five:  Die cut and emboss leaves (I used my Cuttlebug) and attach to flowers when you assemble your project.

I hope you join us for this fun challenge at Memorable Seasons blog and forum this week. 

Supplies Used:
Cardstock: Discount Cardstock: "Brilliant White 80# 12 x 12"
Adhesives: Plaid: "Mod Podge Sparke", All Night Media: "Mini Pop Dots" and "Pop Dots"
Patterned Paper: Jillibean Soup: Coordinating Egg Drop Soup Paper "Ground Ginger", "White Pepper", "Sesame Oil", "Egg Yolk"
Embellishments: Studio Calico Kit: Japanese Tape, My Mind's Eye: Fine and Dandy "Tickled Pink Bling", American Crafts: Thickers "Delight", Dear Lizzy and American Crafts: Remarks "Dimensional Stickers Flutter", Hero Arts: Pearls
Other Tools: ProvoCraft: Cuttlebug and Embossing Folder, ProvoCraft: Cricut Expressions Electronic Die Cut Machines with "Accent Esentials" cartridge, Making Memories: Paper Reveries "Butterflies", Sizzix: Die Cut "Flower Layers", Papertrey Ink: Dies, "Beautiful Blooms", "Delightful Dahlia"

Monday, December 27, 2010

Sketches in Thyme and The Kraft Outlet Creative Team

Before I introduce the Sketch and Challenge for the Tuesday Take Card Sketch challenge at Sketches in Thyme this week, I want to make an announcement about something new that is going on beginning in January... I'll be heading up (coordinating) a team of four fabulous Designers over at The Kraft Journal, which is the blog for Kraft Outlet.  To learn all about the exciting new happenings and to meet this fabulous new Creative Team... please visit The Kraft Journal today!

That said, here's another fun sketch to get you creating for this week's Sketches in Thyme challenge!  Our sponsor for this month is Charlene's Button Box and do I ever have the cutest winter snowflake buttons to show off on this card!  I adore these buttons!  You can buy your own right here. It's funny too, when I started this project, I wasn't sure how I was "feeling" this sketch.... but I am so pleased with how it inspired this card!  I hope you play along with us this week... I can't wait to see what you create using this sketch as your inspiration too!


Here is a close-up so that you can get a really good look at the buttons.  I just realized too that although I made this card (and this blog post) at the beginning of December, it won't actually reveal until AFTER Christmas... good thing the card simply reads Happy Holidays... perhaps we can pretend this is a winter/New Year holiday card?


Supplies Used:

Buttons: Charlene's Button Box
Cardstock: Papertrey Ink: "Hawaiian Shores", "Stampers Select White", "Kraft"
Ink: Papertrey Ink "Hawaiian Shores"
Stamps: Hero Arts "Get Merry"
Other Tools: Ranger: Emossing Pearl "Silver", ProvoCraft: Mini Monograms Cartridge, and Cuttlebug Embossing Folder, Papertrey Ink: "Banner" die cut,

Wishing you Sunshine

You'd think that I would have thought to actually create a New Year card for this week considering that big celebration is just around the corner... ah, but instead all I could think about is how much I want it to be sunny and bright!  Given the fact that it is neither sunny nor bright right now in Michigan (snowy and bright... yes, SUNNY, no), I decided to create this little mini card using the two largest French Flair dies and believe it or not, the Poinsettia 2 die as well.  I just love that die and wondered if by simply changing the colors used if I could make a more spring-like flower rather than the traditional Christmas flower that it is. I so enjoy when it is possible to use seasonal products for times other than the actual season the product was intended, if you know what I mean.

 
To create this quick and easy card. I used the largest XL Stackers French Flair die and cut it out from some rustic white cardstock. I then used the next smaller die to cut my patterned paper and adhered them together and scored it in half to create the mini card. Next I cut the Poinsettia 2 die out from green, yellow and rustic white to create my "Spring" flower. I added some gems for a bit of bling and attached the sentiment on a piece of scrap cardstock. I love that Cheery Lynn Designs dies make it possible to create a quick and easy card that is so pretty too!

Saturday, December 25, 2010

You're on my Mind with Cheery Lynn Designs Dies

Merry Christmas from all of us at Cheery Lynn Designs! I hope that your day thus far has been both merry and bright!

A few days ago, having run out of holiday project mojo, I created this spring-like card using Cheery Lynn Designs dies. You can find the links for the Cheery Lynn Designs dies I used to create this card at the bottom of this post!


After creating a 4 1/4 x 5 1/2 inch card base, I cut a piece of patterned paper measuring 4 x 5 1/4 and embossed it with the Lattice 2 die. I used both the Accessory Plate that I talked about on this post right here, as well as the large embossing pad kit you can buy from Cheery Lynn Designs right here.  For the sentiment, I cut a piece of white cardstock using one of the French Flair dies and then cut that in half to fit under the smaller strip of patterned paper that adorns the center of the cardfront.  I also used two of the butterflies from the Dimensional Butterfly Bundles and cut them from white cardstock. After cutting them (they come out of the Cuttlebug beautifully embossed without having to run it through again to emboss!), I then inked them up with some yellow ink so that you can really see the beautiful embossing the dies created on the paper. 


This close-up shot allows you an opportunity to see the beautiful embossing on both the patterned paper from the Lattice 2 die, as well as the Dimensional Butterfly die. So pretty!

You can visit the Cheery Lynn Designs online store to purchase these dies for your next papercraft project... and we'd love to see what you create so please leave us a comment on the Cheery Lynn Designs Blog (right here) with a link to your design and we'll be sure to visit!  

Dies Used: 

Thursday, December 23, 2010

An Early Christmas Present from Imaginisce!

The other day I got an early Christmas present and I've been hardly waiting to share the news with you too! I am both thrilled and honored to announce that I was selected to represent Imaginisce as part of their 2011 Design Team!

Trust me, it's an understatement when I say how much I am looking forward to working with all of the talented crafters on the 2011 team, as well as all the FABULOUS products (like the I-top and I-rock) designed and manufactured by Imaginisce.

By the way, you can keep up with all the latest product news (you've just got to check out all the new paper collections they have in stores now and on the way!) and 2011 Design Team inspiration on the Imaginisce Facebook page, the blog right here and the website right here! I hope you'll join us!

Sunday, December 19, 2010

Papercraft Star Tags of Christmas Blog Hop

Catherine PoolerHappy Holidays and welcome to the Papercraft Star Tags (and more) of Christmas Blog Hop sponsored by Catherine Pooler. We are so happy you could join us for this special event!

You should have arrived here from Kristina's blog. If not, please start at the beginning of the hop at Papercraft Star so you don't miss a single thing, especially since this is the last stop on the hop! :-)

During this hop, we hope that you'll find a wealth of inspiration among the beautiful projects our Designers have created especially for you! To add to the fun, we've got fabulous prizes along the way at many of our Designer's blogs and you'll be entered to win a full month subscription to Club InBox by our generous sponsor Catherine Pooler, if you are a follower of Papercraft Star, visit every blog and leave a comment with all of our Designers! You have until midnight (Eastern Time) on Saturday December 25, 2010 to leave all your comments and be entered to win the Grand Prize. We'll draw the winners of the prizes and announce them beginning Sunday December 26, 2010.

If you've read any of my recent posts lately you know that I have been having some serious mojo issues these past few days, especially when it comes to holiday projects... I'm just outta ideas!  So, to create this tag, I searched through papercraft magazines (many of them) and came across one that had a felt Poinsettia created using Papertrey Ink large and small leaf dies. (I'm so sorry that I don't remember which magazine or what designer though!).

I cut the leaves from Pure Poppy and Spring Moss felt and simply arranged them into a flower that resembled a Poinsettia. I used my glue gun to adhere them together onto a piece of felt I cut using my 1 3/4 circle punch. I then added pearls and glass beads for the center of the flower.  I attached the flower and printed paper to a tag I cut using my Cricut. Stamped the sentiment, inked the edges, added an eyelet and ribbon and I was done.  Whew! I do believe that this will be the LAST holiday project I create this season... and I feel RELIEF!  (I'm really not ba-humbugging the holidays...promise, just the thought of doing even one more holiday project!).  :-)

At any rate, I sincerely hope that you enjoyed the Papercraft Star Tags (and more) of Christmas Blog Hop! We are so glad you could join us during this special, but hectic time of year! Again, this is the last stop on the hop, and to be eligible for the Grand Prize, you must comment on all the stops... so if you missed any, just return to Papercraft Star and you'll find a list of all the blog stops along the way!

Happy Holidays to you and yours and thank you again for joining us for the Papercraft Star Tags of Christmas Blog Hop!

Saturday, December 18, 2010

Celebrate Today with a Cuttlebug Accessory Plate You are Gonna Love!

If you are a Cuttlebug™ user (like I am), then you know that it's often necessary to use shims for embossing or cutting with some dies. Sometimes I can even go a little crazy trying to figure out whether I need one shim, two shims...(and I so hate wasting both paper and time trying to figure out how to get the most detail) well, Cheery Lynn Designs has this fabulous little tool to end your shim woes and I am so loving on this little accessory plate. It was developed for Cuttlebug™ users to be able to cut finer details and larger images without a large number of shims. This is a special stainless steel that will help support the cutting activity. It works fabulously for embossing too! These plates will become marked and even dented but will still continue to be a great tool for easy cutting and embossing!  I actually use the plate for all my cutting and even a lot of my embossing by putting the plate between my A and C (for Cutting) or A and B plate (for embossing). It works like a dream and I do believe my shim woes have been forever cured by Cheery Lynn Designs.
I used that handy-dandy little plate to create the darling little dimensional buttons that I cut to embellish this quick and easy card. Cheery Lynn Designs offers six different die plates each of them with a dozen or more button dies! That's a lot of buttons to choose from! I used three of the buttons from the Dimensional Button 3 set to embellish this card.  Look at the detail achieved when you use these fabulous little dies!


To create this card, I cut a 5 1/2 x 4 1/4 cardbase with Kraft cardstock. I then selected three circle dies from the Circle Little Stackers Nesting Dies and taped them (cut side up) inside the front of the card (with removable tape). I then ran it through my Cuttlebug to create three cut circles in the card front.

Tip: Taping the dies keeps them from moving around when you cut.


Then I adhered patterned paper and matching cardstock behind each one of the holes and messy (very messy!) sewed around each one of the circles with my sewing machine.  Then I cut three different size buttons from the Dimensional Buttons 3 die pack.  These dies are seriously amazing! One pass through the Cuttlebug (with my accessory plate) and you have a beautifully cut and embossed button!  How cool is that?! 

I spritzed the buttons with some glimmer mist, tied them up with some twine and adhered them to each of the circles. Stamp the sentiment, add pearls and a pretty little bow and you have a quick and easy card! Ta-da!

Tip: Cut a 4 x 5 1/4 piece of white cardstock and adhere to the inside front of the card to hide the sewing and tape.

Below are the links to the Cheery Lynn Designs supplies I used in this project so you can purchase your own! Now go forth and Celebrate Today with Cheery Lynn Designs dies and don't forget the accessory plate!

Little Stackers Nesting Dies
Dimensional Buttons

Friday, December 17, 2010

Papercraft Star Challenge 25 Executive Team Reveal

It's Friday's Executive Team Reveal for Challenge 25, at Papercraft Star and my week to create something for the challenge!  Check out this pretty inspiration photo from Martha Stewart dot com.


To find our current challenge at Papercraft Star and enter your project for this week go here.


When I sat down to create this project I was seriously out of Mojo, I've created more holiday projects this season than I ever have before and despite the fact that I absolutely love the inspiration photo for this week, I was seriously out of ideas.  I solved the problem by cruising through the November/December 2010 Paper Crafts magazine and TA-DA, I found some inspiration in a project designed by Carolyn King. You can see the project for yourself on page 59 of that issue. Here's my take on her gorgeous design.


The colors that really spoke to me from the inspiration photo were the combination of red on the holiday decor and the aqua hue of the wall. So I brought those colors together on this gift bag/card combination. Because I was also so burned out on the holiday papers I've been using lately, I decided to break out some patterned paper from the Beautiful Blooms pack by Papertrey Ink to create this project. Although it's certainly not traditional holiday paper, it does have just the right colors, as well as the Aqua Mist cardstock (also by PTI)...the perfect match to the wall color in the inspiration photograph.


This close-up shot gives you a better look at the felt flower and that adorable little reindeer I made (I made about 30 of them little suckers... it's addicting!). I found the idea for that in a papercrafting magazine as well! (I told you I was out of Mojo!!) :-)

I'm really looking forward to seeing all the beautiful holiday creations you make using our fabulous inspiration photograph for this week's challenge.  You still have time to enter your project before voting begins too, so I do hope you join us!

Before I go, let me just give you a quick run-down of the supplies I used to create this gift bag/card combo.  The patterned paper and cardstock are from Papertrey Ink.  I also created the felt flower using Pure Poppy and Spring Moss felt and a Beautiful Blooms flower die (also by PTI). The sentiment is stamped using their Pure Poppy Ink with a Hero Arts Stamp. The button and twine are also PTI. To create the reindeer I used brown yarn and google eyes and bells that I purchased at Wal-Mart. The ribbon on the bag is from Really Reasonable Ribbons.


Thursday, December 16, 2010

Warm Winter Wishes Card and Memorable Seasons

As I mentioned in earlier posts this month, a lot of stickers came in the Memorable Seasons Design Team Kit. Consequently, I haven't used this many stickers on my projects since WAY back in the day when scrapbooking was all about the stickers and not much else.  At any rate, I had fun trying to think of interesting things to do with these darling winter stickers from Echo Park.  Here I made a card using a set, and I stuck them to Clear Cardstock that I cut and "frosted" with some white Staz On ink. You can purchase the patterned paper as well as these stickers right here.


I popped up the card "window" using Pop Dots that I hid behind the stickers.  The twill ribbon and Aqua Mist cardstock are from Papertrey Ink. The border punch is from Martha Stewart.


Thanks for stopping by today...and here's sending you "Warm Winter Wishes!"

Wednesday, December 15, 2010

Tag Trio from the Midnight Frost Collection by Bo Bunny

Hope everyone is enjoying their day! This is just a quick post to share a simple little trio of tags I created earlier this month using the Design Team kit from Memorable Seasons. I failed to complete a full supply list (eek) like I normally do... but I will say that the pattened paper is Bo Bunny's Midnight Frost Collection and available for purchase at the store right here.


The tags also feature pearls by Hero Arts, Cardstock and stamped sentiment from Papertrey Ink, a Cuttlebug snowflake embossing folder to create the texture, as well as white cording and eyelets from my stash.

I also made the tags using my Cricut...but I can't remember which cartridge I used! What was I thinking when I didn't write this stuff down? Bad papercrafter, bad.

Tuesday, December 14, 2010

Joy Joy Joy for Sketches in Thyme

It's Sketches in Thyme... time!  This week's sketch is clean and simple... and thus allows you to keep it that way, or use your imagination and really doll it up.  I hope you play along with us this week!


For this challenge we were given both the sketch to use and some beautiful buttons from this month's Sketches in Thyme sponsor, Charlene's Button Box.  For this card, I opted to use these cute little Christmas tree buttons... but instead of using them as trees... I decided to make them holly leaves instead.  They do kind look like leaves when coupled with the berries... right? (At any rate, in my world they do!).  :-) I decided to keep the card just as clean and simple as the sketch.... because I really wanted the holly "leaves" to shine through. Aren't those trees....errrr leaves cute as a button! :-)...  (I just couldn't let that pun pass me by... sorry about that!)


The patterned paper is from The Girl's Paperie Tinsel & Twig Collection. I also used a Hero Arts stamp and Red Baker's Twine from Jillibean Soup and those berries I hacked off a big sprig of them that I bought at Meijer in the floral department.  Now you just have to hop on over to Sketches in Thyme and see the rest of the Team B reveal... the cards are gorgeous!

Monday, December 13, 2010

Let's Say Thanks in Support of our Troops

Let's Say Thanks in Support of our Troops is a program sponsored by Xerox. In three easy steps, the website gives you a chance to send a free printed postcard to military personnel stationed overseas showing your support and appreciation for their service to our country.   It literally only takes a minute or two! Please take a moment from your hectic schedule to visit this link and send a postcard to show your support! And let others know about this website too please! I sent the Michigan postcard... so sweet.

Sunday, December 12, 2010

I'm Stuck on Echo Park Wintertime Collection Kit from Memorable Seasons!

Here I am ... still creating cards to finish my holiday card list! I gotta admit though, this year it's been so much fun making cards with the fantastic Echo Park Wintertime Collection kit I received from Memorable Seasons as a member of the Design Team!

This is yet another card I created using stickers! A new thing for me, and wow, I am so loving how easy a card can come together with the help of a nicely placed sticker or two! Yee Haw!


This also happens to be yet another card I've made using inspiration I found at Ashley Newell's blog.  I love that gal and her awesome card creations! She's a Rock Star in my book.  I was really drawn to her design that included combining the rustic-look of baker's twine with the more elegant sheer ribbon on this card that she made right here. 

Instructions: 
  1. Create card base from red cardstock 4 ¼ x 5 ½.
  2. Cut cream cardstock 4 x 5 ¼ to create card front and adhere sticker.
  3. Stamp sentiment onto card front.
  4. Cut strip from Kraft paper, wrap with twine. Adhere to card front.
  5. Wrap ribbon (x 3) around card front and tie into bow.
  6. Adhere to card base.
Supplies Used:
Cardstock: Papertrey Ink: “Rustic Cream”,“Pure Poppy”, “Kraft”
Ink: Hampton Art: Chalks Pigment Ink “Red” (ID# VP0018R)
Stamps: Hero Arts: “Merry Christmas Trees”
Fiber: Jillibean Soup: Bean Stalks “Red Twine”, Darice Inc. Ribbon: “1/4 inch Chiffon White”
Embellishments: Echo Park: “Wintertime Element Stickers”

Saturday, December 11, 2010

Cheery Lynn Designs Origami Tree Tutorial and Gold Foil Notecard

Origami Christmas Trees on cards and other holiday projects is quite trendy this year and so I thought it would be fun to create one of my own and show you just how quick and easy it is to make a beautiful little tree using Cheery Lynn Designs thin metal dies. (They work in all your favorite tabletop die cut machines!) 

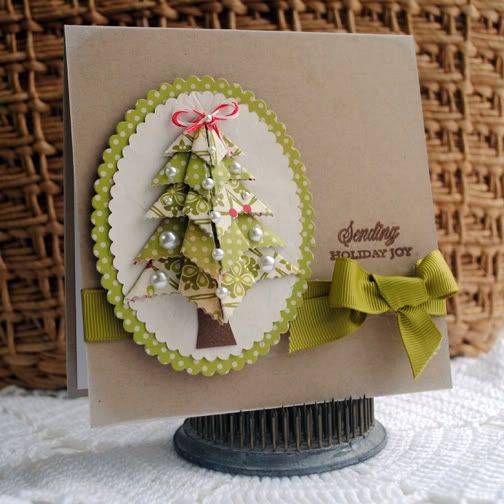
To create the tree that you see on this card, I used Cheery Lynn's Scalloped Square Little Stacker Nesting Dies. I then "highlighted" the tree on my card front by framing it on the Scalloped Oval Little Stacker Nesting Dies. To add just a bit more Christmas cheer to the card I also embossed the ivory cardstock using the Poinsettia XL Embossing Plate.  Now I'll show you how to make your own Origami Christmas tree....


To create an Origami Christmas tree you'll need the following supplies:
Scalloped Square Little Stacker Nesting Dies (all of them in the pack except for the smallest die)
Patterned Paper (I used Tinsel & Twig by The Girls Paperie)
Brown cardstock for the tree trunk (I just used a scrap piece that I cut by hand to create the trunk)
Desired embellishments for your tree decorations.


1.  Using all but the smallest die in the Scalloped Square Little Stacker Nesting Dies pack die cut patterned paper.  I used two coordinating patterns.


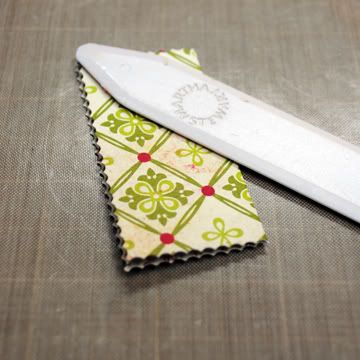
2. Now since Origami is all about the folding... let's get you started.  First fold one square in half.


3.  Then unfold the paper and fold it in half again in the other direction.


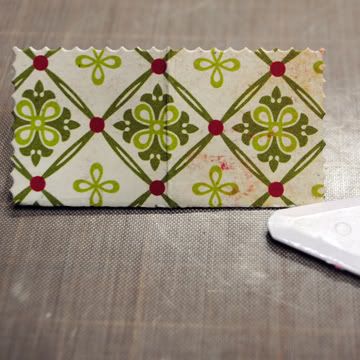
4. Now unfold the paper again and refold it into a triangle. Unfold again and repeat the triangle fold in the other direction. Then unfold the paper again...


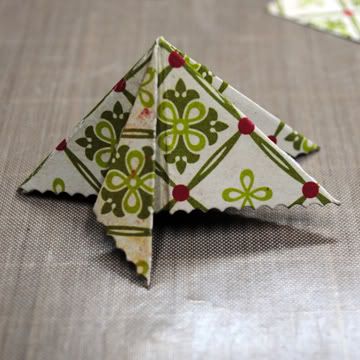
5. Push the two center folds (made when you folded it in half) toward the center to create the shape above.


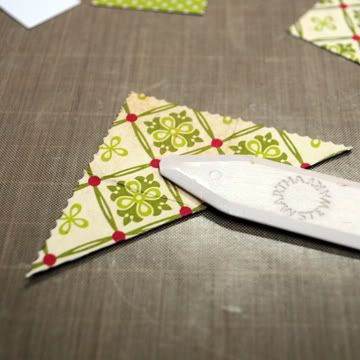
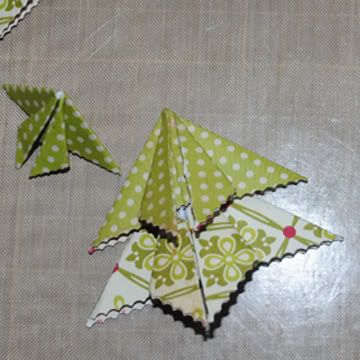
6.  Face the paper toward you and fold in the left side of the front triangle toward you (kinda like making a paper airplane...sorta.).


7.  Repeat that fold with the right side of the front triangle. This creates one layer of your Christmas tree.


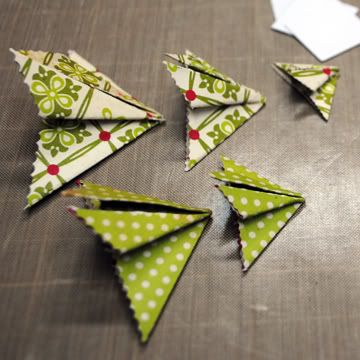
8. Repeat all the steps with each one of your die cut scalloped squares.


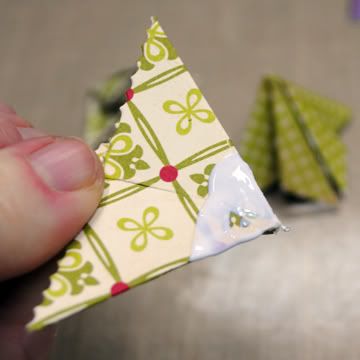
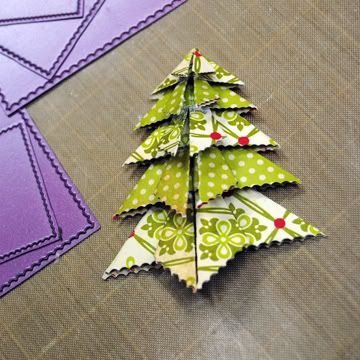
9. Assemble the tree layers by putting glue at the top of the triangle, on both the front and the back.  Insert the larger layer into the center fold of next smaller layer.


10.  Continue gluing each layer into the next until you get to the final layer (do not put glue on the top layer of your tree)


11. The assembled layers should then look something like the photograph above. 


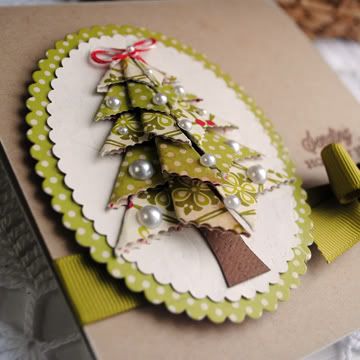
12. You can then add the tree to your project, adhere embellishments and your hand cut "tree trunk".

(Tip: When using thick cardstock (like I did here), you may wish to glue your layers down to prevent the tree from "popping" up too much.)

That's all there is to it and so easy with Cheery Lynn Designs dies too!  In fact, it was so easy and fun, that I decided to create one more quick card with Gold Foil, a product I'd not yet ever tried before.  You can purchase it from the Cheery Lynn Designs store right here. 


To create this clean and simple card, all you need is a 5 1/2 x 4 1/4 cardbase. With the cardbase folded in half, position the second to largest die in the Card-Makers Stackers Nesting Dies (I used the plain rectangle) between the fold of your cardbase, cut side up. Then run it through your favorite die cut machine (mine is the Cuttlebug). If you look closely at the photograph above you'll see that the rectangle die also embossed a nice frame with the cut.

Now cut a piece of foil large enough to fit behind the opening you just created in the card front and run it through your die cut machine using one the the XL Embossing Plates available at the Cheery Lynn Designs store. I used the Foliage embossing plate that you can purchase right here. Adhere the foil to the inside of the card front. (Tip: cut a piece of cardstock 5 1/4 x 4 to cover the back of the foil in side your card for a more professional finish to your card).

To see more beautiful projects and fun ways to use Cheery Lynn Designs dies in your favorite tabletop die cut machines visit the Cheery Lynn Designs Blog. To shop in our store, go here.
Related Posts Plugin for WordPress, Blogger...