Showing posts with label Cards. Show all posts

Thursday, September 15, 2011

Cardabilities Sketch Challenge: Vintage Clean and Simple

It is reveal day at the Cardabilities blog and we have a wonderful sketch to get you crafting for this week's challenge too, I hope you join us!

The Sketch


The Card


This week's sketch inspired me to create this quick and simple card that features vintage patterned paper and cardstock in hues of red, pink and yellow.  I also finally broke out a previously unused Waltzing Mouse stamp set that coordinates with the Spellbinders die I cut from white cardstock for the focal point and sentiment on this card. Butterflies cut with Martha Stewart's Royal Butterfly punch and topped with pearls finish off this sweet little card.
I'm looking foward to seeing what you create with this fabulous sketch and can't wait to see you over at the Cardabilities blog!

Tuesday, September 6, 2011

Happy Fall with Cheery Lynn Designs Dimensional Leaves Dies


I have to admit, that I am no where near wanting summer here in the United States to be over but like it or not Fall is upon us and it is indeed time to start working on our fall papercraft projects, so for today's post I created this Happy Fall card featuring Cheery Lynn Designs Dimensional Leaves.

To create this monochromatic card, I paired Vintage Cream cardstock with Kraft. I started by creating a 4 1/4 by 5 1/2 top fold card with Kraft cardstock and layered it with cream cardstock. On top of that I added a layer of Kraft cardstock that I first embossed with the Lattice Circle Frame plate using an embossing stack with my Big Shot. I then cut Dimensional Leaves and an Acorn using dies from both the Dimensional Large Leaves #2 and the Dimensional Small Leaves #2 and stamped the "Happy Fall" sentiment right onto the focal leaf. Vintage Cream ribbon and brown pearls were added as a finishing touch.

Friday, August 19, 2011

GCD Studios: Save Time and Money on your Next Craft Projects


Like many papercrafters, I have two passions with regard to this hobby, making projects with paper and collecting supplies to make those projects. Most papercrafters will tell you that part of the hobby is buying the supplies and as much as we may enjoy spending all that time and money making our selections and purchases, I've gotten to a point where I have so many supplies to choose from when I sit down to craft that it's often more time consuming to choose the supplies for any one project than it is to actually make the project itself!


If you've been in that same situation before, then I've got an idea that I hope may inspire you in a way that will allow you to save both time and money on your next papercraft projects. For me, the warm summer months find me spending a lot more time outside enjoying my family and engaging in summer activities, so when I do find time to craft I don't want to spend a lot of precious minutes sorting through my supplies, I just want to craft and staying focused is key!

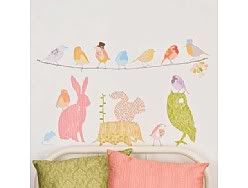
I maintain that focus by first choosing a theme, like the End of Summer one I used for these projects, an inspiration photograph like the one above, and most importantly, select a limited set of supplies (that's what saves both time and money!).

The ONLY supplies I used to create my projects included: Patterned paper from GCD Studio's The Great Outdoors Collection by Heather Tozzi, specifically Picnic Table (that matches the red in the inspiration photo) and S'mores (that loosely matches the brown in the photograph), as well as cardstock in two shades of blue and the lighter brown from the color combination and white. Other supplies included the Vintage Picnic stamp set by Papertrey Ink, Vintage Picnic Basket die, one border punch, inks in coffee and black, watercolor pencils to color the images, one rectangle and one scalloped rectangle dies by Spellbinders, as well as red ribbon and red and white Baker's Twine. That was all the supplies I used to create all three of the cards I'm showing you today.


Once you've selected your supplies vow to yourself that you will not go back to your stash to choose anything new for your projects (that's the time saving part!). Believe it or not, it is still possible to create a variety of projects that can be both fun and fabulous, using only the supplies you have chosen and a bit of imagination too!


The next time you are in your craft room, try challenging yourself to use a set number of supplies along with your favorite selection of GCD Studios patterned papers to save time and money when creating your next papercraft projects... it's also a great way to use up your stash!

Wednesday, August 17, 2011

Children Themed Photo Inspiration

Photo Credit Garrendeny Lane
I created this card a while back using the photo below as inspiration... I just never shared the card before now...

Beth Moore
I focused on the pale green and blues in the inspiration photograph and opted to create a Baby card using Prima Marketing 6 x 6 patterned paper from the Jack & Jill Collection. I first created a 4 1/4 x 5 1/2 inch card base from Vintage Cream cardstock (Papertrey Ink) and layered that with a patterned paper cut to 4 x 5 1/4. Using a Spellbinders die, I cut a coordinating piece of patterned paper and layered that under a die cut circle that I printed a sentiment on from my computer.  To complete the project I added ivory ribbon and trim and added pearls from Bo Bunny.

Saturday, July 30, 2011

Cardabilities Sketch Challenge and Reveal

Today is reveal day at the Cardabilities blog and we have another wonderful sketch by Karan Gerber to get you crafting for this week's challenge too, I hope you join us!

The Sketch
The Card


Admittedly, I got a just a tad carried away with this sketch because I ended up adding some extra elements to make the card work for me.  I started by selecting a piece of pattened paper from Cosmo Cricut Mini Deck "Up Cycle" and paired it with True Black cardstock from Papertrey Ink to make this unisex birthday card.  This was a chance for me to finally use some Maya Road Bingo Motif pieces that I've had in my stash for I don't know how long to add "flowers" to the leaves.  Also used to create this card were stamps and dies from Papertrey Ink, "Ad Sense" and "Turning a New Leaf" as well as their True Black Swiss Dots ribbon.  I used the Stampin Up Window Word punch for the small sentiment by the bow and the ink used was Memento "Tuxedo Black".

Wednesday, July 27, 2011

Papercraft Star: Anything Goes Challenge

This week the challenge at Papercraft Star is the BEST EVAH... 'cause you can do whatever you want! That's right the challenge this week is "Anything Goes" and we say anything...we mean ANYTHING (well, okay no naughty stuff, but other than that...just go for it!).

With that said... for this challenge I wanted to do something BIG and BOLD so I chose some bright colors, Papertrey Ink Pure Poppy and Hawaiian Shores cardstock matched perfectly with this Crate Paper polka-dot pattern, add a extra large sentiment, and some ribbon, lace and a couple of Glam Rocks from Imaginisce and ta-da, one BIG and BOLD card was born.


You've got plenty of time to get your own project for this challenge completed too and we hope you do! You can find the link to our current challenge in the upper right corner on the sidebar of the blog! We can't wait to see what you create!

Tuesday, July 26, 2011

Imaginisce: Christmas in July with Santa's Little Helper Collection


Ho, Ho, Ho... it's Christmas in July time at Imaginisce and we're having a very festive week celebrating the release of our Christmas collection 'Santa's Little Helper'.


Our design team elves have been busy creating lots of goodies in Santa's workshop and over at the Imaginisce blog you can take a peek at what's been going on in the North Pole... and get in on all the fun giveaways that are happening there as well!

Here's what I have been working...


Card with Gift Card Holder
I used the Plantin Schoolbook cartridge and my Cricut to create the gift card holder that I attached to the outside of this card. I cut the envelope at 3 3/4 inches with the Tall Ball feature selected...which makes perfect little holes to tie the envelope closed with a sweet little ribbon bow.

Card Featuring Snag 'Em Stamps from Santa's Little Helper Collection
This card features the darling little reindeer stamp from the Imaginisce Santa's Little Helper Collection.  He's colored with watercolor pencils and a few Imaginisce Glitter Rocks embellish the card for some Christmas bling.

Clean and Simple Christmas Tag
This clean and simple Christmas tag was cut with Spellbinders dies and highlighted with a Waltzing Mouse coordinating stamp set.  The Christmas tree is another Snag 'Em Stamp from Santa's Little Helper collection by Imaginisce and is embossed with Pink Zing! and highlight with Imaginisce Crystal Hot Rocks.

Now get on your sleigh and head on over to the Imaginisce blog for more winter fun with Imaginisce and Little Santas Helper collection!

Saturday, July 23, 2011

Garden Gate Thank You Card with Cheery Lynn Designs

Cheery Lynn Designs Rectangle Card-Makers Stackers Nesting Dies paired with Scalloped Rectangle Card-Makers Stackers Nesting Dies create the perfect backdrop for this sweet and simple Thank You card. 


For a bit of rustic charm, I cut Kraft cardstock with the darling little Garden Gate die and wrapped it up into a bow with pink and white Baker's Twine that coordinated perfectly with the pastel colors in my patterned paper.  I wanted the sentiment to really stand out as the focal point for this card, so I chose to stamp in onto cream cardstock cut with one of the larger French Flair Classic Large Stackers Nesting Dies from the set and popped it up with dimensional foam to really make it stand out against the garden gate. I love the gorgeous embossed border that is created when cutting with the French Flair Classic Large Stackers Nesting Dies, especially if you use the "Cuttlehug" Large Metal Adapter Plate.  With my Big Shot, I've found that if I use the metal adapter plate in my stack it alleviates the need to first cut and then emboss and instead does it with one easy step with most dies.

Be sure to visit the Cheery Lynn Designs blog each and every day for more inspiration using Cheery Lynn Designs Magical Dies!

Sunday, July 17, 2011

Celebrate with Cheery Lynn Designs Dies

For today's "Celebrate" card, I paired Cheery Lynn Designs Rectangle Card-Makers Stackers Nesting Dies cut from coordinating patterned paper with Scalloped Rectangle Card-Makers Stackers Nesting Dies to create a cheerful backdrop for for the pennant banner and flower. 


To create the banner, I layered die cuts from the Pennant Die cut from cream cardstock and patterned paper and adhered them to the cardfront. As a focal point, I added a flower cut from yellow and green cardstock using Judy's Blooms die. Finally, I added a stamped sentiment onto cream cardstock cut using the Large Silver Stackers Nesting Dies.

More examples of how I used the perfectly sized Card-Makers Stackers Nesting Dies to create pretty and professional-looking projects are here, here and here.

Friday, July 15, 2011

Cardabilities Sketch Challenge and Reveal

I'm just delighted to share my first project as a member of the fun and amazing Cardabilities Design Team! Today is reveal day at the Cardabilities blog and we have a wonderful sketch to get you crafting for this week's challenge too, I hope you join us!

The Sketch
The Card


Aqua Mist and Pure Poppy (Papertrey Ink) are at the top of my favorite color combinations list so when I found these patterns papers in the Cosmo Cricut Odds and Ends patterned paper collection I knew I wanted to combine several pieces of the patterned paper that featured these colors with the cardstock to create this bright and cheerful card.   Other supplies I used to create this card include the Border Carnival Die from Cheery Lynn Designs, JBS Antique Stick pins ordered from Kraft Outlet, Red Seam Binding from Really Reasonable Ribbons, Red Riding Hood Red ink from Stampin' Up, and Stamps from Waltzing Mouse's Rescue Remdies cut using Spellbinders Labels 4.  

Saturday, July 9, 2011

Live for Today with Cheery Lynn Designs

I paired Cheery Lynn Designs Rectangle Card-Makers Stackers Nesting Dies cut from smokey black and cream cardstock with daisies cut from patterned paper using the Darling Daisies die to create this elegant and inspirational card with matching envelope. 


The perfectly sized and beautifully embossed edge that is achieved by using Cheery Lynn Designs Card-Makers Stackers Nesting Dies is featured on the Vintage Cream cardstock that the sentiment is stamped on, as well as the Smokey Shadow cardstock that backs the sentiment. These dies help make professional looking cards so quick and easy that they are a must-have item for all card makers no matter what your skill level may be.

To highlight both the sentiment and the envelope, I cut daisies from the Cheery Lynn Designs Darling Daisies die and adhered black rhinestones to each for added glamour. Gently folding each petal of the daises together adds extra dimension to the flowers on this project. 

More examples of how I used the perfectly sized Card-Makers Stackers Nesting Dies to create pretty and professional-looking projects are here, here and here.


Supplies Used for this Project:
Cardstock: Papertrey Ink: “Smokey Shadow”, “Vintage Cream”
Patterned Paper: Sassafras: “Ellie’s Tale” Wee Bundle
Stamps: Papertrey Ink: “Through the Trees”
Ink: Tsukineko Memento Ink: “Tuxedo Black”
Embellishments: Imaginisce: Hot Pack Compact “Black”
Dies: Cheery Lynn Designs: “Card-Makers Stackers Nesting Dies” and "Darling Daisies"
Other Tools: Sizzix: Big Shot Die Cut Machine, Imaginisce: I-Rock Tool and dimensional foam tape.

Thursday, July 7, 2011

Thursday Trigger for The Kraft Journal: Patriotic/Americana Challenge

Many of our followers over at The Kraft Journal must have enjoyed the long 4th of July weekend and are continuing to reap the benefits of the mostly mild summer months we are enjoying around the United States because it's been pretty quite around the blog lately (here to for that matter)!  I can only hope that the quiet means you've all been soaking up some much needed sunshine and relaxation away from the computer ... but now it's time to come back and play along with us this week for this fun challenge... am I right??!! :-)

Even though our "Patriotic/Americana" Challenge at The Kraft Journal is more than half over, that doesn't mean that there isn't still plenty of time to join us...'cause there is!! All the details regarding this challenge are available by clicking on our Current Challenge link that is located in the top right sidebar of our blog.  You have until this Sunday at 6:00 p.m., Eastern Time to enter for a chance to win prizes and adorable blog buttons too!


To create this Patriotic card, I started with a 6 x 6 inch square top-fold card made from Light Kraft Coverweight Cardstock and rounded the corners. I then layered that with a 5 3/4 x 5 3/4 inch piece of
Lunch Bag Kraft Cardstock, rounded the corners of that and then added a layer of patterned paper to create the card base. I used the same layering of Light Kraft Coverweight Cardstock, Lunch Bag Kraft Cardstock and coordinating patterned paper to create a base for white ribbon and tied it into a bow. I topped the bow with JBS Antique Stick Pins and a red button tied up with Blue Baker's Twine.  Yet another layer of die cut Light Kraft Coverweight Cardstock and Lunch Bag Kraft Cardstock is the base for my stamped and Copic Maker colored image of a vintage picnic basket complete with stars and a flag, perfect for the 4th of July. A stamped sentiment on white cardstock cut with a banner die completed the project. These details are also available at The Kraft Journal blog. Now it's your turn...and we can't wait to see what you create!

Wednesday, July 6, 2011

Papercraft Star: Garrendeny Lane Photo Inspiration Challenge

The challenge at Papercraft Star this weeks starts with a luscious photograph from Garrendeny Lane and we hope ends with a project you create that was inspired by this fun photograph too!


Photo Credit: Garrendeny Lane
To create my project for this reveal I started with an Orange Zest 5 1/2 x 4 1/4 cardbase and added layers of patterned paper from Crate Paper's Emma Shoppe Collection 6 x 6 paper pad. Orange Zest Ribbon topped with a purple button from my stash (inspired by the purple flowers in the photo) finished this quick and easy, but oh so Orange and Zesty card! :-)


I hope you join me by entering this Papercraft Star photo inspiration challenge.  You can learn all the details and enter your project by clicking on the Current Challenge link located in the upper right sidebar of the Papercraft Star blog!

Monday, July 4, 2011

GCD Studios: Happy 4th of July!

Nothing says "Summer" to me more than camping and the 4th of July, so when GCD Studios asked the Design Team to create Summer-themed projects, it seemed only natural to combine a project that included a 4th of July theme with fun and "campy" designer papers like that of The Great Outdoors Collection by Heather Tozzi.


For this projected I used three fun red, white, blue and gray designs from The Great Outdoors Collection including "Happy Camper", "Picnic Table" and "Bandana" (even the names of the paper say "camping-fun" don't they?!). 

I totally love the grid lines and gray hues on of the reverse-side of "Happy Camper" and featured that color by using a scallop circle die cut of that patterned paper behind the image I stamped onto white cardstock. To further play up the gray hues, I then stamped the stars and flag basket topper with black ink and heat-embossed it with silver embossing powder and rubbed gray chalk around the bottom of the basket to ground the image on the circle die cut. A little blue chalk rubbed around the top of the image gives the feeling of a "wide-open" summer-sky.  I colored the basket with my Copic Markers in earth-tones and used a light hand on the flag with some pretty Spica Glitter Pens in red and blue.

Instructions to recreate this card: 
  1. Create a 5 1/2 by 4 1/4 card base from white cardstock.
  2. Cut piece of red and white patterned paper "Picnic Table", border punch, wrap with Baker’s Twine and tie twine into bow; adhere to card base.
  3. Cut piece of "Picnic Table" red patterned paper and adhere to card front.
  4. Cut piece of  blue and white patterned paper "Bandana" and adhere to card front.
  5. Die cut circle from white cardstock stamp image; heat emboss and color.
  6. Stamp image again on cardstock, color flag, cut out and adhere to colored image with dimensional foam adhesive.
  7. Die cut scallop circle from "Happy Camper" patterned paper; adhere to back of stamped image circle and adhere to card front with dimensional foam adhesive.
  8. Die cut banner from white cardstock, stamp with sentiment and adhere to card.
  9. Adhere Glam Rocks with I-Rock tool.
Supplies Used:
Patterned Paper: GCD Studios: The Great Outdoors Collection, “Happy Camper”, “Picnic Table”, “Bandana”
Cardstock: Papertrey Ink “Stampers Select White”
Stamps: Papertrey Ink “Vintage Picnic” (image and sentiment)
Ink: Memento “Tuxedo Black”, Stampin’ Up “Real Red” 
Fiber: Kraft Outler “Blue Baker’s Twine
Embellishments: Imaginisce: Glam Rocks “Masculine”
Dies: Spellbinders: Standard Circles Large and Scallop Circles Large, Papertrey Ink: “Double Banners”,
Other Tools: Imaginisce: I-Rock tool, EK Success Dotted Lace Border Punch, Pop Dots, Ranger: Embossing Powder "Silver", Copic: Copic Sketch Markers and Spica Glitter Pens and blue and gray chalk from my stash.

For more inspiration using GCD Studios products, visit the blog today!

Saturday, July 2, 2011

Enjoy the Moment with Cheery Lynn Designs

I'm excited to share my project with you today because it combines some of my most favorite basic (must-have) dies from Cheery Lynn Designs as well as one of my favorite color combinations... Lemon Yellow and Gray! This project features die cuts from Rectangle Card-Makers Stackers Nesting Dies, French Flair Dies, the Dotted Swiss Embossing Plate, and a cut from the Pair of Ferns die. (I apologize in advance that the embossing is difficult to detect in this photograph - but it is there on the large piece of yellow cardstock!)


To recreate this card...
  1. Create a 4 1/4 x 5 1/2 inch card base from gray cardstock.
  2. Cut a piece of yellow cardstock to 4 x 5 1/4 inches, emboss with Dotted Swiss Embossing Plate and adhere to card front.
  3. Die cut piece of  patterned papper using Rectangle Card-Makers Stackers Nesting Dies and adhere to a piece of gray cut from the next larger size Rectangle Card-Makers Stackers Nesting die; adhere to card front with dimensional foam tape.
  4. Die cut Pair of Ferns from smokey black cardstock and adhere one fern to card front (save the other for another project).
  5. Die cut piece of gray cardstock from French Flare die and stamp with sentiment then adhere to a piece of yellow cardstock cut from the next larger French Flare die; adhere to card front with dimensional foam tape.
  6. Adhere Imaginisce Hot Rock with I-Rock Tool.
Hope you Enjoyed this Cheery Lynn Designs Moment....and be sure to stop back in at the Cheery Lynn Designs blog every day for more inspiration from the Cheery Lynn Designs Design Team!

Thursday, June 30, 2011

Thursday Trigger: The Kraft Journal: "Something Old/Something New" Challenge

Our "Something Old/Something New" Challenge at The Kraft Journal is in full swing and there is still plenty of time to join us. All the details regarding this challenge are available by clicking on our Current Challenge link that is located in the top right sidebar of our blog.  You have until this Sunday at 6:00 p.m., Eastern Time to enter for a chance to win prizes and adorable blog buttons too!


To create this Sympathy card for our Something Old/Something New challenge, I combined a sentiment stamp (Through the Trees by PTI) that I have had for well over a year (and had yet to use) with one of my new Parisian Accents Spellbinders dies.

I started by creating a 4 1/4 x 5 1/2 inch base card from Buff Ivory Cardstock. I then border punched white cardstock and adhered it to the front of the card. On top of that I layered Lunch Bag Kraft Cardstock and patterned paper. I also die cut Lunch Bag Kraft Cardstock and white cardstock and layered it to create the focal point for the card, as well as a pretty place to stamp my sentiment for this clean and simple card.

Tuesday, June 28, 2011

Imaginisce Happy Harvest Release Party


It might be summertime here in the United States...but at Imaginisce this week, it's Happy Harvest Time!  I hope you hurry on over there to join in the Happy Harvest Release Party festivities... catch a glimpse of all the great projects created with the Happy Harvest products by our dedicated Design Team and get in on a chance to win some outstanding prizes too!


The "Simple Joys" chipboard sticker from the Happy Fall Chipboard Sticker set was a perfect piece to use as the focal point for this simple and elegant card.  I paired Autumn Splendor patterned paper with Hawaiian Shores cardstock that I embossed with the Cuttlebug Swiss Dots folder on a Dark Chocolate cardbase.  A Dark Chocolate ribbon finished the project.  For fun I submitted this card into the CAS-ual Friday "Getting Edgy" challenge.


A Rustic Cream cardstock base is the backdrop for this Happy Fall card that features the adorable Owl from the Fall Friends Icon Die Cuts set.  I border punched Terra Cotta tile cardstock and layered it with Dark Chocolate for a backdrop to a piece of Dancing Leaves patterned paper. Die cut Scalloped and Silver Stackers Ovals (Cheery Lynn Designs) formed a base for the Owl to perch upon. For added detail I topped the card with a Terra Cotta Tile ribbon, a Tim Holtz Note pin and added a leaf from the Fall Friends Icon Die Cut set to the pin top.  For some bling I adhered Glitter Hot Rocks with my Imaginisce I-Rock tool.

To see more fabulous projects using the new Happy Harvest Collection, head on over to the Imaginisce Blog and join the Happy Harvest Release Party going on all week long!

Thursday, June 23, 2011

Thursday Trigger: The Kraft Journal "Welcome Summer" Challenge

Our "Welcome Summer" Challenge at The Kraft Journal is in full swing and there is still plenty of time to join us. All the details regarding this challenge are available by clicking on our Current Challenge link that is located in the top right sidebar of our blog.  You have until this Sunday at 6:00 p.m., Eastern Time to enter for a chance to win prizes and adorable blog buttons too!


For this "Welcome Summer" challenge I created a card featuring a fun summer sentiment that I found online. I printed the sentiment using two different fonts onto Lunch Bag Kraft Cardstock that I layered with "Salt Air" patterned paper by Cosmo Cricket. I also created a flower from Lunch Bag Kraft Cardstock by punching out three scalloped circles, spritzing them with glitter mist and layering them with a Salt Air doily as a finishing touch. Lunch Bag Kraft Cardstock from Kraft Outlet is the perfect weight and texture to make handmade embellishments...this paper is a Papercrafter's must-have staple!


I've entered this card into these fun challenges:
Anything Goes Challenge Blog: Here Comes Summer
The Paper Variety: It's Summer
The Paper Shelter: Fun in the Sun
Fab 'n Funky: Summer Loving

Bright and Sunny Wishes for a Belated Birthday with Cheery Lynn Designs

Today I want to share with you, a bright and cheeryful Belated Birthday card featuring dies from Cheery Lynn Designs.  It seemed only fitting to create a "sunny" card given that it is Summer here where I'm at (always happy news when you live in Michigan!).


To create this project you'll need these Cheery Lynn Designs dies, the Lattice 1 Die/Embossing Plate, Judy's Blooms and Rectangle Card-Makers Stackers Nesting Dies.

Instructions:
  1. Create a 41/4 x 5 1/2 inch card base from yellow cardstock.
  2. Die cut piece of blue cardstock using the Lattice 1 die and adhere to card base.
  3. Die cut piece of patterned paper from Rectangle Card-Makers Stackers Nesting Dies and adhere to piece of yellow cardstock cut from one size larger Rectangle Card-Makers Stackers Nesting Dies; adhere to card front.
  4. Die cut Judy's Blooms from both yellow and blue cardstock, assemble flower and adhere to card front.
  5. Cut banner from yellow cardstock, stamp with sentiment, score ends of banner to fold in as shown on card and adhere with dimensional foam tape.
  6. Adhere rhinestone to flower.
Hope you have a bright and sunny day and don't forget to visit the Cheery Lynn Designs blog again for more inspiration from the Cheery Lynn Designs Design Team!

Saturday, June 18, 2011

New Border Carnival from Cheery Lynn Designs

This week we are showcasing the newest Cheery Lynn Designs dies officially released on June 15 and for my card today I am giving top billing to the new Border Carnival die that just makes me swoon (and I bet it will do the same to you as well!). I am not afraid to say that this is my new FAVORITE... look at the beautiful detail on this border! It is so beautiful in fact that I wanted it to be featured on this card, so I left things very simple.


Important Note:  This border dies comes packaged on a piece of cardboard and I have a little secret for you... if you go ahead and leave the die attached to the cardboard and then add a Cuttlehug to your stack as well... it will cut like BUTTER... seriously all those little pieces from the intricate details will simply fall out when you pull the die from the paper. 
Instructions:
  1. Create a 4 1/4 x 5 1/2 inch top fold card from dark blue cardstock.
  2. Cut a piece of patterned paper to 4 x  5 1/4 and adhere to card base.
  3. Die cut two Border Carnivals from white cardstock, trim to size and adhere to card front.
  4. Die cut Silver Stackers Oval Nesting Die from white cardstock and stamp with sentiment.
  5. Die cut Scalloped Oval Nesting Die from dark blue cardstock and adhere to back of sentiment oval; pop up on card with dimensional adhesive.
  6. Adhere Glam Rocks with I-Rock tool.
That's all for today, but be sure to visit the Cheery Lynn Designs blog every day for more inspiration from the Cheery Lynn Designs team!
Related Posts Plugin for WordPress, Blogger...