Thursday, December 22, 2011

The Kraft Journal: Favorite Project of 2011 Challenge

 
Beth Moore: Favorite Project of 2011

For today's Thursday Trigger post over at The Kraft Journal, I want to share with you my favorite Kraft Outlet project from 2011 and I hope this will inspire you to join our challenge this week.  It's simple to join, just follow the Current Challenge link located in the upper righthand of our sidebar and link up your past favorite project from 2011 that also featured Kraft cardstock or products you purchased from Kraft Outlet.

My favorite past project was this decorated  Lunch Bag Kraft CD Sleeve that created a fun and pretty way to store a CD filled with some of my favorite Summer 2011 photographs.  Other products from Kraft Outlet that I used include: a Round Metal Edge White Tag from the Designer's Special Natural Tag Collection that I first spritzed with coffee colored mist and then stamped with the word "Remember", Blue and White Baker's Twine, Tim Holtz Film Strip Ribbon that matches my photograph storage theme for this project, and a die cut tag that I stamped with the word "Summer" and attached at the top of the sleeve. I cut the index tab from Lunch Bag Kraft Cardstock with the idea that I'll decorate more of these sleeves to store my photo CDs by season and once I put them all in a box, it will help me locate whatever CD I may wish to find later.

Remember, there is still plenty of time for you to join our Favorite Project of 2011 challenge.  You can find the link to our current challenge in the upper right corner of our sidebar at The Kraft Journal blog or click here.  We can't wait to see what your favorite project of 2011 was!

Wednesday, December 21, 2011

Relaxing before the Holidays...

While the rest of us have been scurrying around getting ready for the holidays, my new granddaughter Rozlin has been doing a lot of this...

Princess Rozlin Fast Asleep
and some of this...

Princes Rozlin with Momma
and a whole lotta cooing and even smiling...but do you think I can even get one photograph of THAT??!!!  Ah well, there is bound to be a moment when she smiles AND I have the camera at the ready too...right?

Hope your holiday preparations are going well...and that you've found some time to relax too, I know Rozlin is! :-)


Tuesday, December 20, 2011

Merry Christmas Elves


Merry Christmas Elves: Jack and Seth
A couple of weeks ago, my grandsons donned these darling santa hats (bought for them by my mother, aka "Granny") to help us decorate the Christmas tree we put up in our basement family room. I've been so busy since that day, I didn't have time to share this photograph...until now! By the way, I have NO IDEA why both the boys decided to cross their arms for this picture - ha!

These two guys (and my new granddaughter as well) have kept me VERY busy over the past several months (the reason my blog has been pretty quiet). But I'm hoping after the holidays to get more crafting done (in my new office/craft room), and spend more time sharing what I'm creating here at Runs With Scraps as well.

For now, I hope all of you have some little Christmas Elves in your life... as they sure make the holidays special!

Happy Holidays!

Wednesday, December 14, 2011

The Kraft Journal: Gift Card Holder Tutorial

Over at The Kraft Journal it's time for our weekly Kraft Outlet product tutorial. However, before I get started with it, I'd like to apologize in advance for the less than perfect lighting in the following photographs. I just recently moved my craft space and have not yet worked out the lighting.

Despite the poor lighting issues, today I'm going to show you how to quickly create a "no frills" gift card holder (perfect for those last minute gifts)... this gift card holder can also easily be embellished to create a more elaborate card as well.

No-Frills Gift Card Holder with Belly Band
With that said, to create today's "no frills" gift card holder you'll need the following supplies:

Brown Kraft Cover Weight Cardstock cut to 4 1/4 x 11 inches
Brown Kraft Cover Weight Cardstock cut to 1 1/4 x 7  inches
Twill Tying Tape 
Patterned Paper cut to 2 3/4 x 4 inches
Stamp Set(s) of choice (I used Papertrey Ink "2008 Holiday Tag Collection" and Hero Arts "Merry Christmas Tree" set)
Adhesive
Ink

You'll also need the following tools:

Stampin Up Large Window Punch
1" Circle Punch
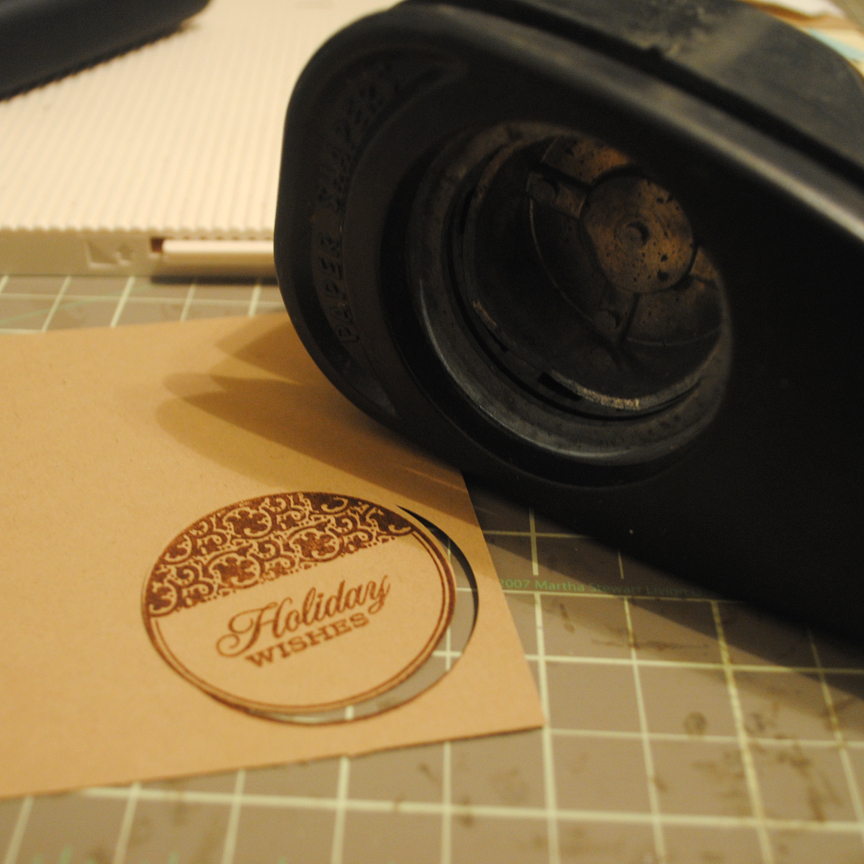
1 3/4 Circle Punch (to cut out stamped tag)
Scoreboard/Scoring Tool

Start the project by inking all edges of cardstock and patterned paper, which is much easier than waiting until the card was completed like I did here!


Score the 4 1/4 x 11 inch cardstock at 3", 5 1/2" and 8".


Fold into an "M".


On the third panel from the left apply adhesive as shown above. (This will create the pocket for the gift card)


Fold the cardstock together to adhere the adhesive creating a "T". The center panel will be the pocket of for the gift card. The top of the "T" will be the front and back of the card.


Working on the center of the card, use the Word Window punch to cut along the top (leaving a small section on each end that is not cut) that will create the opening to the gift card pocket as shown below.


Using your 1 inch circle punch, cut a half circle from the center of the gift card holder pocket slot to create a tab.


The gift card pocket should look like this...


and the gift card slides into the pocket as shown below.


Embellish gift card as desired or continue to follow the instructions below to recreate this gift card holder with belly band shown in this tutorial.


Stamp a sentiment on the front of the gift card holder pocket.


Adhere patterned paper to card front and use the 1 1/4 x 7 inch strip of Kraft cardstock to create belly band.


Fold band of cardstock around outside of card.


Turn card over and use adhesive to adhere band around card.


Wrap Twill Tying Tape around belly band, tie into bow or knot and trim edges.


Stamp tag onto scrap piece of Kraft cardstock and punch out with 1 3/4 inch hole punch.


Adhere to belly band under knot of bow.


While there are a lot of photographs with this tutorial it actually is a project that comes together very quickly and again, there are many options for adding embellishments to really make your gift card holder unique.

Remember, there is still time to enter our challenge this week over at The Kraft Journal. For all the details and to link your project click on our Current Challenge link located on the upper righthand of the Kraft Journal sidebar!

Happy Krafting!
Related Posts Plugin for WordPress, Blogger...