Thursday, March 31, 2011

Thursday Trigger for Kraft Outlet

Today's Thursday Trigger at The Kraft Journal is for our current "Flowers" challenge and is a birthday card I created using patterned paper and embellishments by Crate Paper. The card also features a small shipping tag from the Designers Special Natural Tag Assortment  that I stamped with one of the crown images from The Tweety Jill Journey to France stamp set and then tied up with a natural twill bow. All of these highlighted products are available for purchase from Kraft Outlet.


I created this card from a 5 x 12 inch piece of patterned paper that I folded to create a 5 x 5 cardbase. The additional two inches of patterned paper I folded again to create some interest in the inside of the card (an idea I got from a current issue of Papercrafts magazine).


I used my circle punch to create a cut out that allowed me to stamp the sentiment for the inside of the card as well. A small rubon flower (also Crate Paper) helped keep the "Flower" theme flow from the outside to the inside of the card.

Don't forget, you still have plenty of time to enter our "Flowers" themed challenge. Simply post your projects before Sunday April 3, at 6:00 p.m., Eastern Time to be eligible to win our prizes. You can find the current challenge by clicking on the link located in the upper right of our sidebar.  Don't forget to include either Kraft cardstock or products purchased from Kraft Outlet on your projects per our challenge guidelines!  We're really looking forward to seeing what you create!

Monday, March 28, 2011

Make it Monday with Kraft Outlet

A new challenge opens today over at the Kraft Outlet's official blog, The Kraft Journal. You have until Sunday April 3, at 6:00 p.m., Eastern Time to enter your project in our "Flowers" themed challenge to be eligible to win some nice prizes, like blog buttons, store vouchers and even a chance to be featured at The Kraft Journal.


I created a couple of cards for this week's challenge one that I am posting today and you'll see a coordinating card from me on our Thursday Trigger post as well.  I also made an adorable matching gift bag (all created for my youngest daughter's 19th birthday... but while the bag was adorable, the photograph of it WAS NOT...so no picture to post on that...drat!). At any rate, the "Flowers" theme inspired me to use patterned paper (Crate Paper) with a bold floral motif. The card base and an accent border are both cut from Brown Kraft Cover Weight Paper . That pretty little crown stamp is from the Tweety Jill Journey to France Stamp Set. I also incorporated Red and White Baker's Twine for the outside of the card and used a Card Sleeve Envelope to hold a gift of money for the birthday girl (because what teenager doesn't like to get money, right?). I actually created this particular card for Cait (my middle daughter) to give to the birthday girl. Cait wanted to give Cydney money for her birthday to help fund a trip Cyd is taking to Flordia in a few months.


I hope you'll have time to hop on over to The Kraft Journal and check out the other Designer inspiration pieces for this challenge...and then get on into that craftroom and create something to share with us. You'll find the link to the challenge right here.

Sunday, March 27, 2011

O My Crafts and Kristina

Sometimes you wake up to something that just gets your day started off on the right foot.  The other day, a friend and fellow crafter (thank you Regan) sent me a copy of an email she received from O My Crafts.  The email was O My Crafts' recent promotional e-newsletter which just so happened to feature one of my favorite cards I made for the Imaginisce Berryilicious Release Party. They used the card to promote one of my favorite Imaginisce tools too... the I-Rock.


You can see the entire e-newsletter at this link right here.

On another note, my sweet Kristina flew back home yesterday afternoon and is back with her family safe and sound.  We all (especially me!) loved having her here in Michigan with us (and the 10 days just FLEW by!)... we miss her already (sniff...sniff)! I gotta tell you too....that girl can COOK! We ate like royalty while she was here (the nights she cooked anyway!!) and I just have to say she makes the BEST meatballs and homemade spaghetti sauce EVAH!! :-)


Saturday, March 26, 2011

I simply adore how beautifully the new Silver Stackers dies (silver in color) combine with Cheery Lynn Designs Stackers Nesting dies (purple in color) to create perfectly spaced layers for papercraft projects.  They make creating cards so fun and easy and today, I'm going to show you how to use Cheery Lynn Designs Classic Circles to create this clean and simple masculine card.

For this project I used both the Circle Classic Large Stackers Nesting Dies and the Silver Stackers Circles to create the large circle for the middle of this 5 x 5 sqaure Birthday card and the Small Classic Circles Nesting Dies and Silver Stackers to create the small layer circle under the button.


Directions:
  1. Create a 5 x 5 cardbase with Core'dinations Whitewash Collection cardstock.
  2. Sand edges of cardbase with Sand It Gadget
  3. Cut 4 3/4 x 4 3/4 square of patterned paper (I used Cosmo Cricut's new patterned paper from the Salt Air collection) and adhere to cardbase.
  4. Die cut Core'dinations cardstock from the second largest Classic Circles Large Nesting Dies and sand edges.
  5. Die cut patterned paper from the second largest Silver Stackers Classic Circles dies and adhere to larger circle and then cardbase.
  6. Cut piece of Core'dinations cardstock to fit front of card and emboss with XL Damask Embossing Plate. Sand embossed image with Sand It Gadget.
  7. Stamp sentiment and adhere to card front as shown.
  8. Die cut Core'dinations cardstock from second largest Small Classic Circles Nesting dies.
  9. Die cut white cardstock using Small Silver Stackers Classic Circles Nesting dies (2nd largest die in set) and adhere to larger circle with Pop Dots and card front with adhesive tape.
  10. Stamp wreath onto white circle.
  11. Tie button with twine and adhere to circle.
  12. Attach Imaginisce Hot Rocks with I-Rock tool.
 Note: Stamps are from Papertrey Ink

Visit the Cheery Lynn Designs blog today and every day for more ideas and inspiration from Cheery Lynn Designs!

Friday, March 25, 2011

Happy Birthday to my "Baby"!

Today my "baby" turns 19 years old, Happy Birthday Cyd (aka Squid)! We celebrated the event last evening as Miss Cydney has a big party planned with friends today.  For our family event however, my middle daughter Cait made the cake (while Kristina and I went shopping in Rockford...thanks Cait!).  And once the party got started, my grandsons were only too happy to help Aunt Cyd blow out the candles (after we all sang to her of course)...


However before cake, everyone ate Lasagna (Cyd's dinner request)... and Rahja was only too happy to clean up some plates.


Jad (a name invented by my daughters John + Dad = Jad...my significant other on the left) and Dad (the father of my children on the right) helped in the celebration in their own special styles...


As did Kristina and Heidi (one of our canines)...


 and a few of Cyd's close friends too...


a lovely evening of celebration all in all... for a lovely young woman... Happy Birthday Baby! :-) (and as you can tell from this photo... I have yet to decide on curtains or valances for the windows since the recent paint job inside my house... oh well! :-) )

Thursday, March 24, 2011

FINALLY, Remi DeVil Sleeps...

We are always so DELIGHTED when "little" Remi DeVil FINALLY takes a nap... all that running, jumping, playing, chewing of shoes and wall trim tuckers a little girl out...

Thursday Trigger for Kraft Outlet

This week's challenge at The Kraft Journal (the official blog for Kraft Outlet) is "Oh Baby, It's Spring" and for today's Thursday Trigger post I have a quick and easy "Baby" card to share with you featuring Brown Kraft Cover Weight Cardstock, Earthy Hemp Cord and 7 Gypsies Seam Binding all available for purchase at the Kraft Outlet.


You'll have until Sunday March 27 at 6:00 p.m., Eastern Time to enter your project into the challenge. Your entry makes you eligible to win prizes, features and blog buttons too!  I hope you join us and to learn more about this and our other weekly challenges at The Kraft Journal check this link right here.

Wednesday, March 23, 2011

Rock, Paper, Scissors Blog Hop with Imaginisce I-Rock Tool

If you'd like a chance to win a great I-Rock prize package and see lots of I-Rock Pizazz inspiration too...check out this link right here today!

Tuesday, March 22, 2011

GCD Studios Spring Spin-off Contest with Prizes

This contest is a spin off contest for the Brave Girls Camp Contest and it runs through April 1, 2011.

Rules:

1) create a project (it can be anything you want), but keep the theme "spring" in mind.

2) You must use the chipart tool on it somehow (if you don't have it, it can be found in many stores)

Michaels
HSN
Artsy Findings

3) submit your projects by April 1, 2011 to: Chipart_contest@gcdstudios.com and here is the prize for our Spring Spin off Contest with Fiskars.

The value is over $200 in punches, paper, Chipart tool, trimmers and much more :)
and here's the prize for the actual Brave Girl Contest... full details are available at the GCD Studios website right here.

Saturday, March 19, 2011

Cheery Lynn Designs and a Kraft Outlet Lunchbag Kraft Paper Flower Tutorial

I recently learned a new paper flower techinque using Lunch Bag Kraft paper from Aphra Boyler's tutorial right here.  I loved her flower design but wanted to tweek it just a little bit so that I could incorporate my beloved Cheery Lynn Designs dies to re-create my own flower for this little Easter card.

Flower Created Using Cheery Lynn Designs Little Stackers Circle Nesting Dies

Supplies and Tools you will need to create this card include:

Little Stackers Circle Nesting Dies (the first three smallest dies in the set) 
Paper Towel
Hole Punch
Decorative Brad
Tattered Angels Glimmer Mist (Antique Linen)
Green Cardstock (for leaves), Pink and Rustic White Cardstock for card base mats
Easter Graphic printed on Rustic White Cardstock from The Graphics Fairy

From Kraft lunchbag cardstock, die cut three each of the smallest circles from the Little Stackers Circle Nesting Dies. Also die cut another 13 circles of the third from the smallest circles of the Little Stackers Circle Nesting Dies.


Lightly mist all the circles with Tattered Angels Antique Linen Glimmer Mist and blot dry with a paper towel.


To create flower center, emboss three each of the first three smallest Nesting circles using the Large Rectangle Stitcher Plate.


Crumple up circles into balls and then straighten them and layer on top of each other with the largest toward the bottom of the stack.


Punch hole through entire stack of circles (in the center) and attach a decorative brad to hold them all together.


Set aside flower center. Use one of the other 13 circle die cuts as your flower base and roll each of the other 12 circles into cones. Attach to the circle base with glue.


Attached the cone petals with glue as shown until the entire base circle is covered in cone petals.


Adhere flower center to petals with glue.


Hold flower in palm of hand and squeeze to scrunch up flower petals and add more dimension.


Pull and arrange layers until you are satisfied with the way the flower looks and attach to your next project as desired with Dimensional Leaves die cuts.


For the card base I cut a 5 1/2 x 4 1/4 inch card base from Kraft Cardstock and added mats of Pink and Rustic White cardstock that I cut using the Card Makers Stackers Nesting Dies (the first two largest dies in the set). I adhered the flower and an Easter themed graphic from The Graphics Fairy to complete the card.

Join us again at the Cheery Lynn Designs blog for another great product featuring your favorite Cheery Lynn Designs dies.

Friday, March 18, 2011

Kristina's in the House!

She's here! My bestie gal pal and co-creator of our challenge blog Papercraft Star, Kristina Harmon (of Kristina's World blog) arrived safe and sound here in Michigan yesterday to spend the next 10 days stirring up some trouble with me!

After I picked her up at the airport, we went out to lunch, stopped at Target for a bit of shopping (because I never get out of Ionia and had to see what a REAL store looks like while I was in Grand Rapids) and then we departed the big city for my small-town home.

Kristina hasn't been here to visit since this past summer, so she had a new member of our household to meet... Remi DeVil (our 7 month old Great Pyrenees).


Remi was a bit shy at first (NOT!)....


and apparently wanted to make sure that her and Kristina saw "eye-to-eye" about how things were gonna be during her visit with us...


before she decided she loves Kristina just as much as the rest of us do!

I'm thinking these photos are a scrapbook page just waiting to happen...don't you?  Now if I can just tear Kristina away from Remi's loving embrace long enough to get her down to my craft room to start working on it!

Thursday, March 17, 2011

Happy Saint Patrick's Day!

Happy Saint Patrick's Day to all of you and with that said...I'll have you know that along with my Thursday Trigger post for this week's "Saint Patrick's Day or Green" challenge at The Kraft Journal, condolences (grin) are in order for me... BECAUSE...  fifty (yes... the BIG 5-0) years ago today I was born on Saint Patrick's Day. 

I'm told that the nurse (who happened to be of Irish heritage) wasn't too happy about the fact that my parents planned to name me Elizabeth (and not the nice Irish name of "Patricia").  I gotta admit however that not unlike how I am about a lot of things these days, I don't remember a thing about that day so many years ago... but I do remember that we've got a GREAT challenge going on this week at The Kraft Journal and I hope you play along with us! 

In fact, you have until Sunday March 20, at 6:00 p.m., (Eastern Time) to enter your challenge project for a chance to win a beautiful Top Three Award button for your blog, a chance for your project to be showcased on our Feature Me Friday post and/or a chance to win a $15.00 gift voucher to Kraft Outlet.

Being Saint Patty's day and all, I decided I should create a card celebrating this particular "Wearin' of the Green" occasion, but alas, I'm a wee bit low on products for this day (believe it or not), so I grabbed up my one and only stamp set and created this card.


I paired by favorite Kraft Lunch Bag cardstock with Ripe Avocado (Papertrey Ink) cardstock that I stamped with that one and only stamp set I was telling you about (also PTI by the way).  I then cut another piece of Kraft paper, embossed with a Collage (Tim Holtz) embossing folder and added ribbon, pins, green crystals and an appropriate image (from The Graphics Fairy) to create today's card in celebration of this day! 

While I can't say that I am sure I am 100 percent excited about this milestone birthday I'm having today... I can say that I am TOTALLY excited about the fact that my gal pal Kristina Harmon (and fellow Designer here at The Kraft Journal and Papercraft Star too) will be landing at an airport not far from my one-cow town today to spend the next 10 days at my home.  Kristina is like the "baby" sister (I say baby because the girl hasn't even hit 40 yet!) that I never had and I'm over the moon excited about all the time we'll have together to talk, laugh, craft, eat, DRINK and be merry! I sincerely hope you'll all be enjoying your day today as much as I will be ... after I pick Kristina up from the airport that is!

Tuesday, March 15, 2011

Happy News from GCD Studios!

I am wildly excited to share some good news that I got last Friday... but you know, I had to keep the secret on the down low until the official announcement was made on the GCD Studios blog today!  I've been invited to join the GCD Studios Design Team for the 2011-2012 DT year and I am just tickled pink to have this wonderful opportunity to work with so many talented Designers! You can meet all the Design Team for GCD Studios right here!

Monday, March 14, 2011

The end of the paint can...

If you visited me here at the blog last Tuesday... you'd know that since then I have been painting the inside of my house.. most of the main floor anyhow.  Today... I finally arrived at the bottom of the 5 gallon paint can and finished up with part of a one-gallon can (you don't need much paint when you are painting white over white).  I am officially done painting... painting and more painting, of white, white and more white! Well, done until the drywall sanding in our Master bedroom is complete... and then, I'll have to start all over... but at least THAT room won't be painted white (as much as I love white... I can honestly say I am rather over it being on the walls, in my hair, on my clothes.... even on the bottom of the dogs and cats feet!.,). I painted, the computer room, the kitchen, (including the cupboards) the dining room, the living room, the small bathroom, the hall AND my grandson's bedroom....  and I had help...kinda, sorta...


These are just a few of the MANY furry little culprits that spent the last seven days walking in my paint tray, standing on top of freshly painted cupboard doors as I had them laid out on plastic to paint and brushed up against freshly painted walls....over and over again...


consequently, the kind of help they offered wasn't the kind of help one would hope for as they've been a pain in my paint roller for the better part of the week... and I'm quite certain if you look closely at some of the walls...they have some mighty fine pet hair painted right into them...

I'm thinking I could have saved myself a bundle on paint rollers if I had instead just dunked a cat or two into the paint can and used them to cover the walls... :-)

Now that the walls are painted however,  I'm having a hard time getting myself to hang much back up on them, I think perhaps I just need a bit of time to enjoy the fact that they are fresh and clean... still what I lack in the way of art to look at on the walls I now have elsewhere... so feel free to stop on over and see the nice little white kitty prints I have running across my kitchen floor...now that's unique art if I do say so myself! :-)

Saturday, March 12, 2011

Luck of the Irish with Cheery Lynn Designs

Saint Patrick's Day is just around the corner... AND...it just so happens that on that day I will also be celebrating the BIG 5-0! (feel free to leave your condolences here... ha-ha).  Actually, I'm only semi-weirded out about the whole concept of being eligible to join AARP... mostly I'm just glad I made it this far which I think I can credit to the fact that I have heard the secret behind living a long life... keep breathing as long as you can. :-)

At any rate, if you can believe it, despite the fact that I am a Saint Patrick's Day "baby", I have NEVER (never, ever, ever) before created a Saint Patrick's Day card... so after 50 years (almost)... I decided it was high time I did so and what better way to create my first Irish-themed card than to use some Cheery Lynn Designs dies and embossing plates to do so, right!!?!


My biggest challenge in creating this card was the fact that I don't really own any papercraft products that lend themselves well to creating a Saint Patty's Day card, except for one tiny little stamp set I bought a year ago (when I thought I should finally make one after 49 years...but didn't).  So I had to sort through my stuff and come up with something "green". I managed to round up some green ribbon, bling, ink and a bit of patterned paper featuring green too.

I started this card by creating a 5 1/2 x 4 1/4 card base with cream cardstock. Then I cut a piece of patterned paper to 5 1/4 x 4 inches and embossed it using the Lattice1 die. I've talked about the Lattice1 and Lattice2 dies before, how I love them because you can choose to either emboss with them or actually die cut with them as well. For this project I decided to feature both aspects of this die, so I also used it as a die cut with more cream cardstock and adhered a strip toward the bottom of the card. I cut the Polka Dot paper with the largest Classic Large French Flair Nesting Die and trimmed it to fit the card front as shown.


I used the Circle Little Stackers Nesting Dies  to cut and layer the cardstock I used to stamp the sentiment. These small circle nesting dies are perfect for stamping and layering, and now with the recent addition of the newly released Silver Stacker Layers it's so easy to find the perfect circle size to match all of your round stamps! Bravo Cheery Lynn Designs!

All that was needed to finish this Irish-inspired card was some bling from some green crystal Hot Rocks adhered with the Imaginisce I-Rock tool, a stamped sentiment and some ribbon. I have now officially created my first St. Patrick's Day card and with the help of Cheery Lynn Designs dies and embossing plates it was so easy too!

I hope you have a safe and happy St. Patrick's Day celebration and remember to stop by Cheery Lynn Designs blog every day for a new inspiring project using Cheery Lynn Designs products.

Thursday, March 10, 2011

Thursday Trigger for Kraft Outlet "Spring Fling" Challenge

This week's challenge at The Kraft Journal (official blog for Kraft Outlet) is "Spring Fling" and today I've created a spring inspired card with a bi-fold twist for my Thursday Trigger post over there,... a final bit of inspiration to get you geared up to enter your "Spring Fling" project.

Just as a wee reminder, you've got until Sunday evening at 6:00 p.m., to enter at this link right here. You also have a chance to win a $15.00 Kraft Outlet store voucher in our random drawing this month and the more challenges you enter, the more chances you have to win so we hope you'll join us in March!

For this project, I knew I wanted to pair some yummy Lunch Bag Kraft Cardstock from Kraft Outlet with some Jillibean soup spring-themed patterned paper, but I also wanted to do a little something different with the card base... to capture the "fling" side of our challenge.

The cardbase is a twist on a bi-fold style-card that I found in the November 2009 CardMaker Magazine.


Just in case you don't have that copy of the magazine on hand, I'll give you the instructions to create this card base.

Cut an 8 x 4-inch piece of Lunch Bag Kraft Cardstock; with long side horizontal, score a vertical line 2 3/4 inches from left end. Fold flap to the right.

Fold a 3 x 8-inch piece of patterned paper in half, forming a 3 x 4-inch top-folded card. Slide card over right end of Kraft card base. Adhere backs together. 

After finishing the entire card, the patterned paper top-folded card attached to the Kraft card base opens as shown below.


To create the inside sentiment to this card, I layered Lunch Bag Kraft Cardstock that I die cut and stamped under die cut patterned paper and a Brown Kraft Label that I stamped as well.  I also stamped pale pink polka dots on the front of the card and attached a die cut flower. 

When the card is opened fully, it looks like this...


and (just so that you can see it again without scrolling back) when closed fully, it looks like this...


The Design Team at The Kraft Journal is looking forward to seeing what you create for our "Spring Fling" challenge. Your entry not only provides you with a chance to win a store voucher, you also have a chance to be selected as one of our Top Three for this challenge or have your project showcased on the blog.

Thank you for stopping by today and don't forget to hop back in tomorrow for over at The Kraft Journal for our "Feature Me Friday" post when we showcase designs created by you!

Other supplies used to create this card not mentioned above include:
Flower Die (Sizzix)
Cardstock, Stamps, Label Die Cuts and Ribbon: Papertrey Ink
Ink: Stampin' Up
Pearl: KaiserCraft

Wednesday, March 9, 2011

What I'm doing this week...

Painting... but not that fun kind that includes paper and glue.

This week I've got lots of projects on my hands.  It started with a bathroom renovation (that is two years in the making)...

It included a total gutting of the entire Master bathroom and bedroom.... and two new windows where there where none before (let in the light!!!).


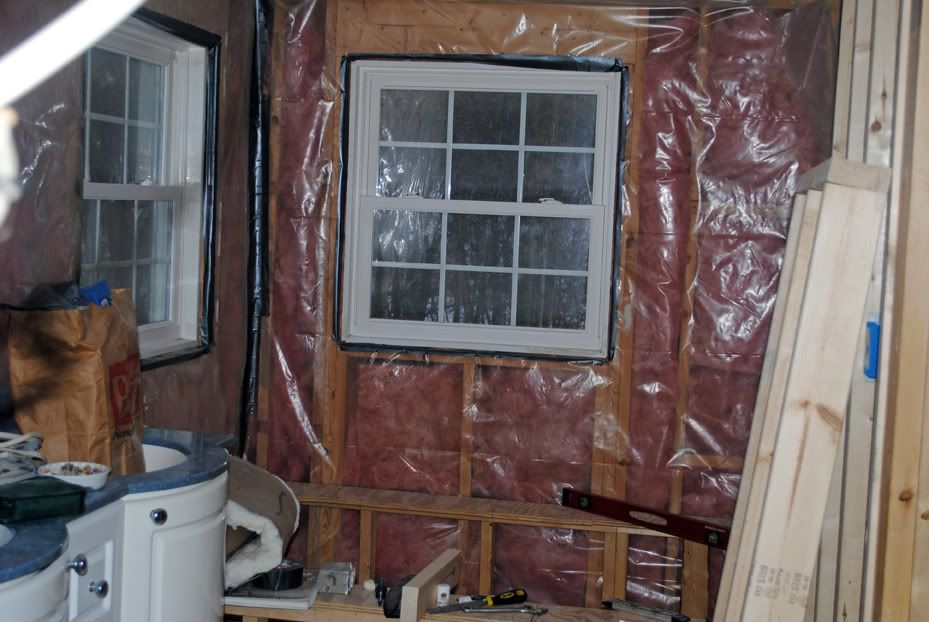
New Windows in Master Bath

The renovation also includes a double shower, a huge whirlpool tub, which my honey just HAD to have... it's more like a swimming pool...and for the record has been in our garage for the entire winter (you know, where my vehicle SHOULD have been)...

The big double shower meant however that the door and part of the wall between the living room and our Master bedroom had to come down to bring the shower in... and then put back up and looking not so pretty...


The door frame and wall that came down...and went back up

Because my home is a modular that I had set on a basement, the walls are panel board (yuck!)... so of course that had to be torn down and drywall put up in the Master bedroom.

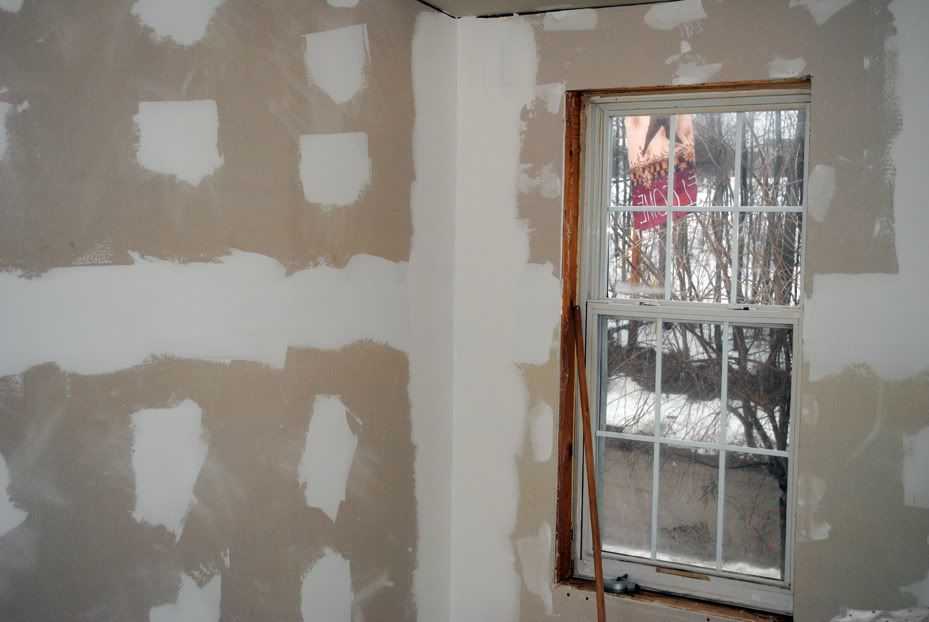
Master bedroom with new drywall

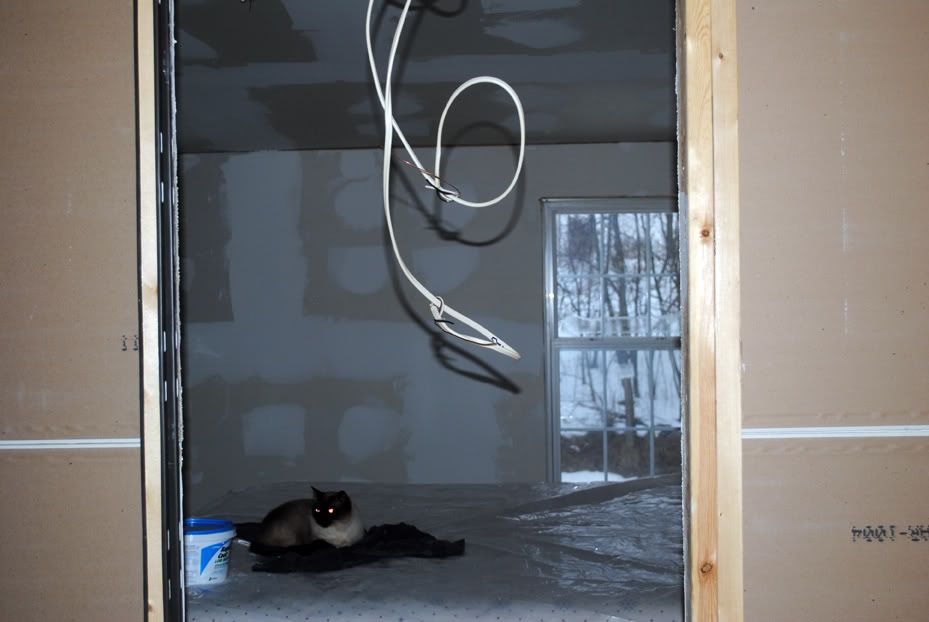
Pocketdoor Frame from Master Bath into Master Bedroom
And... since I had to paint that wall in the dining/living room anyhow... (that's our next project to drywall, but not until the bedroom and bath are finished...and who the heck knows how much longer THAT will take).
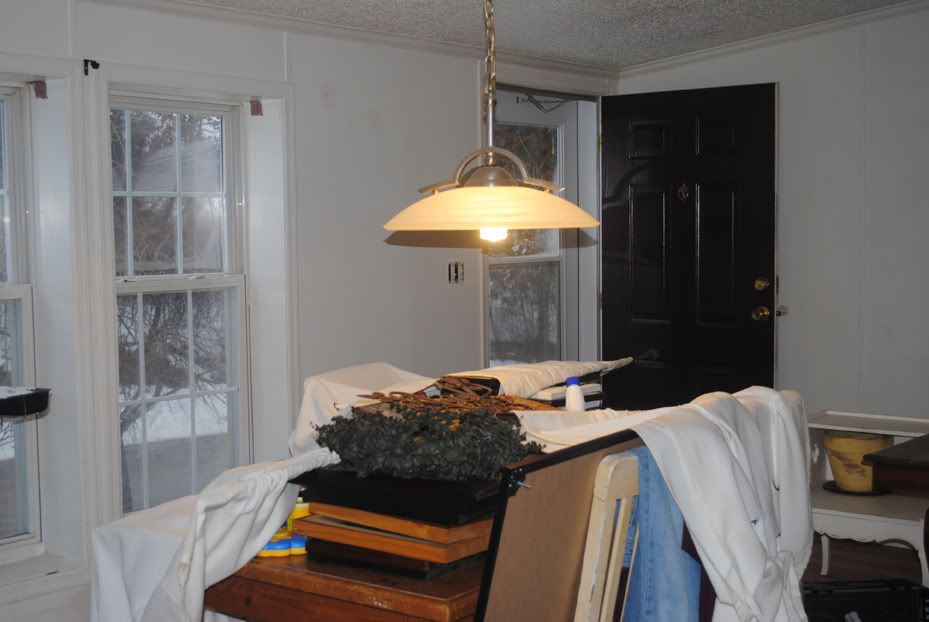

Dining Room
...and since my computer room, kitchen, dining and livingroom are all open to each other, that meant there would be no real place to begin or end the painting, especially since I figured if I was painting anyhow, I might as well do the ceiling...and take everything off the wall, spakle up the holes and change the wall decor around too... (thus the pile of stuff currently on my dining table above). This...the reason I have a lot of this...


Since my grandsons have been otherwise "placed" for day care the last two days, I've made it through the computer room and kitchen (not including my cupboards...that actually REALLY need to be painted too...but geez, I can't do EVERTHING all at once... or ummm, can I?) :-) and I am currently painting in the dining room.

Except for this moment when I stopped to blog...


with the help of one of the cats. :-) At least this room is painted...never mind that everything is still piled in the middle of the room..... AND Kristina is scheduled to fly in in just over a week!!!  Nothing like a little pressure to get you to get your house back together before company arrives! :-)

With all this work going on around here... you'd think that a few of the beings that ALSO live here could be helping out a bit.... but they just keep trying to find a place to lay around (which is much harder when the furniture is all piled up (even though the dog beds are free and clear!).


If you look closely on the loveseat however, Heidi, Molly and Marley managed to pile themselves up on the one open spot and left poor Remi to search for a spot on her own... the poor dear.


Okay... so back at it.  What are you up to this week?
Related Posts Plugin for WordPress, Blogger...