Saturday, January 29, 2011

Heart to Heart

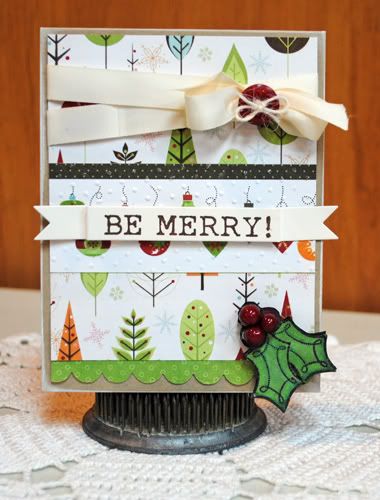
I'm excited to share a card I created using the new Heart to Heart Doily and other fabulous dies from Cheery Lynn Designs, including a sneak peek at the new English Doily that makes its' debut at CHA in California this weekend!

Because Valentine's Day is drawing near, I've been in the mood for creating some lovey-dovey cards and using the Heart to Heart Doily is just the die to inspire a mushy card! 


To add to the overall romantic feel that I wanted to express with this card I also incorporated some of my other favorite dies.  The border at the bottom of the card is cut from the Embossed Hearts Scalloped Border Die, the leaves that I used with my hand-cut flowers are from the Small Dimensional Leaves 1 set of dies and I used the Foliage embossing plate to create that pretty embossed effect on the pink card stock that goes across the center of the card. A quick swipe with some Antique Linen Distress Ink and the embossing really pops... I love that!


The close-up above provides you with an opportunity to get a really good look at the beautiful dimension and intricate cuts achieved using the Heart to Heart Doily die cuts. 

And...while I am on the subject of the intricate cuts the Heart to Heart and other new doily dies create, I'd like to share a little tip with you (because I just know you are going to want to own each and every one of the Cheery Lynn Design doilies)! The intricate details of these dies incorporate lots of tiny-little die cuts that don't all fall out right when you take them out of your tabletop die cut machine. To remove those pieces quickly (and easily), tear off a piece (about three fingers wide) of removable tape and sticky-side down, press it onto the die cut. When you lift up, off come the little pieces (yay!) (Alternately you may use a paper piercer or tweezers but that take just a tad bit longer to poke out the cuts that don't fall out automatically).  For more tips and tricks using Cheery Lynn Designs you should check out these videos.

Thanks so much for stopping by today, join us again tomorrow over at the Cheery Lynn Designs blog for more projects using Cheery Lynn Design's magical dies!

Friday, January 28, 2011

Holy-Moly...

I was sorting through the vast amount of cards I have created (I really need to start giving more of them away!)...and came across this Mother's Day card that for some reason I never posted on the blog (or gave to my mother obviously!).  In fact, it's been SO LONG since I created this card that I can't remember what papers I used... (maybe you recognize them?).  I do remember that I used a sketch that I found in one of my bazillion or so papercraft magazines that I hoard ... errr, save. :-)


I also know that the ribbon is satin Raspberry Fizz (from Papertrey Ink)... and the sentiment is from Papertrey Ink as well and oh, oh, those pearls are Hero Arts. But the paper... grrrr, no clue.

At any rate, I should consider this my lucky day... I mean, I FINALLY have a card in my pile that I know EXACTLY who I can give it to.... but shhhhhh....don't tell my mom, it's a surprise. :-)

Thursday, January 27, 2011

Pearlized Dried Flower Thank You Card

Way, way back in December 2009 Jennifer McGuire featured a video on her blog right here.  I loved the technique and even purchased the Hero Arts stamped that she used in the video and created a number of cards similar to that which is in this video. 

Fast forward to present day, I was sorting through some old stamps from my Design Team gig at Just for Fun Stamps and came across a dried flower stamp that I hadn't ever used... perfectly suited for this pearlized technique. (Unfortunately, the pearlized-look is impossible to see in the photograph...grrrr, but I think you can see how it actually looks if you watch Jennifer's video.)

At any rate, using that technique and the Just for Fun stamp, I created this card...


I can't tell you how disappointed I am that you can't see the pearlization...but I'll share with you how I created the card...and if you try it out for yourself, you'll see just how beautiful this technique really is!

1. Create base of card from Vintage Cream Cardstock 4 ½ x 5 ½

2. Create card front from Vintage Cream Cardstock 4 x 5 ¼

3. Ink edges of card front with “Scattered Straw”

4. Place stamp onto acrylic block, stamp side up on your work surface. Press “Scattered Straw” ink pad onto Dried Flower stamp ensuring all areas of the image are covered with ink. Then separately dab “Broken China” and “Peeled Paint” inks randomly onto top of stalks of rubber stamp.

5. Leave the stamp face up on your work surface and spray stamp lightly with Glimmer Mist allowing mist to pool onto stamp.

6. Stamp image onto card front and let dry.

7. Stamp sentiment in “Coffee”

8. Adhere to card base.


9. Adhere pearls.

That's all there is too it and the result (in person) is so lovely!

Supply List:

Cardstock: Papertrey Ink: “Vintage Cream”
Stamps: Just for Fun Rubber Stamps: “Dried Flower Stalks” (item G3434), Papertrey Ink: Vintage Picnic Stamp Set: “Thank You”
Ink: Ranger: Tim Holtz Distress Ink: “Scattered Straw”, “Broken China”, “Peeled Paint”, Ranger: Archival Ink “Coffee”
Embellishments: Tattered Angels: Glimmer Mist “Pearl”, Hero Arts: Pearls “White”

Tuesday, January 25, 2011

Cuttlebug Quilling Kit and Tuesday Take Challenge

Back in December I purchased all three of the new Cuttlebug Quilling kits that are available... and when I saw this week's sketch for the Tuesday Take Challenge at Sketches in Thyme, I knew I wanted to use one of the kits to create a flower for the card I made using this sketch.

For this card I gathered together cardstock, patterned paper, ribbon and stamps from Papertrey Ink. Some Hero Arts pearls, a cuttlebug folder to emboss the white cardstock behind the Cuttlebug Quilling kit flower and ta-da, a card was born.

Oh geez, I almost forgot...that little banner that the sentiment is stamped on is a die from Papertrey Ink as well. Now, what I really want you to see though is this flower and leaves close-up.... take a look...


Such a fun flower...and so dang easy with the Cuttlebug Quilling kit too... you can buy them for yourself right here. This particular flower is from the Chrysanthemum kit.

Now I'd love it if you hurried on over to the Sketches in Thyme blog... you don't want to miss the other Designer reveals for this sketch, really you don't! Then, of course, I want you to get in that craft room of yours and whip up something pretty to join the challenge along with us... because I can't wait to see what you design too!

Sunday, January 23, 2011

Finally... Cait is 21!

Exactly 21 years ago today, a bouncing baby girl (weighing in at a healthy 8 pounds 13 ounces) with peach fuzz on her head, a tiny little face and rather big (but ever so adorable) ears was born... we named her Caitlin Jane and we were pretty dang sure this was indeed one of the finest babies ever brought into this world.  It seems like only yesterday that I held her in my arms for the first time and now.... sniff, sniff, she's 21! Whew that time went by in a wink!

At any rate, I'm guessing that of all the birthday presents she opens today, none are going to give her the same thrill that this one little "gift" from Secretary of State gave her ... a brand new driver's license (you know the kind that can get you into the bar to buy your very own drink)... geesch, Michigan says she's all grown up, but to me, she's still just my baby girl (only slightly taller)...


Happy 21st Birthday Caitlin Jane!

Saturday, January 22, 2011

Happy Fall! (kinda-sorta)...

Okay, Okay, so it's not REALLY Fall.  But I couldn't help myself... I just HAD to create a Fall card using the brand new Dimensional Leaves dies from Cheery Lynn Designs.  Granted these leaves are beautiful to use on all your projects, no matter what the season, but I'm from Michigan and whenever I see a Maple leaf that isn't attached to a tree (even if it happens to be a metal dimensional die), I think of Autumn (if you've never been to Michigan during the Fall Color Tour season, you've just GOT to plan a visit... it is so totally gorgeous here during that time of year!) 


To create this card I pulled out some cardstock in shades that reminded me of Autumn. I started with a basic 4 1/4 x 5 1/2 card base. I cut the mats (rust, brown and white) using the Card Maker's Stacking Nesting Dies that are perfectly sized to make matting your cards so easy...and they give the mats an embossed edge that I just ADORE.  Then I cut a variety of leaves from the Dimensional Large Leaves Die Set 1 and Die Set 2. I adhered some leaves directly to the white mat and popped a few up with pop dots to create more dimension. Some ribbon, a Tim Holtz note pin and a stamped sentiment complete the card. 


To get the fabulous dimension from the dies with my Cuttlebug, I also used the Metal Adapter Plate (aka CuttleHUG) between my A and C plates. The dimension created using these dies is gorgeous don't you think?

Thanks so much for stopping by the blog today.  Now hop on over to the Cheery Lynn Designs blog and check out all the other fabulous projects created with Cheery Lynn Designs dies!

Tuesday, January 18, 2011

Imaginisce Animal Crackers Release Party Day Two!


It's day two of the Imaginisce Animal Crackers Release party! Visit the blog today and you could win the complete Animal Crackers collection and...

The new D-Stress Tool!

For our Day Two of the release party, the Imaginisce blog is featuring a big 'ol pile of scrapbook layouts by the 2011 Imaginisce Design Team... here's one you'll see over there.

The photos on this layout are back from winter 2007. My grandson Jack, now 3 1/2 did not take kindly to this layout... upon seeing it he exclaimed, "Hey Nanie, why you put that beard on me?" When I told him that I thought it was cute, he said, "Well, I don't like it" and stomped away.  Since when did he become a scrapbook layout critic anyhow? :-)

At any rate, whether Jack likes my layout or not, there's lots more inspiration over at the Imaginisce blog today.  I urge you to visit, but not just for the prizes, you'll have a chance to see that this collection isn't just for kiddie layouts...so hop on over there to check out all the inspiration and get in on the chance to win!
And don't forget to visit The Kraft Journal and Papercraft Star as well to win even more prizes!

Monday, January 17, 2011

Microwave Popcorn Slider with Imaginisce


As I promised earlier today on this post that included my Imaginisce Animal Crackers Release Party project, I am posting this tutorial so you can create your own Microwave Popcorn Slider like the one I used in my Movie Night gift set. Don't forget that the Imaginisce Animal Crackers Release Party is going on today through Thursday over at the Imaginisce blog, be sure to stop by every day this week for a chance to win some really awesome prizes!

This tutorial is also availabe for download in PDF form! Click here to download the document.


Tools Needed:
Scoreboard
Paper Cutter
Scissors
3/16 hole punch
Border Punch (I used the EK Success Bracket Edger)
Centering Ruler
Pencil and Eraser
Eyelet Tool (Crop A Dile)

Supplies Needed:
Bag of Microwave Popcorn
24 inches of ribbon
6 x 11 inch piece of white cardstock
5 ¾ inch by 11 inch piece of patterned paper
2- 3/16 eyelets
Embellishments

Products I Used for This Tutorial:
Patterned Paper, Die Cuts, Chipboard and Ribbon by Imaginisce “Animal Crackers” Collection


Step 1: Using your scoreboard, score both your cardstock and your patterned paper at the following: 1 ½, 2, 6 ¼ and 6 ¾ inches


Step 2: Border punch both longs sides of your patterned paper.


Step 3: Carefully line up your score marks and adhere patterned paper to cardstock.


Step 4: With a centering ruler find the center between the 2 inch and 6 ¼ inch score marks. Make a make small pencil mark there. Then using your ruler and find the center between the 6 ¾ inch score mark and the end of the paper and mark it with the pencil.


Step 5: Punch a 3/16 inch hold and attach eyelet. Then fold paper at score marks and adhere together as shown below. Erase pencil marks if needed.


Step 6: Thread ribbon from outside slider as shown.


Step 7: Continue to thread ribbon across slider and through second eyelet hole as shown.

Step 8: Insert popcorn package into slider pushing the ribbon down with the package. The ribbon will hold the popcorn package inside the slider.


Step 8 continued: The loop as pictured above at the bottom of the slider is what will hold the popcorn package inside the slider.


Step 9: Pull the ribbon up tight enough to hold the package inside the slider, ensuring the entire package is inside the slider. Cut extra ribbon from bow tails.


Step 10: Embellish slider as desired.

These sliders are great on their own to give as an inexpensive but thoughtful gift... but they are even better if you add them to an entire "Movie Night" gift set like you saw in my last post.


Happy Crafting!

Imaginisce Animal Crackers Reveal Party and Prizes, Prizes, Prizes!

Starting today through Thursday, the Imaginisce  blog is hosting the big reveal party for the new patterned paper collection, "Animal Crackers". All of the Designers have created projects using the new collection to inspire you and you can join in on the party by visiting us at the blog, and enter to win very generous prizes (if I do say so myself). 

I've been fortunate enough to have seen many of the projects created using this line... and I have to tell you that I am just totally BLOWN away by the unique and inspirational creations of the 2011 Imaginisce Design Team. But, you've just gotta see for yourself... so go here and have a look-see...and that's just today's reveal, like I said, we'll have new projects listed every day through Thursday!

I created three different projects so far with the Animal Crackers collection and today I'm going to share my favorite, the "Movie Night", gift set.


This set includes, a gift bag with attached gift card, a DVD with decorated cover, a microwave popcorn slider and two bottles of soda pop (okay, okay, it's Diet Pepsi) with bottle covers.

Later today, I'll show you exactly how to create a microwave popcorn slider like I did in the photo above.  Very similar to the Cocoa Sliders I shared just before Christmas... but for now, head on over to the Imaginisce blog and get in on the giveaways!

But wait, before you go I want to also fill you in on a couple of other happenings around our crafty cyber space.  Today is Make It Monday at The Kraft Journal, join in our challenge over there and you could win $20 worth of products of your choice from Kraft Outlet.  You can also win a $25.00 gift certificate to either My Favorite Things or Papertrey Ink from the challenge blog Papercraft Star by becoming a follower... our goal is to reach 1000 followers before the end of the month so we can draw that prize and we're only 30 crafters away from that goal!

Be sure to leave a comment at all three places (and become a follower too why don't ya?), Imaginisce, The Kraft Journal and Papercraft Star... if you wanted you could even tell them that Beth sent you... you know, to make it look like I've got a friend or two! (grin). 

Saturday, January 15, 2011

Memorable Seasons Monthly Sketch Challenge

Every month at Memorable Seasons we sponsor a sketch challenge on the forum.  This month's we've got a fabulous sketch for you, you can look for the January sketch challenge post right here.  I hope you'll play along with us for a chance to win a prize from the Memorable Seasons store!

This layout happens to be the FIRST layout of the year for me. The photograph I chose to scrap is a picture I copied off of my oldest grandson's father's Facebook page (say that three times fast!). Geesch.

Because his father took the photo with his phone in dim light, it wasn't the best quality, but regardless it was one of those RARE moments where Jack was actually SMILING for the camera! I love this photo not just for the smile, but because it also shows Jack enjoying one of his favorite pasttimes back when he was two... putting on Grandpa's boots.


I do believe that I put this sketch together in record time and that was strongly due to the fact that not only did I adore this sketch, I also (with the exception of one sheet of cardstock and the products I used to create the title) used my Studio Calico December kit... thank you Memorable Seasons and Studio Calico!

Friday, January 14, 2011

Papercraft Star Executive Team Reveal and an Imaginisce Project

It's my week to host the Papercraft Star Executive Team reveal for this week's challenge. The challenge is to use a sketch by the talented Liz Chidester and create a project of your choice using her cute sketch as your inspiration. 

I thought it would be fun to combine my project this week with products from Imaginisce. I just recently received a huge box of products to use due to my new position on the 2011 Imaginisce Design Team and I wanted to provide my followers here and those over at Papercraft Star as well an opportunity to see the ever-so-cute Enchanted Collection by Imaginisce.

This card is for my darling niece Mia, just to remind her of how much she is loved by me... and to say that she's beautiful inside and out!


Other products from Imaginisce that I used to create this card include the I-Top, to make that cute matching button on the ribbon flower and the I-Rock tool to add all the sparkling gems. I also heated up my new I-bond cordless glue gun to create the ribbon flower.  It is SO FANTASTIC to have a glue gun that doesn't require you to be near an outlet! 

The die cuts from the Enchanted collection made this card a snap to put together.  I also used my Cricut and the Gypsy Wanderings cart to create the flourishes I added to the ribbon flower and cardstock from Papertrey Ink.

There is still time to enter this week's challenge at Papercraft Star and we can't wait to see what you create with Liz's sketch!

Thursday, January 13, 2011

Imagine Plus Reminisce Equals Imaginisce


Just before Christmas I recieved one of the best presents EVAH (!!) when I was invited to join the 2011 Imaginisce Design Team. All of this week, we will be introducing the newest additions to our team (like me for instance) as well as re-introducing returning members by sharing things you may not know about us.

Along with the introductions, you'll also have an opportunity to win a prize or two from Imaginisce by commenting on and following this blog and then hopping on over to the Imaginisce blog to leave a comment and follow there as well so make sure to head on over to the Imaginisce blog to get in on the action.

Next week we'll also be introducing Animal Crackers, the newest Imaginisce collection, so be sure to stay tuned for that!

Here are the projects I created in 2010 to lure Imaginisce into letting me join the team for 2011, but first I will preface the reveal of those projects by saying that when I applied for the team, I told them about my desire to be a trend-setter in the scrapbooking industry but that for whatever reason the cat fur stuck in adhesive tape trick that I've been using hadn't yet caught on... personally, I think they chose me for the team to allow me the chance to give this new trend in scrapbooking more exposure. :-) What do you think?

Sugar and Spice Layout

Cottage Christmas Collection Gift Set

Cottage Christmas Collection Card

Wednesday, January 12, 2011

In Memory of our Gracie May

In late November I shared here on the blog that we lost one of our dogs, Gracie May to a sudden illness. While Gracie was beloved to all of us here in the family, she was really my middle daughter's dog. Gracie went to all of her doggie training with Caitlin, slept in Caitlin's room... you get the picture.  Gracie's passing was heartbreaking for me personally on two levels; to lose a sweet young dog from our family so unexpectedly and to watch as my daughter struggled with Gracie's loss as well.  As part of the healing process, I created a layout of Gracie for my daughter and afterwards, put it (along with Gracie's collar) in a large shadow box that I presented to Caitlin for Christmas. Because it was a Christmas gift, I haven't shared the layout before today, here it is before I put it together with her collar in the shadow box.


Our Gracie May


Given the circumstances surrounding this particular blog post, I feel like I should also share something on a lighter note as well... if you follow this blog you also know that at the beginning of November (several weeks before Gracie's sudden passing), my daughter Caitlin rescued a young puppy she almost ran over one evening on a back road.  "Remington" or as we call her, "Remi" has had a number of health issues she's had to overcome since her rescue (she came to us, hungry, cold, dirty and covered in small unexplainable wounds).

I'm happy to report that Remi (while struggling with skin issues) is growing by leaps and bounds and has truly become a loved and valued member of our rather large family of people and pets...  here's a recent photograph of Remi taken a couple of weeks ago after my mother stopped by for a visit... Remi decided to use my mother's purse as a pillow... bless her little furry heart! :-)


Okay, that's all for today.  Thanks so much for stopping by.

Tuesday, January 11, 2011

Come on Over Friend

We've got a fun sketch over at Sketches in Thyme for our Tuesday Take card challenge this week and I am so hoping you'll join us!

Now as much as I LOVE the holidays, it is so nice to be creating something other than Christmas projects now! I had a great time combining this sketch with a little purple paper...reminds me of Spring...and I'm always up for anything that reminds me of Spring about this time of year in Michigan when we typically have snow up to our patooties.

To create this project I gathered up a whole slew of Papertrey Ink products. The patterned paper, cardstock, saddle-stitch ribbon, stamps and the eyelet and chair die I used are all from Papertrey Ink. The pearls are from Hero Arts and I used Fiskar's Top Crest border punch as well. A little black ink went into the mix too.


Now I want you to scurry on over to Sketches in Thyme and check out the other Designer inspiration for this sketch...and then, get in your craft room and whip up something fun... I can't wait to see what you do with this sketch too!

Monday, January 10, 2011

Challenge 1 Begins over at The Kraft Journal!

It's Make-It-Monday with the Kraft Outlet over at the blog, The Kraft Journal. The Challenge Word for this week is "Flourish". Use this week's word to inspire you to create a project and then link it up at the bottom of that post on The Kraft Journal blog before 6:00 p.m. (Eastern Time) on Sunday January 16.  All participants in our challenges this month have a chance to be featured on our "Feature You Fridays" posts as well as be entered to win a $20.00 Kraft Outlet Store Voucher!  The more challenges you enter this month, the more chances you have to win!  Remember to follow our challenge guidelines to include either Kraft cardstock or products from Kraft Outlet on your project to be eligible for the prizes.

I hope you join us over at The Kraft Journal today.  Our Designers have some fabulous inspiration to share today... go take a look-see!

Sunday, January 9, 2011

Cheery Lynn Designs Black, Red and White

This week, January 8 through January 14 at Cheery Lynn Designs all of the Designers are challenged to use the colors red, white and black to create a project using the dies of our choice.  I hope you join us every day to see all the Design Team creations using these colors along with the dies from Cheery Lynn Designs.

For my red, white and black card I pulled out the Embossed Hearts Scalloped Border, and the Scalloped Square from one of the Little Stackers Nesting Dies sets (I used the two smallest dies in the set).  To make this card you also need your Cuttlebug and the Metal Adaptor Plate.


Instructions: 
  1. Create a 4 1/4 x 5 1/2 white cardbase.
  2. Put the Metal Adaptor Plate between your A and C plate and cut one scallop using red cardstock and your regular cutting stack. (Tip: using the Metal Adaptor Plate adds enough depth to the stack to cut the small hearts out of the scallop instead of embossing the hearts onto the paper). Reserve some of the small hearts to add to your card front later.
  3. Trim the scallop to 1 1/4 inch x 5 1/2 inches.
  4. Remove the Adaptor Plate from your stack.
  5. Cut four more scallops from black cardstock. Trim all of them to 1 1/4 inch x 5 1/2.
  6. Layer the scallops as shown, adhere each one to the one placed above it.
  7. Tie ribbon around top of scallops and adhere to cardbase.
  8. Glue reserved small red hearts randomly onto cardfront.
  9. Using the smallest scalloped square die cut from red cardstock and stamp sentiment.
  10. Die cut next size larger sqaure and adhere to back of red cardstock slightly off center to create a shadow.
  11. Adhere sentiment to card.
  12. Adhere pearls.
Supplies Used:
Cardstock: Papertrey Ink: "Pure Poppy", "Stampers Select White", "True Black"
Stamp: Bo Bunny "Love Birds"
Ink: Ranger: Archival "Black"
Dies: Cheery Lynn (a Division of Dies Direct): "Embossed Hearts Scalloped Border", Little Stackers Nesting Dies "Scalloped Square"
Embellishments: Papertrey Ink: Swiss Dots Ribbon "True Black", KaiserCraft Pearls "Black"
Other Tools:Provocraft: Cuttlebug, Cheery Lynn Designs: "Cuttlebug Metal Adaptor Plate"

Friday, January 7, 2011

Memorable Seasons Design Team Reveal and Online Crop News

This month the Designers at Memorable Seasons are revealing our projects in coordination with the Memorable Seasons Numbers Crop. The Crop begins today and runs through Sunday. I hope you join us for a weekend of crafty fun right here on the message boards!

Now for my monthly reveal...after working on so many holiday projects over the past couple of months, having an opportunity to create with products that remind me of summer fun was a real treat! I chose the Jillibean Soup Summer Squash Soup Collection and Jill also chose some great embellishments for me to use as well. The list of supplies from the Memorable Seasons store that I used for these layouts is available right here.

For my "Typical Photo" layout, I used my Cricut to create the camera die cut, embossed it with my Cuttlebug and added Glossy Accents to the lens to give it the shine of glass... unfortunately I didn't take a photo that shows that! Grrrr. :-)

For my "Ouchies" Layout I chose to hide the journaling (which is a personal message to my grandson regarding surgery he had to remove a cyst from above his right eye) in an envelope I created from a plastic template. You saw the sneak peek for this layout on yesterday's post here at Runs With Scraps.

I've had the flowers I used in this layout for almost a year... I couldn't believe I finally found a place to use them (I had lost hope)...  See that, all good things come to those who wait. (sorta).

Join us for the Memorable Seasons New Year's Number Crop!! Beginning on Friday, January 7 through January 9, the Design Team will issue 12 challenges for the 12 months of the year. Each challenge will represent a month and will use the number of that month in a creative way to inspire your layout or card. Our Online Crop will last until Sunday night, but you will have until the following Sunday night (January 16) at midnight to complete your challenges. Points will be awarded for each challenge completed as well as the games that we play over the weekend. The person with the most points will be our winner! There will also be some fun RAK give aways, games, and great sale items at the online store too! Don't miss out on all the fun! Join us this weekend!

Thursday, January 6, 2011

Online Crop at Memorable Seasons This Weekend!

Join us for the Memorable Seasons New Year's Number Crop!! Beginning on Friday, January 7 through January 9, the Design Team will issue 12 challenges for the 12 months of the year. Each challenge will represent a month and will use the number of that month in a creative way to inspire your layout or card. Our Online Crop will last until Sunday night, but you will have until the following Sunday night (January 16) at midnight to complete your challenges. Points will be awarded for each challenge completed as well as the games that we play over the weekend. The person with the most points will be our winner! There will also be some fun RAK give aways, games, and great sale items at the online store too! Don't miss out on all the fun! Join us this weekend!

This weekend the Design Team will also reveal their montly projects created using products from the Memorable Season's Store. Here's a sneak peek of one of my layouts...


The sneak peeks are online now at the forum right here.  The big reveal happens tomorrow when we kick off the weekend crop.  Hope you join us!

Tuesday, January 4, 2011

Cheery Lynn Designs Blog Candy Give-Away

Cheery Lynn Designs is giving away a $40.00 gift certificate to their store!  What better way to introduce their magical dies that work in all of your favorite table top die cut machines!  Visit the Cheery Lynn store today to find out how you can win, but hurry... the give-away ends January 30!

Related Posts Plugin for WordPress, Blogger...