


It's Halloween Night... the siren is just sounding now to signal the end of Trick or Treating and I just selected the winner of the Bitten by the Bug2 Blog Hop Winner the $15.00 gift certificate to the either Papertrey Ink or My Favorite Things (Winner's Choice).
And the winner is... Rexann (aks Craftaholic), she said, " What a pretty LO and love the colors!! TFS!!".
Rexann provided me with her email address with her comment, which worked out swell, as I am going to send her an email (right after I finish this post) to ask her which certificate she wants me to send to her via email!
Congratulations Rexann, an email is on the way to you. And thank you to everyone who joined us for the Bitten by the Bug blog hop this past week!
Sunday, October 31, 2010

Happy Halloween
I don't have photographs of my darling grandsons in costume yet (Trick or Treating is scheduled for this evening), but I do have some photographs of the boys and their Jack o' Lanterns. With the help of their mothers, the boys carved pumpkins last night.


Seth (in the orange doggy shirt, my youngest grandson) wasn't too thrilled with "pumpkin guts" so his cousin Jack (my oldest grandson) was happy to lend a helping hand with the scooping process.

I really have no idea what the boys were doing when I snapped this photograph but here they are with Jack's Batman and Seth's Vampire creations.

When they finished the pumpkin carving session, I wanted to get photographs of the boys with their mothers, but the boys were far too excited to stand still for any modeling session, even if it was with their Jack o' Lanterns.
Hope you all enjoy your Halloween and here's wishing you lots more treats...than tricks! :-)
Friday, October 29, 2010
Perfect 10 with Summer Camp Stuido Calico Kit
I recently had a chance to sit down and create a scrapbook layout using the Studio Calico Summer Camp kit. I have been very pleased with all the kits I have received from them and have a lot of fun creating with the kits.
I love this photograph of my oldest grandson when he was only 10 months old, and when I saw the color combinations in the Summer Camp kit, I knew I had to use them to scrap these pictures. While it does appear to be a Fall themed layout... the photographs were actually taken in woods behind our house in March!
I do think it is very ironic that although I titled this layout "Perfect 10"... the title turned out anything but perfect... I had a lot of trouble trying to get the little letters I cut with my Cricut on straight... arrrggh! LOL.

Despite the imperfect title however... my little darling Jack is indeed perfect in every way as far as I am concerned!
Thursday, October 28, 2010
Combined Scrapbook Kit Layout
My youngest daughter Cydney is a budding photographer and recently took these pictures of my middle daughter Caitlin. (Cyd did a fabulous job didn't she?!).


I used a combination of my Studio Calico Back 40 kit and my Scrapbooking Circle September kit to create the layout. I loved the Crate Paper (the flowered paper) so much that I recently ordered the whole Resoration Collection (and can't wait for it to arrive in the mail soon!). The tickets were cut using a Papertrey Ink die cut and stamped with their coordinating stamp set. I cut Cait's initials for the simple title to this layout using my Cricut and Plantin Schoolbook cart. The journal strips I printed off my computer.
Wednesday, October 27, 2010
"Mama" Layout with Studio Calico Back 40 Kit
This is perhaps one of my favorite photographs of my oldest daughter Erin and her son (my second grandchild) Seth. Although the photograph was taken in the morning (before Erin even brushed her hair)... I believe it is beautiful in it's natural simplicity and for me reflects the affectionate and close relationship my daughter has with her son.
To create the layout I used mostly elements from the Back 40 Studio Calico Kit. The title I cut using my Cricut and the Mother's Day cartridge.


To create the layout I used mostly elements from the Back 40 Studio Calico Kit. The title I cut using my Cricut and the Mother's Day cartridge.

I created the simple accordion flowers with coordinating papers and cut the flourishes for them with my Accent Essentials cart. The leaves were die cut from a Papertrey Ink die cut (Beautiful Blooms) and embossed in my Cuttlebug with the Swirls embossing folder.

Monday, October 25, 2010
Banner Challenge and BBTB2 Blog Hop
This week it is my turn to host the challenge at Bitten by the Bug2, which means that it is also my turn to pick the cut we'll use for this week. I knew I wanted to select something from Country Life, however, because it is fairly new, I also wanted to make sure everyone could play along. So, for this week's challenge you may use any of the banner special feature keys on the Country Life cartridge OR you may use any banner from any Cricut cartridge at all! With such a wide variety of cartridges to choose from, I hope anyone who wants to play along this week can and will!

My sweet Molly-Dog was my inspiration for this scrapbook layout. I created the banner using the Country Life cartridge. The bottom layer is a simple scallop banner cut and the top is just a plain banner cut, but to jazz it up a bit, I cut the top layer from Dear Lizzy adhesive-backed fabric paper. I've had it in my stash since this past spring and after awhile, I wondered if I would ever end up using it... now I am just so glad I had it to use on this project...and for the record... the fabric paper cuts like a DREAM on the Cricut!


Supplies Used:

My sweet Molly-Dog was my inspiration for this scrapbook layout. I created the banner using the Country Life cartridge. The bottom layer is a simple scallop banner cut and the top is just a plain banner cut, but to jazz it up a bit, I cut the top layer from Dear Lizzy adhesive-backed fabric paper. I've had it in my stash since this past spring and after awhile, I wondered if I would ever end up using it... now I am just so glad I had it to use on this project...and for the record... the fabric paper cuts like a DREAM on the Cricut!

I cut the flowers from Dear Lizzy glitter paper and doubled some of them for a 3-D effect. Some Japanese paper tape, Hero Arts pearls and Dear Lizzy foam alphas provided for the perfect finishing touches to this super feminine layout of my middle daughter Cait and my sweet (and bossy) Molly-Dog.

Now... on to our end of month Bitten by the Bug2 blog hop... if you arrived here from Bitten by the Bug2 then you are on the right track, if not, start there and you'll land here in just a moment. If you came here from BBTB2, you are on the right track and your next stop on the hop is Lori. If you should get lost along the way you can regroup by checking back here!
Okay now, for the blog candy here at Runs With Scraps. During this hop, leave a comment and become a follower if you are not already and you will be eligible to win a 15 dollar gift certificate to My Favorite Things or Papertrey Ink (winner's choice)! I'll draw the winner on Halloween! Here is the Blog Hop list...
Beth (you are here!)
Supplies Used:
Cardstock: Papertrey Ink: Stampers Select "White", American Crafts: "White 12 x 12"
Patterned Paper: Dear Lizzy & American Crafts: Spring Collection
Ink: Tsuikeneko: Memento "Tuxedo Black"
Stamps: Papertrey Ink: "Framed"
Embellishments: Dear Lizzy: "White Foam Alphas", Hero Arts: "White Pearls"
Die Cuts and Tools: ProvoCraft: Cricut Expression and Country Life Cartridge
Other Tools: Fiskars Border Punch
Sunday, October 24, 2010
Better Living Through Scrapbooking Challenge
This just may be the only time you ever hear me say this.... drop your papercrafting and get cookin' because this week's challenge at Better Living Through Scrapbooking is all about the FOOD! It is the "Favorite Recipe Challenge".

To join us for the “Favorite Recipe Challenge” all you need to do is create a page showcasing your favorite recipe that you received from your mother, grandmother, or other relative or family friend and then choose at least 2 of the following:
1. Include a photo of yourself preparing the dish, or a photo of the completed dish.
2. Include a photo of the person who gave you the recipe.
3. Make a copy of the original recipe, or hand write the recipe on a card and include it on your layout.
4. Use cardstock as your background, but ink, stain, paint, or color-spray it to make it unique.
5. Use a shape punch or border punch somewhere on your page.
Not only did I have fun creating the layout for this challenge, the afternoon spent cooking up the recipe was totally awesome. Three of my aunts happened to be in town visiting my mother, so we all got together to create my grandmother's Croatian Potato Salad recipe. Unfortunately I got so caught up in preparing the dish with them, that I forgot to take a photograph of them all together! Drat! But I did get a photo of my Aunt Sally doing her magical potato peeling trick for us with boiled potatos and a serrated knife. You won't believe how easy it is to peel a potato that way.
For the additions to the challenge I included a photograph of the finished dish, as well as the hand-written recipe card that my Aunt Kathleen wrote out for me. After deciding on how I wanted to lay the page out, I realized that I needed a special place for the recipe card. I knew that I did not want to permanently affix it to the page in case my daughters ever wanted to recreate the dish for themselves at some point in the future. So I put my thinkin' cap on and finally decided to cut the side off an envelope and then I adhered it to the layout and then adhered the photograph of the finished dish on top of the that. This little solution created the perfect spot to put the recipe card, which I attached a bit of looped ribbon to, so the card can be pulled out of the envelope easily. For the photograph below, I pulled the recipe card partically out of the "pocket" so you get the idea of what I mean.

To incorporate our sponsor products for this challenge. I created the flower leaves from wallpaper that was included in my Gauche Alchemy kit, I painted a thin coat of Plaid's Folk Art paint in Mettalic Peridot to give the leaves a bit of shine. I also embossed them and folded them to add texture to the layout. I added the stamped "Enjoy" from the For the Luv of Art "My Favorite Things" stamp set as well and colored it up a bit with a couple of Copic Markers. Discount Cardstock's "Really Red" cardstock was the perfect mat for all my photographs too!

I wanted the journal block to stand out on on this page in order to write about the day (since my photographs unfortunately didn't tell the whole story... remember I said I forgot to take a picture of my aunts and my mother all together).

We seriously had such a great time doing this that we are planning another get together soon, the only thing up in the air right now is what fabulous Croatian dish we are all going to tackle next! One thing is certain however, next time, I won't forget to take a photograph of all my favorite women together!
Sponsor Supplies Used:
Cardstock: Discount Cardstock "Really Red 12x12”
Stamps: Plaid: For the Luv of Art "My Favorite Things stamp set"
Embellishments: (Leaves) Gauche Alchemy "Acme Mixed Media Paper Crafting Kit"
Paint: Plaid: Folk Art “671 Metallic Peridot”
Adhesives: Plaid: All Night Media “Mini Pop Dots”
Additional Supplies Used:
Cardstock: Papertrey Ink “Vintage Cream”
Patterned Paper: October Afternoon "Thrift Shop: Complete, Collector’s Item, and Needs Paint"
Ink: Ranger: Archival Ink “Coffee”
Embellishments: Papertrey Ink Grosgrain Ribbon: “Pure Poppy”, Webster’s Pages “Sparklers”, American Company: “Shipping Tag”, Melissa Frances: “Kitschy Kitchen Chipboard”
Other Tools: Copic: Markers: “BG11 and R29”, Fiskars: Border Punch, Tim Holtz Tiny Attacher and envelope, ProvoCraft: Cuttlebug and “Swirls Embossing Folder”.
Sunday, October 17, 2010
You've heard of Cat in the Hat??.......
Well at my house we have Cat in a Pot...

Yesterday my mother stopped by my house to return my big cooking pot. Since I wasn't home she set it on the entryway bench (along with my grandson's sweatshirt that was forgotten at her house). When I arrived home, I found THIS... our very own "Cat in a Pot." This big guy is always good for a chuckle and...I do believe I feel a scrapbook layout coming on. :-)

Yesterday my mother stopped by my house to return my big cooking pot. Since I wasn't home she set it on the entryway bench (along with my grandson's sweatshirt that was forgotten at her house). When I arrived home, I found THIS... our very own "Cat in a Pot." This big guy is always good for a chuckle and...I do believe I feel a scrapbook layout coming on. :-)
Better Scrap and Recylce, Reuse or Renew
Do you recycle, reuse or renew products on your scrapbook pages? If not, it's time to start... at least for this challenge anyhow (of course, it's great to do it all the time, actually... recycled products for your layouts saves you money and it's great for the environment too! You can't beat that with a stick, now can you?!
Okay so anyhow, this week at Better Living Through Scrapbooking it's time to put some of those things you might have otherwise tossed into the trash on your layout! It's what this week's challenge is all about! Read on...

“Recycle, Reuse, Renew challenge” All you have to do is use recycled products that might normally be discarded as part of a scrapbook page and then choose at least 2 of the following additions to include in the layout:
1. Use corrugated cardboard or other recycled packaging on your page.
2. Find fun or unusual items around your house and use them as elements on your page. Playing cards, clothing tags, junk mail, broken jewelry, old greeting cards or postcards, buttons and/or material from old clothing, advertising magnets, pins and keychains, and blooms and/or leaves from discarded plastic floral arrangements are just a few ideas.
3. Journal about why recycling is important to you.
4. Use traditional adhesives (Scotch tape, masking tape, duct tape, Elmers Glue, staples) on your page in lieu of scrapbook adhesives.
5. Use glitter somewhere on your page.
For this layout I decided to use old books pages to make my flower embellishments and use part of a paper bag that I received when I bought a cute stamp from an Etsy shop. I also used corrugated cardboard letters for my title and vintage paper from the Guache Alchemy kit (one of our fabulous Better Scrap sponsors this month!). I also stamped images (from our Plaid sponsor) onto plain brown packing paper that comes in a monthly scrapbooking kit I receive. I dug a few buttons out of my old button jar too... removed from clothing that was too worn out to donate.

I took this photograph of my sweetheart John, when we were visiting this quaint little "Heritage Village" (near the lakeshore in Michigan) while we were on our (much-needed) week-long golfing vacation. I have tons more fun photographs to scrap from that trip too... but this time, I just really wanted to do a layout about, "My Love". Isn't he just a doll?!!
Okay, so all that said, here is the supplies list (after you read it, do head on over to Better Scrap and join in the challenge along with us.. or just stop by to see all the fabulous Design Team creations... I am honored to work with a bunch of very talented crafters on that team if I do say so myself!!
Sponsor Supplies Used:
Cardstock: Discount Cardstock "Midnight Black” 80# 12x12,
Stamps: For the Luv of Art "My Favorite Things stamp set" Plaid Enterprises, All Night Media Rubber Stamps “Ornamental”
Vintage Paper: Gauche Alchemy "Acme Mixed Media Paper Crafting Kit"
Adhesives: Plaid: All Night Media “Mini Pop Dots”
Additional Supplies Used:
Cardstock: Papertrey Ink “Vintage Cream”
Patterned Paper: Crate Paper "School Spirit Collection: Chemistry" Cosmo Cricut “Togetherness: Making Plans”, My Mind’s Eye “Lost & Found: Market Street “Love” Beautiful Paper”
Ink: Zig Memory Systems: “Pure Black”, Ranger: Archival Ink “Coffee”
Embellishments: Button Twine: Papertrey Ink Rustic Cream Button Twine, Jillibean Soup: Corrugated Cardboard Alphas “Kraft”
Other Tools: Brads and Buttons from my stash, paper sack
Okay so anyhow, this week at Better Living Through Scrapbooking it's time to put some of those things you might have otherwise tossed into the trash on your layout! It's what this week's challenge is all about! Read on...
“Recycle, Reuse, Renew challenge” All you have to do is use recycled products that might normally be discarded as part of a scrapbook page and then choose at least 2 of the following additions to include in the layout:
1. Use corrugated cardboard or other recycled packaging on your page.
2. Find fun or unusual items around your house and use them as elements on your page. Playing cards, clothing tags, junk mail, broken jewelry, old greeting cards or postcards, buttons and/or material from old clothing, advertising magnets, pins and keychains, and blooms and/or leaves from discarded plastic floral arrangements are just a few ideas.
3. Journal about why recycling is important to you.
4. Use traditional adhesives (Scotch tape, masking tape, duct tape, Elmers Glue, staples) on your page in lieu of scrapbook adhesives.
5. Use glitter somewhere on your page.
For this layout I decided to use old books pages to make my flower embellishments and use part of a paper bag that I received when I bought a cute stamp from an Etsy shop. I also used corrugated cardboard letters for my title and vintage paper from the Guache Alchemy kit (one of our fabulous Better Scrap sponsors this month!). I also stamped images (from our Plaid sponsor) onto plain brown packing paper that comes in a monthly scrapbooking kit I receive. I dug a few buttons out of my old button jar too... removed from clothing that was too worn out to donate.

I took this photograph of my sweetheart John, when we were visiting this quaint little "Heritage Village" (near the lakeshore in Michigan) while we were on our (much-needed) week-long golfing vacation. I have tons more fun photographs to scrap from that trip too... but this time, I just really wanted to do a layout about, "My Love". Isn't he just a doll?!!
Okay, so all that said, here is the supplies list (after you read it, do head on over to Better Scrap and join in the challenge along with us.. or just stop by to see all the fabulous Design Team creations... I am honored to work with a bunch of very talented crafters on that team if I do say so myself!!
Sponsor Supplies Used:
Cardstock: Discount Cardstock "Midnight Black” 80# 12x12,
Stamps: For the Luv of Art "My Favorite Things stamp set" Plaid Enterprises, All Night Media Rubber Stamps “Ornamental”
Vintage Paper: Gauche Alchemy "Acme Mixed Media Paper Crafting Kit"
Adhesives: Plaid: All Night Media “Mini Pop Dots”
Additional Supplies Used:
Cardstock: Papertrey Ink “Vintage Cream”
Patterned Paper: Crate Paper "School Spirit Collection: Chemistry" Cosmo Cricut “Togetherness: Making Plans”, My Mind’s Eye “Lost & Found: Market Street “Love” Beautiful Paper”
Ink: Zig Memory Systems: “Pure Black”, Ranger: Archival Ink “Coffee”
Embellishments: Button Twine: Papertrey Ink Rustic Cream Button Twine, Jillibean Soup: Corrugated Cardboard Alphas “Kraft”
Other Tools: Brads and Buttons from my stash, paper sack
Saturday, October 16, 2010
Papercraft Star Design Team Call!
Papercraft Star Weekly Challenge Blog Design Team Call
Papercraft Star, an exciting and unique papercrafting challenge blog is looking for talented, motivated, responsible designers who have time to commit to design layouts, cards and projects weekly with both their products and sponsor products when assigned. We welcome all applicants 18 years of age or older, who live in the United States. We are sorry we are unable to accept international applicants at this time due to mailing costs of sponsor supplies however, please apply if you are interested in Guest Designer Positions!
We are putting together a team of:
1. Enthusiastic, creative people that love papercrafting, and are able to do weekly assignments such as layouts, projects and cards with their products and sponsor products when assigned, based on the weekly challenge.
2. Applicants must be able to commit to a 6-month term, beginning December 1, 2010 May 31, 2011.
3. Applicants must have a personal blog and be able to provide excellent photographs of their projects.
4. They must familiarize themselves with the Papercraft Star Design Team Guidelines and be prepared to follow those guidelines.
5. If selected, Designers must submit one project per week, create tutorials as assigned (approximately every 6 – 8 weeks), be an active participant of the Papercraft Star message boards and actively promote Papercraft Star via their social networks or galleries (if applicable)
6. Applicants must be at least 18 years of age and live in the United States. International applicants will be consider for Guest Designer positions so we encourage you to apply.
In return, you will receive:
1. An exciting way to promote your designs and increase your blog following through a professionally presented challenge blog.
2. An opportunity to be part of an exciting and unique professionally administered challenge blog that continues to be inspirational and different.
3. Sponsor products when provided.
To apply please send the following to papercraftstar@gmail.com (please use “Design Team Call” as your subject) and include:
1. Full name, address, phone number and email address.
2. Three papercraft projects that represent both your style and your best work.
3. Complete Challenge 23 as listed on the Challenge Page at Papercraft Star (see below for details).
4. A link to your personal blog, a link to your YouTube channel (if applicable), and links to your online galleries (if applicable).
5. Design teams, if any, that you work on now or have worked on in the past.
6. Read the Design Team Guidelines posted under the Creative Team tab (scroll past all the Designer photographs) and determine if you are willing to comply with the guidelines.
7. Write a short paragraph about yourself telling us why you think you'll be a good fit for the Papercraft Star Design Team. Please also let us know that you read the Design Team Guidelines.
Additionally you must do the following:
1. Become a follower of Papercraft Star (if you are not already).
2. Sign up on the Papercraft Star Message Board
3. Complete and email with your application Challenge 23 - (this will be your first Design Team reveal if selected for the Team). The challenge: To Create a Holiday Gift Tag using Cardstock, Patterned Paper, Stamp and/or Die Cut (Cricut or Other), Ribbon or Twine, Gems or Pearls.
Submission deadline is November 5, 2010 we will announce our Design Team members on November 14, 2011.
Friday, October 15, 2010
Better Scrap October Newsletter Challenge
The Better Livining Through Scrapbooking October Newsletter is available today. You can sign up to receive the newsletter by email at the Better Scrap website right here. The newsletter is chocked full of great inspiration and information, you really don't want to miss it. It also features a Newsletter challenge, here are the details...
“Five Fun Facts” challenge. All you have to do to join the challenge is to create a layout about five fun things that people may or may not know about you and choose at least two of the following additions:
1. Take a “self-portrait” photo of yourself and use it on your layout.
2. Use the word FIVE or the number 5 in a fun and interesting way on your page.
3. Use alphabet stickers somewhere in your page design but NOT as the title.
4. Place your journaling on strips of paper, or cut your journaling into strip of paper and place them on your page.
5. Use star shapes somewhere on your page.
Here is my take on the challenge:

My oldest daughter took this photograph of me back in (I'm guessing) 1997 and I've meant to scrapbook the photo ever since. However, like I mentioned before, I'm really not very good at, or comfortable with, scrapbooking about myself. So to say the least, these kinds of challenges are very....well... challenging for me! It was a challenge as well to decide what additions to the challenge I wanted to take on (how many times do you think I can say "challenge" in one sentence?). In the end, I decided to add a Star shape (from the Gauche Alchemy kit) and use journaling strips for my facts about me.

I am in love the Plaid's All Night Media Ornamental Stamp set and knew I wanted to use it on this layout. So I decided to stamp a shipping tag with ink and emboss the image. The cute bright yellow band-aid and star are from our sponsor Gauche Alchemy and I stamped a sentiment from the My Favorite Things stamp set by For the Luv of Art on an old kraft envelop from my stash. The rich brown cardstock, "Clove Felt" is from Discount Cardstock.
I hope you'll join us in the challenge and if you do let me know by commenting here and I'll be sure to stop by to check it out!
Sponsor Supplies Used:
Cardstock: Discount Cardstock "Clove Felt 80# 12x12, Pink Ice Parchment 8 ½ x 11”
Stamps: Plaid: All Night Media Rubber Stamps “Ornamental”, For the Luv of Art "My Favorite Things stamp set"
Embellishments: (Band-Aid and Star) Gauche Alchemy "Acme Mixed Media Paper Crafting Kit"
Adhesives: Plaid: All Night Media “Mini Pop Dots”
Additional Supplies Used:
Cardstock: Papertrey Ink “Vintage Cream”
Patterned Paper: Echo Park "Life is Good",
Ink: Ranger: Big & Bossy: Embossing Ink, Archival Ink “Coffee”, Tsukineko: VersaMark Chalk Ink “Pixie Dust”
Embellishments: Ranger: Clear Embossing Powder, Prima: Prima Flowers Item # 539955, My Minds Eye: Laundry Line “Natural Glitter Chipboard Alphabet”, Button Twine: Echo Park “Life is Good” Element Stickers, Papertrey Ink White Jute Button Twine
Other Tools: Fiskars: Top Crest Border Punch, Kraft envelope, button and yellow ribbon, shipping tag from stash, pink polka dot tape from October's Studio Calico kit.
Thursday, October 14, 2010
Better Scraps Special Assignment: Plaid and Discount Cardstock
My assignment this week for Better Living Through Scrapbooking was to create a project that featured our sponsors Plaid and Discount Cardstock. It was fabulously fun to create this "Laugh" layout of my youngest grandson featuring so many different products.

To liven up the tag, I sponge painted it with Plaid's Apple Barrel Paints in "Cloudless" and "Light Green Leaf". After the tag dried, I stamped it using Plaid's All Night Media Ornamental Stamps and then Mod Podged the giggle and play tickets onto the tag using Mod Podge "Paper". I painted the chipboard frame with Light Green Leaf Apple Barrel paint as well and after it dried I applied a coat of gloss Mod Podge to give it just a bit of luster.
To create the dragonfly, I die cut it using the Gyspy Wanderings and my Cricut Expression. I cut the shadow and one layer using Discount Cardstock in Patriot Blue Linen. I also cut one layer from patterned paper and assembled the three layers using Plaid's Mini Pop Dots for dimension. I then applied a coat of Mod Podge "Sparkle" to the top of the dragonfly for added bling.

I love how Mod Podge Sparkle adds an even layer of glitter to the embellishment.
To create the title I cut three layers of the word "Laugh" from the Wall Decor and More Cricut Cartridge. For the bottom layer I cut the word in Rich Linen cardstock (PTI), for the middle and top layer I cut the word from Discount Cardstock Patriot Blue Linen. I then painted every other letter of the middle layer with "Cloudless" Apple Barrel paint. For the top layer I applied a coat of Gloss Mod Podge to give the title some added shine and then assembled all of the layers with Mini Pop Dots. I also applied Sparkle Mod Podge to the die cut butterflies and adhered them to the layout using Mini Pop Dots, the perfect size to adhere tiny embellishments to your layouts.
Sponsor Supplies:
Cardstock: Discount Cardstock "Patriot Blue Linen” 80# 12x12,
Stamps: (Tag) Plaid: All Night Media Rubber Stamps “Ornamental”
Adhesives: (Dragon Fly and Title) Plaid: All Night Media “Mini Pop Dots”, ( Dragon Fly, Title, Tag) Plaid: Mod Podge “Sparkle”, “Paper” and “Gloss – Lustre”.
Paint: (Tag, Title Shadow and Chipboard Frame) Plaid Apple Barrel Paint “Cloudless” and “Light Leaf Green”Additional Supplies Used:
Cardstock: Papertrey Ink “Fine Linen”
Patterned Paper: Studio Calico "Anthology: Periodical", Bella Blvd “Estate Sale: Nana’s Apron”
Ink: Ranger: Archival Ink “Coffee”
Embellishments: Button Twine: Papertrey Ink White Jute, Crate Paper: Border Restoration Collection, Hero Arts: Pearls, Zva Creative: Crystals, Maya Road: Chipboard Frames, American Tag Company: #5 Shipping Tag
Die Cut Machine: Provocraft: Cricut Expression and Gypsy
Cartridges: (Title) Provocraft: Wall Décor and More, (Dragon Fly) Gypsy Wanderings
Other Tools: Button from stash, Fiskars: Top Crest Border Punch, Martha Stewart: Royal Butterfly Punch, Tim Holtz: Tickets
Tuesday, October 12, 2010
Quick and Easy Bling Card
Yesterday I posted the a card featuring the new Pink Paislee patterned paper I ordered through Ellen Hutson. Today's card features the new Prima Marketing Jack and Jill Collection that you can purchase right here.
The addition of the Zva Creative pearls and the Prima Marketing Rose makes this a very quick card to put together. Although I opted to make a Wedding Card for this project, it is very adaptable to any occassion deserving of a card.

The addition of the Zva Creative pearls and the Prima Marketing Rose makes this a very quick card to put together. Although I opted to make a Wedding Card for this project, it is very adaptable to any occassion deserving of a card.

Instructions:
- Cut card base from Fine Linen cardstock
- Cut patterned paper 5 1/2 x 4
- Die cut coordinating patterned paper with Sizzix "Brackets" and adhere to patterned paper.
- Adhere ribbon to patterned paper to create card front
- Adhere card front to card base
- Adhere pearls to card front
- Die cut patterned paper for sentiment tag.
- Stamp frame and sentiment on tag.
- Adhere rose to card front
- Adhere sentiment tag to card front with Pop Dots
- Finished Size: 5 1/2 x 4 1/4
Supplies Used:
Cardstock: Papertrey Ink: "Fine Linen"
Pattened Paper: Prima Marketing: "Jack n' Jill" collection 6 x 6 patterned paper
Fiber: Chatterbox: Artsy.licious Splendid Ribbon "Alabaster"
Stamps: Papertrey Ink: Delightful Dahlia (Sentiment), Vintage Labels (Sentiment Tag)
Embellishments: Zva Creative: Pearls (PE-03CA-103), Prima Marketing: Flowers, Fleurs de Prima Love Letter Roses "Peridot" Item #542733
Other Tools" Spellbinders: Nestabilities "Labels One", Plaid: All Night Media Pop Dots
Monday, October 11, 2010
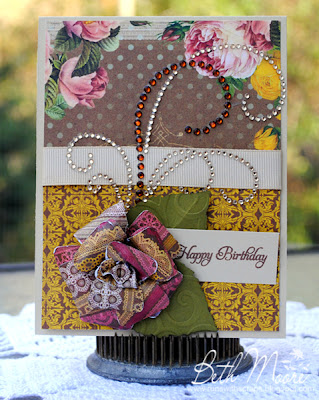
A Grunge Rose Birthday Card
On Friday I received my much anticipated order from Ellen Hutson. Inside the package (which in retrospect I should have taken a photograph of, if I was going to mention in on the blog don't 'cha know), was some delicious new papers from Pink Paislee and Prima Marketing that I just couldn't wait to use to create a couple of cards. Today I am featuring Pink Paislee's "Sweetness" papers that you can purchase right here. And are they ever sweet too! I also ordered some beautiful Zva Creative packages of bling and a few other fun things that, while I didn't use on this card today, I'm sure they will show up in some projects here in the near future!

Instuctions:
- Cut card base from Fine Linen Cardstock (finished size is 4 1/4 x 5 1/2)
- Cut one piece of patterned paper to 4 x 2 1/2
- Cut another piece of coordinating patterned paper to 4 x 3
- Overlap patterned papers and adhere together to create one 4 x 5 card front.
- Adhere ribbon on overlap
- Adhere card front to card base.
- Die Cut leaves from Ripe Avocado and emboss.
- Die Cut three flowers at 2 1/2 inches from Accent Essentials Cricut Cartridge (On the overlay: 4th Row, 2nd White Key w shift selected).
- Apply thin coat of Mod Podge to flowers and create bloom using Tim Holtz Grunge Rose Technique.
- Cut one 3/4 inch x 2 1/2 inch piece of Fine Linen cardstock and stamp sentiment on center.
- Adhere Zva Creative Crystal to card front.
- Adhere leaves, sentiment and flower using Pop Dots.
Supplies Used:
Cardstock: Papertrey Ink: "Fine Linen" and "Ripe Avacado"
Patterned Paper: Pink Paislee: "Sweetness" 6 x 6 Petite Paper Pad
Fiber: Papertrey Ink: Classic Grosgrain Ribbbon 5/8 inch "Fine Linen"
Ink: Ranger: Archival Ink "Coffee"
Stamps: Papertrey Ink: Delightful Dahlia (Sentiment)
Embellishments: Zva Creative: Crystal CR-03CA-114
Other Tools: ProvoCraft: Cricut Expression Electronic Die Cut Machine, ProvoCraft: Accent Essentials Cartridge, ProvoCraft: Cuttlebug and Embossing Folder "Swirls", Plaid: Mod Podge "Paper" Matte Finish
Sunday, October 10, 2010
Better Living Through Scrapbooking Challenge
It's the second October Challenge at Better Living Through Scrapbooking, and I don't want you to forget that if you join in all four challenges during the month of October you are eligible to win some fabulous sponsor prizes. After you are finished here, be sure to visit the Better Scrap website for all the exciting details!

The week it is the all “About Me Challenge” So all you have to do is create an “About Me” layout.
and choose at least 2 of the following additions to the project:
1. Include at least one photograph of you (and only you).
2. Journal about yourself (i.e., your quirks, something you would like to change, your hopes, disappointments, etc.)
3. Use a traditional office supply on your layout.
4. Use foam adhesives or “pop-dots” to give elements on your page dimension.
5. Use an old book or magazine page as part of your layout.”
Now, for me, when this challenge came up I was really stumped as to what I wanted to do, it felt like I had done a lot of layouts that had something or other to do with me (more than I had done in all my years of scrapbooking) in the past two months. There was the one back in September that was about my quirks, then there was the "Baby Me" layout, and don't forget the hideous outfit I wore in a recent layout as well. So as I sat down to work on this project, I knew I just couldn't do another layout about myself which then got me thinking about why I scrapbook in the first place. With that in mind, this is the layout that was inspired from this week's challenge. "It's not all about me!"

I also chose several of the options that went along with this challenge. I used a photograph of me , wrote the journal about myself and why I scrapbook, and I used staples (a traditional office supply) to secure my ribbon to the layout.
To incorporate our amazing sponsor products, I painted the Gauche Alchemy cardboard with Apple Barrel paints and highlighted the journal block with the pretty rose stamp from the My Favorite Things stamps set.
To add a little something extra to the layout, I also created an easy handmade accordion flower as an embellishment. For the record, I do believe this is the most photographs I have ever included on a one-page layout before.
Clicking on the photograph to enlarge it will allow you to read the journal block... or you can skip the novel and go right to reading about the supplies I used.
Sponsor Supplies Used:
Cardstock: Discount Cardstock "Midnight Black” 80# 12x12,
Stamp: For the Luv of Art "My Favorite Things stamp set"
Papers and embellishments: Gauche Alchemy "Corrugated Cardboard"
Paint: Plaid "Apple Barrel: Light Leaf Green" and “Apple Barrel: Satin Cream”
Additional Supplies Used:
Cardstock: Papertrey Ink “Vintage Cream”
Patterned Paper: Jillibean Soup "Coordinating Old World Cabbage Soup"
Embellishments: Ribbon: Papertrey Ink Saddle Stitch “Spring Moss", Button Twine: Papertrey Ink Rustic Cream Button Twine
Other Tools: Sizzix Flower Die Cut, Tim Holtz Tiny Attacher with Staples, Fiskars Top Crest Border Punch, ProvoCraft Cuttlebug with Swirls Embossing Folder, Brad and Button from my stash.
Thursday, October 7, 2010
Two Page Scrapbook Layout
It's funny how times change with regard to scrapbooking. When I first started scrapbooking (back in the Year 1 or so.. haha)... I used to do nothing but two-page layouts, now I rarely, if ever do anything but one page layouts unless there is a specific reason to do so.
At any rate, recently I had to create a two-page layout for a special entry I was submitting. These photographs of my grandsons playing on the "park" (as they so affectionately refer to it) in our backyard lent itself well to a two-page project.

The most important thing about this layout....the DARLING photos my Nanie's Boys! :-)
At any rate, recently I had to create a two-page layout for a special entry I was submitting. These photographs of my grandsons playing on the "park" (as they so affectionately refer to it) in our backyard lent itself well to a two-page project.

Another thing that rarely happens when I scrapbook now is that I rarely, if ever do not make a complete supplies list of the items I used. This however, was not one of those times. So, I'll just say, I used stuff like
cardstock, patterned paper, chipboard buttons, tags and such! :-)The most important thing about this layout....the DARLING photos my Nanie's Boys! :-)
Sunday, October 3, 2010
Simply Stamped in Kraft, Black and White
I used a mix of Cornish Heritage Farms and Just for Fun stamps to create the patterned paper for this simply stamped black, white and kraft card. I really like to keep some "generic" cards in my stash just in case a last minute occasion for a card is needed.

Product list:
Cornish Heritage Farms
Rummage Bin Stamps
Just for Fun Rubber Stamps
Postcard Stamp
Paper Shappers
1 3/4 inch Round Punch
2 inch Scallop Punch
Staz On
Jet Black Ink
Papertrey Ink
True Black and Kraft Cardstock
Other: Twine purchased at Wal-mart

Product list:
Cornish Heritage Farms
Rummage Bin Stamps
Just for Fun Rubber Stamps
Postcard Stamp
Paper Shappers
1 3/4 inch Round Punch
2 inch Scallop Punch
Staz On
Jet Black Ink
Papertrey Ink
True Black and Kraft Cardstock
Other: Twine purchased at Wal-mart
Better Living Through Scrapbooking - Favorite Color Challenge
This the the first challenge of October at Better Living Through Scrapbooking. Not only do the challenges at Better Scraps keep you thinking outside the box... participating in all the challenges duing the month ensures you are eligible to win a fabulous sponsor prize drawn at the end of each month! Visit the blog for all the details by going right here. But wait, before you go there, here's the challenge for this week...

“Favorite Color Challenge”
Create a layout dedicated to your favorite color.
Choose at least 2 of the following:
1. Journal on the layout as if you are speaking directly to your favorite color, and tell it why you love it, and what it means to you.
2. Take a photo of something you love that is in your favorite color, and use it on your layout.
3. Use rounded corners somewhere on your layout.
4. Create hand-doodling somewhere on your page.
5. Make the name of your favorite color a prominent part of your title.”

I combined the products from our sponsors, Discount Cardstock, Gauche Alchemy, Plaid and Norma Kennedy For the Luv of Art Stamps with some products from my own stash to create this layout featuring my favorite color shades of Aqua Blue. I also chose to round the corners of my accent paper, use the color I featured in my title and journaled about the color (sort of) as additions to this Favorite Color challenge.
I started this layout by using Discount Cardstock in Aqua Ice Dust. Plaid's Apple Barrel Paint in Cloudless is absolutely my favorite color from their beautiful paint line, so I knew that I had to add it to my layout. I sponged the paint onto the Gauche Alchemy tag and also used it to paint the white Prima flowers that adorn the bottom of the layout. As a base for the flowers, I cut three scallop circles from vintage paper in the Gauche Alchemy kit, which I thought was the perfect addition to add a little something extra to the flowers. I created the journaling block using one of the stamps from the For the Love of Art Stamp set and some Hawaiian Shores ink, one of my favorite shades of ink.
As a final touch, I created flowers in my favorite color, added ribbon and lace and some patterned paper that featured my favorite color as well.
I have to say that this was the first ever scrapbook layout I created that did not include a photograph of someone or something... it was actually more fun than I imagined it might be. I hope you join in the challenge, I'm looking forward to learning about your favorite color!
Sponsor Supplies:
Plaid:
Apple Barrel Paint in 20741 Cloudless
Norma Kennedy For the Luv of Art Stamps:
Journal Block Stamp
Discount Cardstock:
Aqua Ice Dust
Gauche Alchemy:
Tag & Vintage Paper from kit
Other Supplies:
Papertrey Ink: Hawaiian Shores Cardstock, Perfect Match Hybrid Ink, Hawaiian Shores Ribbon, Vintage Buttons and Leaf Ribbon
We R Memory Keepers: Vintage Blue Patterned Paper
Websters Pages: Bloomers
Mark Richards: Crystal Stickers
Cosmo Cricut: Ready Set Chip in Fairy Tales
Other Tools: Corner Chomper, Sizzix Flower Die Cut, Paper Shapers 2 inch Scallop Punch
Saturday, October 2, 2010
It's Been Too Long...
In Honor of World Card Making Day I wanted to post another card! Nope, I STILL haven't started my holiday cards (although I have all the stuff ready to go) but this card fit the challenge at Cute Card Thursday so I decided to post it. I created it using a Tim Holtz mask, along with Papertrey Ink cardstock, stamps, ink and ribbon. It' s a nice card to send to a friend when you know "It's been too long!". Thus... the senitment! (grin).
Other challenges entered: Bugaboo Stamps, Mark's Finest Papers,

Thank You Card with Inlaid Flower & World Card Making Day!
First and foremost! Happy World Card Making Day!


I used my Gypsy and Cricut Expression to lay out the flower for this card and cut it out from Vintage Cream cardstock. Then I paper-pieced coordinating patterned paper from Basic Grey behind each flower petal to give the card a "in-laid" look. A button with some twine and a simple little Thank You stamp finished out this super simple card.
I entered this card in these challenges:
http://babybuddesigns.blogspot.com/
http://totallypapercrafts.blogspot.com/
http://acraftylittleplace.blogspot.com/
Supplies Used:
Papertrey Ink
Vintage Cream Vintage Button, Dark Chocolate and Rustic Cream Cardstock
Provocraft
Cricut Expression, Gypsy, Gypsy Wanderings
Hero Arts
Classic Messages
Basic Grey
Origins Paper Pad
Subscribe to:
Posts (Atom)


