


You've already heard that a new challenge blog is coming your way, right? Papercraft Star, is a weekly challenge blog that will go live June 23, 2010... but in the meantime, you can help the blog out by entering your all-time favorite projects that you've done in the past. Your entry will then be voted on by the public and on June 4, Papercraft Star will announce the winner who will receive some cool blog candy just for helping test the new voting system. How easy and fun is that??!!
So go ahead and choose your favorite projects right now... and then go to Papercraft Star to link them up. Then the voting begins and you are on your way to winning some sweet blog candy too!
Thanks for helping Papercraft Star test the new challenge entry and public voting system!
Monday, May 31, 2010

Friday, May 28, 2010
Just for Fun Friday

I hope after seeing this card and visiting the Just for Fun blog that you will decide to play along with us this week for a chance to win a sweet discount at the Just for Fun Rubber Stamps online store right here.
For this card I used the butterfly from the Cats & Stuff unmounted stamp collection. You can buy it right here. The sentiment is from one of my favorite Just for Fun stamp sets called Collage Unmounted and you can buy that one right here.
I colored the butterflies with my Copic Markers and added some Copper Stickles to their wings for just a tad of bling. I embossed the black cardstock strip for texture and cut out each letter of the sentiment to leave a bit of the patterned paper peeking through. Then I tied it all up with a black swiss dot bow because that's how I roll... and now... it's your turn! Yee haw!

Supplies Used:
Stamps: Butterflies: UMS 7017 Cats & Stuff Unmounted, Sentiment: UMS 7002 Collage Unmounted (Just for Fun Rubber Stamps)
Patterned Paper: October Afternoon
Cardstock: Orange Zest, Stampers Select, True Black (Papertrey Ink)
Ink: MementoTuxedo Black (Tsukineko)
Fiber: True Black Swiss Dot (Papertrey Ink)
Copic Markers: YR 15, YR12, YR18, Y 38 and SB 110
Other Tools: Cuttlebug Embossing Folder, Copper Stickles
Wednesday, May 26, 2010
Practical Scrappers Challenge - Felt
Can you believe that yet another week has gone by and it's time for a new Practical Scrappers Challenge? Yep, me neither! Time flies when you are having fun...and we are all having fun crafting, right?! This week's challenge has us pulling out our felt, fabric or tulle! Use any or all of these to create a paper project of your choice and then be sure to link it up to Mr. Linky over at Practical Scrappers in order to play along with our challenge this week! My designer inspiration layout highlights a photo of my youngest grandson swinging. That little guy sure loves to swing!

I embellished this layout with felt "Woolies" from Basic Grey's Green at Heart collection and cut a scallop edge of white felt using the Plantin Schoolbook cartridge. For a little extra "fiber" I also added ribbon in Orange Zest from Papertrey Ink. I just love that fab shade of bright orange! I have to admit that I am really loving this patterned paper from Sassafras Apple Jack collection, you can buy some for yourself right here.
Supplies Used:
Patterned Paper: Report Card collection (October Afternoon), Apple Jack collection (Sassafras)
Cardstock: Orange Zest and Summer Sunrise (Papertrey Ink)
Cricut Cartridges: Don Juan and Sweet Treats
Ink: Distress Ink in Antique Linen (Tim Holtz)
Embellishments: Orange Zest Ribbon and Rustic Button Twine in Cream (Papertrey Ink) White Felt (Joann Fabrics). Memo Pins (Tim Holtz Idea-ology)
Other Tools: Y32 Copic Marker, Fiskars Top Crest punch
Saturday, May 22, 2010
Design Team Call You Don't Want To Miss!
Papercraft Star Weekly Challenge Blog Design Team Call
Papercraft Star, an exciting, newly developed challenge blog that will go live on June 23, 2010 is looking for talented, motivated, responsible designers who have time to commit to design layouts and projects weekly with their products. We haven't set a specific number of designers for our team at this time and welcome all applicants 18 years of age or older.
We are putting together a team of:
1. Enthusiastic, creative people that love papercrafting, and are able to do weekly assignments such as layouts, projects, and cards with their products based on the weekly challenge.
2. Applicants must be able to commit to a 6 months term, beginning June 20, 2010 through December 2010.
3. You must be at least 18 years of age.
In return, you will receive:
1. An exciting way to promote your designs and increase your blog following through a professionally presented challenge blog.
2. An opportunity to be part of brand new challenge blog that promises to be inspiration and different.
To apply please send the following to papercraftstar@gmail.com (please use “Design Team Call” as your subject) and include:
1. Full name, address, phone number and email address.
2. One layout, one card and one project representing your best work.
3. A link to your personal blog, a link to your YouTube channel (if applicable), and links to your online galleries (if applicable).
4. Design teams, if any, that you work on now.
5. Write a paragraph about yourself telling us why you think you'll be a good fit for the new Papercraft Star Design Team.
Submission deadline is June 5, 2010 we will announce our Design Team members on June 12, 2010 and if selected your inspiration piece for the first challenge is due June 20, 2010.
Friday, May 21, 2010
Just for Fun Friday - You could win a 25% Discount for Playing!

It's Just for Fun Friday at the Just for Fun Rubber Stamps blog, and that means that it's time for Color Challenge #12. I opted to keep my card clean and simple and the JFF stamps I chose to use in this inspiration piece reflect that style.
On the Hawaiian Shores cardstock I used the JFF Long Script in Terra Cotta Tile to create my own coordinating printer paper. I then used one of the background stamps from the unmounted sheet of stamps from JFF's Cats and Stuff to create a background on the Vintage Cream paper that I then cut using a scallop border die.
I stamped the (B2291) JFF Just a Note sentiment on Vintage Cream using Hawaiian Shores ink, inked the edges and then popped it up off the card using Pop Dots to make it stand out. A couple of buttons, some twine and a ribbon tied up into a bow finished this clean and simple card.

I hope you head on over to the Just For Fun Rubber Stamps blog to check out the other Design Team inspiration pieces and join us for this week's color challenge. You don't have to use Just for Fun Rubber Stamps to play along but you do have a chance to win a 25 percent discount at Just for Fun Rubber Stamps just for playing along with us!
Supplies Used:
Just for Fun Rubber Stamps: F1872 (Long Script), UMS7017 (Cats and Stuff)
Papertrey Ink: Hawaiian Shores, Vintage Cream and Terra Cotta tile cardstock, ink, buttons and ribbon to coordinate with the color scheme of this challenge. Medium Scallop Border Die, Rustic Cream button twine.
Other: Tim Holtz Distress Ink in Tea Dye
Thursday, May 20, 2010
Magoo's Pillow Boxes
Magoo over at Design.Create.Inspire designed this darling little pillow box (with score marks no less) using the Gypsy and provided a free download at her blog right here. Thank you so much Magoo! I made these pillow boxes at Valentine's Day for my family and filled them with candy (I used red paper and stamped hearts on it). This time I created these cute boxes using some of My Little Shoebox patterned paper that you can buy right here.

Wednesday, May 19, 2010
Practical Scrappers Challenge - Patterned Paper
This week Practical Scrappers challenges you to use your patterned paper to create a layout, card or other paper project. Speaking of layouts, there was a time in my early scrapbooking days that I wouldn't dream of using patterned paper on my layouts, it just seemed far too "busy" to use. However, over the years, as my scrapbooking evolved so did my use of patterned papers and I eventually started to accent my layout pages with a little patterned paper here, a little there. Now..., I'm a patterned paper-aholic for sure... I love to use whole sheets of 12 x 12 patterned paper for backgrounds and even throw in coordinating patterns of smaller cuts, typically from the same collection. Sometimes I will use three and four (or more patterns on the same page!) The layout I've done to inspire you to take part in this week's patterned paper challenge at Practical Scrappers is no exception to that current trend of mine.

One look at this layout is an example for why not much patterned paper in my stock-pile is left to collect dust for very long. Here I used three different patterns from Webster's Pages. One 12 x 12 for the background and two different partial 6 x 6 papers. Not to mention a rather large piece of cardstock and several pieces of ephemera that has it's own patterns as well. When I buy patterned paper I either purchase collection packs or I buy at least two sheets the same 12 x 12 two-sided papers. So I can use both the back AND front of the paper on one layout.
If you find that you are having trouble bringing yourself to use patterned paper in your layouts, here is a article written by Denise Gormish. While the article itself is a bit dated (2007), the techniques and ideas she shares with regard to the use of "busy" patterned paper is still right on target!. To read the article for yourself, click here. Oh, and when you finish with that task... pull out those patterned papers, get crafting and make something to show off!
Supplies Used:
Patterned Paper: Garden Gala "Fresh Air" and Petite Papers Collection triple pack (Webster's Pages)
Cardstock: Vintage Cream (Papertrey Ink)
Ink: Distress Ink in Tea Dye (Tim Holtz)
Fibers: Rustic Button Twine in Cream (Papertrey Ink), Premium Ribbon "Greeting" pack (American Crafts)
Embellishments: Vintage Findings School Kit (Making Memories) Memo Pin (Tim Holtz Idea-ology) Life Journey Epemera (K and Company), Chip Stickers in Granola (Basic Grey), Digital Graphic (Peggy Loves Vintage Esty Store), Time Piece (Tim Holtz) Pearls (Hero Arts), Glitter Mist in Old Lace (Tattered Angels).
Cricut Cartridges: Life's a Beach (page 76 with charm feature key selected) and Tag Bags Boxes and More (page 91, Row 1, Key 12 with shift key selected)
Tools: Ripping Ruler (Karen Foster) Pop Dots.
Tuesday, May 18, 2010
Learning From Dogs Layout
All day last Friday I worked on several projects using patterned paper from My Little Shoebox. You can visit their blog right here. Today I wanted to share this layout I created with photos of two of my dogs, Gracie and Marley.


I used my computer to print out the list of things we can learn from our dogs (author unknown) on American Crafts white cardstock. I just love that my new(er) HP printer will print on paper even larger than 12 x 12. It is the coolest printer EVAH! I also used pastel blue American Crafts cardstock and Stamper's Select white from Papertrey Ink. A Fiskars Apron Lace border stamp like this gave some detail to the white mat that I used on some of the patterned paper. I used a 2 inch scallop punch from EK Success to create the flower. The My Little Shoebox patterned paper you can buy right here. The pearl is from Hero Arts.
Monday, May 17, 2010
Bitten by the Bug2 Challenge
This week's cut for the BBTB2 challenge is from Disney's Hannah Montana cartridge. Using the Rock Star feature it is the 4th row, 9th button from the left, "Ready to Rock".
When I first learned about this challenge I did not own this cartridge, but ... I do now! This gig at BBTB2 is costing some bucks... on the other hand, I'm also growing my Cricut library by leaps and bounds and ya know.. you never can own too many Cricut cartridges... right? (Now I just need to buy more shelves to store all the new carts!).
Anyhow.. enough yapping. On to the inspiration piece...

When I first learned about this challenge I did not own this cartridge, but ... I do now! This gig at BBTB2 is costing some bucks
Anyhow.. enough yapping. On to the inspiration piece...

Okay, so here's the deets: Just about everything you see is Dear Lizzy and American Crafts with the exception of the thread and the white ribbon that I found in my stash. I pulled out a Martha Stewart border punch to add some interest to the blue paper I used as a mat. My Gypsy got a work out as I welded a tag from Sweet Treats (my go-to cartridge for tags!) to the Ready 2 Rock graphic's shadow. I also cut the "2" out a second time to add to the bottom of the layout. The photograph is from 1984! (I told you I was way behind in my scrapbooking!! LOL)... Actually this is a picture of my oldest daughter when she was two, rocking in the maple rocking chair my father bought for me when I was pregnant for her! Thus, I found it quite appropriate to use this photo with the graphic Ready 2 Rock (get it, 2 years old... in a rocking chair)... bahahaha.
Now don't waste any more time reading this silliness and get on over to the BBTB2 blog to join in the challenge, will ya?
Saturday, May 15, 2010
Punches Video and Layout
This week at Practical Scrappers we challenged you to use your punches to create something beautiful with paper. I shared one of my layout's earlier this week and you can see all the other Design Team creations on the blog now as well.
They also asked me to create a video showing how I make those cute little banners with my Fiskars triangle punch and so for the first time EVAH... I made a video (and boy can you tell it is my first time! ha!)... never the less... here it is in all it's shameful, glory (and I use that term lightly!) LOL (I need to work on lighting in a big way, and I think I have a lisp! yee gads!).
I also created a special layout using this technique on a page devoted to one of my favorite pictures of my oldest grandson with his father (the photo is from July 4, 2008). You can see that layout at the bottom of this post.

The patterned paper is from My Mind's Eye Life Stories and Totally Boy. Cardstock, button twine and ribbon is from Papertrey Ink. There is another one of my favorite memo pins from Tim Holtz and I cut the little tag using the Give a Hoot cartridge with the charm feature selected. The bingo card is from Jenni Bowlin.
Okay, it's off to get ready for another Cricut Cake show at the Michael's store in Battle Creek. Maybe I'll see you there! :-)
Friday, May 14, 2010
Just for Fun Friday

It's Just for Fun Friday at the Just for Fun Rubber Stamps blog, and that means that it's time for Color Challenge #11.
This challenge also means that I am officially a member of the Design Team as I have now posted my first inspiration piece for JFF! Yee Haw!
For this challenge I chose to use the Just for Fun Louvre tag stamp as the focal point of my card. I stamped it twice and after coloring the butterfly with my Copic markers, I sprayed it with some perfect pearls water for some shine and then popped it up on the tag to give it a 3-D effect. Some vintage crumpled up seam binding that I bought off Etsy added what I thought was the perfect finishing touch to this vintage-feel card.

If you haven't visited the Just For Fun Rubber Stamps blog yet, then I hope you take off into cyber-space and make a landing there to see what all the JFF designers have created to inspire you and then join in on this week's fun challenge too!
Supplies Used:
Patterned Paper: Totally Girl (My Mind's Eye)
Cardstock: Rustic Cream (Papertrey Ink), Pastel Yellow (Die Cuts with a View Pastel Collection)
Stamps: Just for Fun Rubber Stamps
Ink: Distress Ink in Antique Linen (Tim Holtz)
Embellishment: Stick Pin (Jenni Bowlin), Pearls (Hero Arts) Ribbon: Esty Store
Other: Assorted Copic Markers, Antique Lace Glimmer Mist (Tattered Angels), Perfect Pearls (Ranger)
Practical Scrappers Sketch

It's Friday and therefore it's sketch time at Practical Scrappers. This week we have a beautiful design by the talented Gloria Stengel. This sketch made it a lot of fun to put this card together and gave me the opportunity to use more of the very cute Material Girl patterned paper and chipboard by Cosmo Cricut too! I also used Terra Cotta Tile cardstock for the mats and Vintage Cream for the card base both from Papertrey Ink. With the help of Tim Holtz's paper distresser and his Antique Linen Distress Ink I added a vintage feel to the card and embellished it by stringing three Vintage Buttons (Spring Mix - PTI) with cream button twine (PTI). I printed the sentiment on Cream Cardstock from my computer and cut it out with a Nestabilities die cut.
I hope this week's sketch inspires you to create something beautiful today and don't forget to check out our weekly challenges at Practical Scrappers!
Wednesday, May 12, 2010
Kristina's World Video!
Those that follow my blog know that I consider Kristina, of Kristina's World to be my number one BBF (Best Blog Friend). I'll tell you why. She is creative, fun, intelligent and has a sense of humor that totally rocks (there are probably a few other things too...but hey, I gotta save some of that for the next time I talk about her behind her back) LOL.
Now... that is all I have to say about that! :-)
Okay so, here's where I am going with this. Tonight I watched her latest video that has inspired me to clean out my scrap pile (well, maybe I shouldn't go that far...okay, honestly...she has inspired me to have her come over and clean out my scrap pile :-)... I mean what's a BBF for anyhow, right?). And... not only was the video inspiring...it also put a big, huge grin on my face (I always both learn something from her videos and get a kick out of them as well). So... If you haven't yet visited Kristina's blog (gasp!) or seen any of her videos on YouTube (kmharmon3)...then you can start by watching this one here on Runs with Scraps... and THEN follow the link here to visit her at her blog and why don't cha become a follower while you are at it too!
Now... that is all I have to say about that! :-)
Practical Scrappers Challenge - Punches
Your assignment this week from Practical Scrappers is to dust off all those punches of yours (you know you got 'em!) and create a papercraft project using them. Then be sure to submit your design over at our challenge blog so that everyone can admire your work!
If you need a little inspiration, here is my take on the challenge and if you STILL need more before you feel compelled to enter a project (cough...sputter... gasp!) go over to Practical Scrappers and check out what our talented Design Team has done this week, their designs are sure to inspire you!

If you need a little inspiration, here is my take on the challenge and if you STILL need more before you feel compelled to enter a project (cough...sputter... gasp!) go over to Practical Scrappers and check out what our talented Design Team has done this week, their designs are sure to inspire you!

Supplies Used:
Patterned Paper: The Girls' Paperie
Cardstock: Pink Blush and Vintage Cream (Papertrey Ink)
Ink: Distress Ink in Tea Dye (Tim Holtz)
Punches: Triangle and Romantique Corner Punch (Fiskars), Corner Chomper, Flower Trio and Royal Butterfly (Martha Stewart)
Embellishments: Pearls (EK Success) French Lace Doily (Royal Lace) Oyster Twill (Wrights), Mini Market Stickers (October Afternoon), Crocheted Flowers (Dear Lizzy), Cream Rustic Button Twine (Papertrey Ink)
Cricut Carts: George and Sweet Treats
Other Tools: Cuttlebug, Cuttlebug Swirls Embossing Folder, Cricut Expression and Gypsy
Monday, May 10, 2010
Bitten by the Bug2 Challenge
This weeks Bitten the Bug2 Challenge is sponsored by Peggy Loves Vintage. The challenge is to use the Tags Bags Boxes and More cartridge to create a project using any cut you choose from pages 82 through 91. Peggy Loves Vintage also provided us with some darling vintage prints to use in our projects. I chose an adorable boy playing in the sand and put him on a cute tag I cut using the image on Page 91 of the TBBM manual. I really wanted the tag to be special for this layout in order to highlight the darling image from our sponsor so I also cut a sweet little sandbox and shovel charm from the Life's a Beach cart, added some rustic twine and a couple of my new favorite, memo pins by Tim Holtz. You can buy some of them for your own projects right here. Okay...now it's your turn, go create something beautiful!

Supplies Used:
Patterned Paper: Garden Gala "Fresh Air" and Petite Papers Collection triple pack (Webster's Pages)
Cardstock: Reserve side of Beehive Brunch (Dear Lizzy and American Crafts)
Ink: Distress Ink in Tea Dye (Tim Holtz)
Fibers: Rustic Button Twine in Cream (Papertrey Ink), Premium Ribbon "Greeting" pack (American Crafts)
Embellishments: Vintage Findings School Kit (Making Memories) Memo Pin and Journaling Ticket (Tim Holtz Idea-ology) Life Journey Epemera (K & Company), Chip Stickers in Granola (Basic Grey), Digital Graphic (Peggy Loves Vintage Esty Store), Time Piece (Tim Holtz) Pearls (Hero Arts), Glitter Mist in Old Lace (Tattered Angels).
Cricut Cartridges: Life's a Beach (page 76 with charm feature key selected) and Tag Bags Boxes and More (page 91, Row 1, Key 12 with shift key selected)
Tools: Ripping Ruler (Karen Foster) Pop Dots.
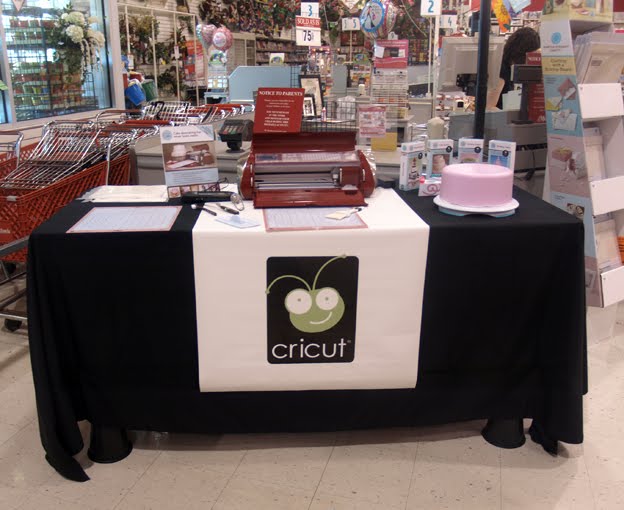
Cake and Provocraft Aisle
Yesterday was another great day providing demonstrations on the Cricut Cake to potential customers. Of course, given the fact that it was Mother's Day the customer traffic was a bit slower than usual. On the up side however, that gave me plenty of time to take some photographs. First of the demo table set up by the door at the Michael's store in Lansing (Frandor), Michigan. And then of their fantastic Provocraft Tech Aisle. That aisle provides almost everything you could want to know (before you buy) about all the sweet Provocraft products available and what they do. Impressive! :-)


Saturday, May 8, 2010
How to make 11 cards real QUICK...
because you were so busy (procrastinating). cough.. sputter.. gasp.
Don't judge me just because you know that it's not like I didn't know it was coming. I mean Mother's day is always the same time every year, right? Not to mention the fact that I have known for a couple of months that there was a big shindig going on today (Saturday) for 4 of my closest friends who all turn the big 5-0 (yep, I said... FIFTY) right around the same time over the next weeks. Still, for whatever reason it came down to last night before I realized that I needed to make almost a dozen cards and had VERY little time to do so. In fact, I had to make Eleven... yep, Eleven cards... but I'm only showing you six - the rest I had to send on their way before I even had a chance to take photographs. That's no never-mind though, 'cause they was all about the same! (This is how I roll when I am under PRESSURE!) :-)
Seriously though, with very little time, I formulated a quick and easy card layout, grabbed some nice papers and cranked them babies out with the help of my trusty Cricut and a couple of cartridges, Mother's Day 2010 and one of my new carts, Potpourri Basket (which I got dirt cheap by the way!).
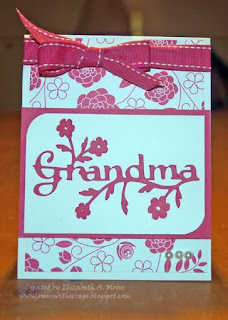
...and then I did a couple of cards for the mothers. Here is an example of the Plum Pudding version...

I actually made four mom cards and three grandma cards in total. Then I moved on to the birthday cards. One of the four turning the big 5-0 (yep, I said it AGAIN... FIFTY!!) is of the female gender and I liked the Raspberry Fizz color best for her so I pulled out my Potpourri Basket cartridge for the Happy Birthday sentiment. Deb's card looks like this...


Don't judge me just because you know that it's not like I didn't know it was coming. I mean Mother's day is always the same time every year, right? Not to mention the fact that I have known for a couple of months that there was a big shindig going on today (Saturday) for 4 of my closest friends who all turn the big 5-0 (yep, I said... FIFTY) right around the same time over the next weeks. Still, for whatever reason it came down to last night before I realized that I needed to make almost a dozen cards and had VERY little time to do so. In fact, I had to make Eleven... yep, Eleven cards... but I'm only showing you six - the rest I had to send on their way before I even had a chance to take photographs. That's no never-mind though, 'cause they was all about the same! (This is how I roll when I am under PRESSURE!) :-)
Seriously though, with very little time, I formulated a quick and easy card layout, grabbed some nice papers and cranked them babies out with the help of my trusty Cricut and a couple of cartridges, Mother's Day 2010 and one of my new carts, Potpourri Basket (which I got dirt cheap by the way!).
First I did a few Grandma cards in two different Papertrey Ink colors, Raspberry Fizz and Plum Pudding (using their patterned paper and ribbon as well). A Raspberry Fizz example is right here...


I actually made four mom cards and three grandma cards in total. Then I moved on to the birthday cards. One of the four turning the big 5-0 (yep, I said it AGAIN... FIFTY!!) is of the female gender and I liked the Raspberry Fizz color best for her so I pulled out my Potpourri Basket cartridge for the Happy Birthday sentiment. Deb's card looks like this...

At this point (and no, not before) I started to feel just a tad bit guilty that I was putting together look-alike cards for all these wonderful women (gulp)...so I added this to the inside of Deb's card just to ease my pain...

By this time is was almost midnight... so I finished the task with three more birthday cards for the OLD men in my life... Art, Chris and Gordy. Though all three of these guys constantly TRY to say that I am older than they are... the fact is... they are WAY - WAY older than me.... I mean I'm still in my 40's (49... eeeek) for crying out loud and they are the big 5-0 (yep I said it AGAIN... 5-0.... FIFTY!!) :-) Anyhow, I pulled out the Cosmo Cricut Boyfriend paper collection pack and matching ribbon as well as some coordinating Papertrey Ink cardstock to finish their cards... also using the sentiment from Potpourri Basket. (if it ain't broke, don't fix it, is what I always say and this card layout was working as far as I was concerned....)

Funny... (sad) that I had all these plans to make each and every one of these cards unique as a testament that my friendship and love for all of them, mothers, mother-in-law types, the grandmothers, grandmother-in-law types and my beloved friends, is unique as well... but in the end, I just wanted to make sure they had a card from all of us to mark these special days! What is that saying about the best laid plans..? Ah well.
Now I'm off to get around for the Cricut Cake roadshow. Today I travel to Michael's in Battle Creek (they've added a store to my show) and then tomorrow another stint at the Michael's in Lansing's Frandor store! Can't wait to get started showing off Provocraft's latest machine!
Oh and if you are in the Mid-West parts (like I am) freezing your butt off right now (like I am) try to keep warm today... figures that the shindig for my pals is an outside hog roast and horseshoe tournament! I hope everyone bring thier mittens. :-)
Thursday, May 6, 2010
Happy Birthday You Heartbreaker!
No one can tell me that this little guy doesn't have some serious game... talk about a chick magnet, this gorgeous guy's got it... and to think he's only (almost) THREE! The little heartbreaker actually turns the big 3 tomorrow (May 7) and well, I just couldn't be any prouder of him!


When we asked Jack what he wanted for his birthday... he replied quite seriously, "A Park" , so Nanie (that's me) and Poppa went out and bought just that (it's actually one of those large wooden playsets..but when you are three, I imagine it seems far grander than even that)... Poppa and Grandpa have been working on it a little bit every day for the last couple of days and when you ask Jack what they are building... he'll happily tell you that it is indeed... "A Park."

I can only imagine that in this photo we caught him chatting up some cute little four-year old girl! Happy Birthday to our sweet boy... Jack-Attack.
BTW: These photos are actually almost a year old, but I couldn't resist putting them up on the blog because they are just so darn cute (and I'm sure you'll see them in a scrap layout soon enough)... however, do feel free to ignore the pink nail polish on his index finger... The fact is, he's actually quite secure in his masculinity and not afraid to be in touch with his feminine side! :-) obviously! :-)
Wednesday, May 5, 2010
Practical Scrappers Challenge
This week's challenge at Practical Scrappers asks you to pull out your stash of stickers and start STICKING! To be honest, at first I wasn't sure just what I wanted to do for this challenge as I don't use stickers much any more...not since I burned myself out on them in my early scrapping days well over a decade ago. I mean, I love what other people do with them, but for myself I find that I often get stuck trying to figure out what to do with stickers. :-)
Then... I remembered a little purchase I made some weeks back when Basic Grey came out with their new Green at Heart paper and embellishment line. I bought the 12 x 12 Collection pack that just so happened to come with... you guessed it, STICKERS! :-) At the time I also bought a pack of their new "Woolies" (felt stickers) to match... not really certain what I would ever end up doing with them. Then I pulled out three different collections of chipboard stickers and some of those clear domed stickers and by that time I thought... "Dang, I gotta lotta stickers for someone who thinks they don't use them much!".

Now don't get "stuck" without an entry for this week's challenge...hurry off to our Practical Scrappers blog, pull those stickers off their backing and get sticking! I can't wait to see what you design with your stickers!
Supplies Used:
Patterned Paper: Green at Heart collection (Basic Grey)
Cardstock: Softstone and Spring Moss (Papertrey Ink)
Ink: Distrees Ink in Tea Dye (Tim Holtz)
Embellishments: Ready Set Chip in Garden Variety and Material Girl (Cosmo Cricket), Title Stickers (EK Success), Chip Stickers in Granola (Basic Grey), Woolie Sticker (Basic Grey)
Tools: Computer, Printer, Fiskars Top Crest border punch
Then... I remembered a little purchase I made some weeks back when Basic Grey came out with their new Green at Heart paper and embellishment line. I bought the 12 x 12 Collection pack that just so happened to come with... you guessed it, STICKERS! :-) At the time I also bought a pack of their new "Woolies" (felt stickers) to match... not really certain what I would ever end up doing with them. Then I pulled out three different collections of chipboard stickers and some of those clear domed stickers and by that time I thought... "Dang, I gotta lotta stickers for someone who thinks they don't use them much!".

Supplies Used:
Patterned Paper: Green at Heart collection (Basic Grey)
Cardstock: Softstone and Spring Moss (Papertrey Ink)
Ink: Distrees Ink in Tea Dye (Tim Holtz)
Embellishments: Ready Set Chip in Garden Variety and Material Girl (Cosmo Cricket), Title Stickers (EK Success), Chip Stickers in Granola (Basic Grey), Woolie Sticker (Basic Grey)
Tools: Computer, Printer, Fiskars Top Crest border punch
The Tools I Use...
Over the past several weeks I received a number of questions regarding the tools I use for papercrafting so I've put together a list of my favorite products and included links to shops where you can find these same beloved tools. For the record, I am not being paid to promote any of these products (although if those companies would like to contact me to arrange something for the future...feel free to do so.. I'm quite fond of money - it supplies my scrapping habit after all!), these are simply the products I use and love, so I want to share them with you... I've also provided links to some of my favorite places to shop where you too can buy them if you are so inclined!
Fiskars - 12 Inch Premium Cut-Line Portable Trimmer


 Tim Holtz Paper Distresser
If you like to distress paper, then this is the tool for you. When I bought this distresser I questioned why, I mean I had another distresser that was working okay for me... but I heard this one was great and I heart Tim Holtz so I bought this one and after using it a few times, threw the other one away... nuff said. You can buy it for just over 5 bucks right here.
Ink Blending Tool from Ranger

Neenah White Cardstock

If you use Copic Markers this is the white cardstock for you. It's recommended by Copic Markers users far and wide and I can attest to the greatest of this particular heavyweight cardstock for not only that but for all your white cardstock needs. I buy it by the ream right here. Speaking of paper, I buy all my color and kraft cardstock from Papertrey Ink and I buy the bulk of my patterned paper right here and right here.
3M ATG Applicator

Fiskars Upper Crest Border Punch


Provocraft Cricut Expression

Fiskars - 12 Inch Premium Cut-Line Portable Trimmer

Until I recently found this bad boy, I was on a quest for the perfect trimmer for years. In fact I purchased so many different kinds of trimmers and replacement blades prior to finding this one I could outfit an entire army of paper cutting people with my castoffs. I won't go into all the reasons I love this particular trimmer (nor will I bad mouth any of my castoffs as they all had some good points and some bad)... let's just say that this trimmer always cuts straight for me, I can clearly see where I want to make my cuts and the wider 6 inch base is helpful for cardmaking. For less than 21 bucks you can buy one right here (as soon as they are back in stock!)

I've owned these scissors long enough now that I can't even remember exactly who recommended them. All I know is that I use them to cut everything and they are by far my favorite scissors of all time. You can buy them right here for under 13 dollars! While we are on the subject of Tim Holtz's Tools here is another that I can't live without...

If you like to distress paper, then this is the tool for you. When I bought this distresser I questioned why, I mean I had another distresser that was working okay for me... but I heard this one was great and I heart Tim Holtz so I bought this one and after using it a few times, threw the other one away... nuff said. You can buy it for just over 5 bucks right here.
Ink Blending Tool from Ranger

I own three of these (so I can use different colored inks without changing the foam pads out) and use them on almost every project. I use it to both blend ink and ink the edges of my projects. You can get one (and it's foam refills) right here for less than 5 dollars.
Neenah White Cardstock

3M ATG Applicator

I know you've heard all the hype about ATG guns, so I won't go into too much here except that while it is big and bulky, it makes up for it by being the best glue applicator around. I bought mine right here. I also buy my refills from them as well right here.
Fiskars Upper Crest Border Punch

Of all the paper punches in the world, my favorite is the Upper Crest Border Punch. That said however, Fiskars brand border punches in general are my favorite. They chomp through the 80 lb cardstock I use for perfect borders every time, where other punches just can't cut it (no pun intended...lol).

Speaking of chomping through paper, I use this corner chomper all the time. It cuts both 1/4 inch and 1/2 inch corners perfectly. You can buy one right here.
Provocraft Cricut Expression
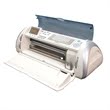
Now I know I started this post off by saying that I don't get paid to promote any of the products I've listed here. This one is the exception. I do get paid to go out and demonstrate Provocraft products, however I started using this machine first and fell in love with it, thus I wanted to be involved in promoting it... I did not first promote it and then use it because I was getting paid to do so, the machine and all the 40 plus cartridges I now own were purchased by me and not given to me by Provocraft! You can buy a Cricut Expression right here. Or go to your local Michael's store and buy one there. At any rate, I do believe I own the best die cutting machine on the market and well, you should too! :-)
Alright then, I think I've pretty much covered it regarding my favorite tools and certainly this is enough enabling for any one person in any one day!
I'd love to hear about your favorite tools as well, so feel free to comment here about yours!
Monday, May 3, 2010
BBTB2 - Life is a Beach
This week's BBTB2 challenge cut is from the Life is a Beach cartridge. When I learned that we were going to use this cut, I hopped on my gypsy to check out all the images because I didn't own the cartridge and never really considered buying it... until I looked at the font and all the images this cart has to offer as well! Wow! I knew I had to buy it. The cut for this challenge is the Leaf1 cut on page 38 of the manual. First Row, 7th Row Over. Use any cut on that page for your entry at BBTB2. I chose the leaf without any feature keys selected to highlight my handmade flower for this card I created to inspire you to join us in this week's challenge. I loved the leaf's detailed cut.


 Side Note: The day after I made this card for the challenge, my youngest daughter needed a gift bag for a teacher that she was presenting a going-away gift too. (She's 18 now and STILL only gives me less than an hour notice when she needs something :-) ) ... Anyhow, I pulled the sentiment off the card... dressed up a plain kraft bag with some Pure Poppy Cardstock by Papertrey Ink and some Patterned Paper by Making Memories Escape Collection. I pulled out my favorite border Top Crest punch by Fiskars and attached the card to the bag. I stamped a sentiment inside the card and had my daughter sign it... Ta-Da! One gift bag and a card in less than 10 minutes that is (I think) masculine enough for a man! When she arrived home from school she told me that this young teacher was very impressed that I had made this gift bag and card myself...to which my daughter said to me (in what I can only imagine was her best, don't be so impressed with my mom's handiwork voice.... "I told him, ah, well making stuff like that is her JOB." :-| LOL... our off spring... can't eat 'em, so we just gotta love 'em. LOL.
Card Supplies Used:
Patterned Paper: Cherry Hill Collection (October Afternoon)
Cardstock: Softstone (Papertrey Ink)
Ink: Coffee (Archival Ink) Tea Dye Distress Ink (Tim Holtz)
Stamps: Classic Messages (Hero Arts)
Embellishments: Ripe Avocado Ribbon and Vintage Buttons Holiday Mix (Papertrey Ink)
Tools: Spellbinders Ribbon Tags Trio, Ink Blending Tool (Tim Holtz)


 Side Note: The day after I made this card for the challenge, my youngest daughter needed a gift bag for a teacher that she was presenting a going-away gift too. (She's 18 now and STILL only gives me less than an hour notice when she needs something :-) ) ... Anyhow, I pulled the sentiment off the card... dressed up a plain kraft bag with some Pure Poppy Cardstock by Papertrey Ink and some Patterned Paper by Making Memories Escape Collection. I pulled out my favorite border Top Crest punch by Fiskars and attached the card to the bag. I stamped a sentiment inside the card and had my daughter sign it... Ta-Da! One gift bag and a card in less than 10 minutes that is (I think) masculine enough for a man! When she arrived home from school she told me that this young teacher was very impressed that I had made this gift bag and card myself...to which my daughter said to me (in what I can only imagine was her best, don't be so impressed with my mom's handiwork voice.... "I told him, ah, well making stuff like that is her JOB." :-| LOL... our off spring... can't eat 'em, so we just gotta love 'em. LOL.
Patterned Paper: Cherry Hill Collection (October Afternoon)
Cardstock: Softstone (Papertrey Ink)
Ink: Coffee (Archival Ink) Tea Dye Distress Ink (Tim Holtz)
Stamps: Classic Messages (Hero Arts)
Embellishments: Ripe Avocado Ribbon and Vintage Buttons Holiday Mix (Papertrey Ink)
Tools: Spellbinders Ribbon Tags Trio, Ink Blending Tool (Tim Holtz)
Sunday, May 2, 2010
Have Your Cricut Cake and eat it too!
Today is the day! Off to demonstrate the Cricut Cake at the Lansing Michael's store on Frandor! Demonstrations are taking place around the country today from 1:00 p.m., to 5:00 p.m, so make sure you take a trip to your local Michael's to get a gander at the Cricut Cake in ACTION!
Last night I rolled out my own Fondant and cut designs from all four of the Cricut Cake cartridges (wow are they FABULOUS!)... while I did the project I photographed each step as I went along so that I could share them with you today.... then, I uploaded all the photos from my camera (including a number of Design Team projects I completed yesterday) and then deleted them from my camera..... only to discover that... I didn't actually move the pictures from my camera.... ARRGGggghhhhh! So... I have no photographs (unless you want to see a half-eatten cake that my family gobbled down)... Anyhow..... the Cricut Cake is great fun and cuts some beautiful designs that make your cake look professionally done...and you'll just have to trust me on that... or get out to Michael's today and see for yourself!
Last night I rolled out my own Fondant and cut designs from all four of the Cricut Cake cartridges (wow are they FABULOUS!)... while I did the project I photographed each step as I went along so that I could share them with you today.... then, I uploaded all the photos from my camera (including a number of Design Team projects I completed yesterday) and then deleted them from my camera..... only to discover that... I didn't actually move the pictures from my camera.... ARRGGggghhhhh! So... I have no photographs (unless you want to see a half-eatten cake that my family gobbled down)... Anyhow..... the Cricut Cake is great fun and cuts some beautiful designs that make your cake look professionally done...and you'll just have to trust me on that... or get out to Michael's today and see for yourself!
Saturday, May 1, 2010
Blog Candy Winner!
Don't judge me, I have yet to figure out how to copy a screen shot of the Random Generator! :-) Never the less, comment #6, Michelle is the winner of my blog candy from our BBTB2 Blog Hop. Michelle please email me bethcat at sbcglobal dot net with your name and address and your blog candy will be on the way to your doorstep! Michelle has one week from today to claim her prize. If the prize is not claimed within that time, I will draw another number so these pretty Dear Lizzy papers find a home! Thanks for hopping along with me and the Design Team at Bitten By the Bug 2!
Subscribe to:
Posts (Atom)


